
What Should You Do Before Setting Up Your DG HOME 1?
When purchasing a miner machine, ensure you have acquired a power cord, an Ethernet cable.
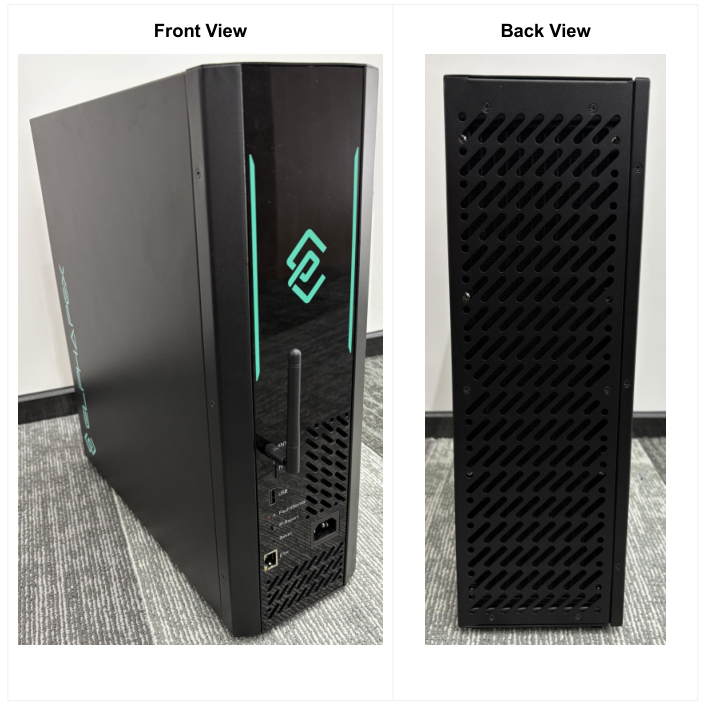
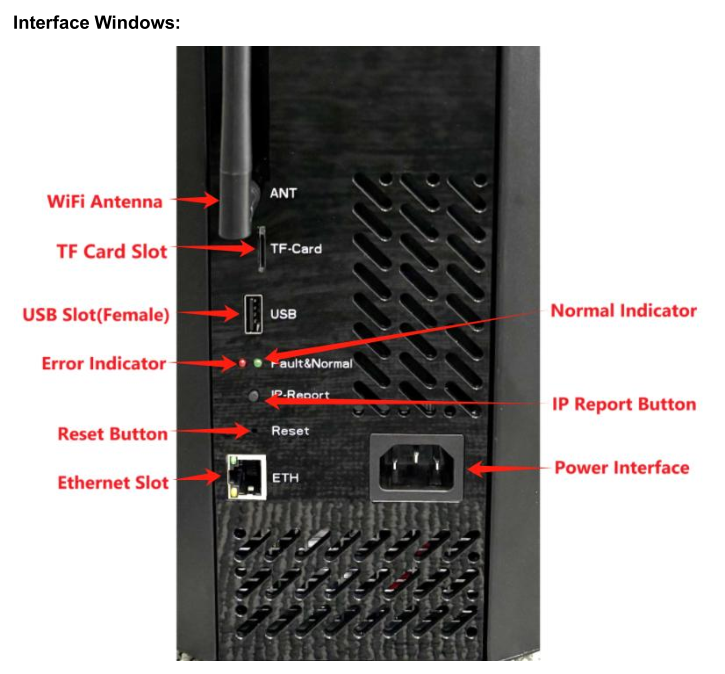
The control board, hash board, power supply, and water cooling radiator of DG Home 1 Server are all integrated inside the box. From the outside, there is only the box,cooling holes, and interface windows.
Before using the miner, please have an initial inspection with the miner:
Miner Inspection Checklist
| Step | Description |
|---|---|
| 1 | Check whether the appearance of the package or the miner is deformed or damaged. |
| 2 | Check whether there is any abnormal noise in the miner, and observe whether there is a case where the heat sink falls off. |
| 3 | If any of the above abnormalities is found, contact technical support immediately and do not power on the miner. |
Before setting up your DG HOME 1, ensure hardware connections, network stability, and a well-ventilated installation location.
| Category | Description |
|---|---|
| Hardware Check | 1.Ensure the DG HOME 1 is properly connected to an appropriate socket. Verify that all connections between the miner, router, and power cord are secure. 2.The server must be connected to an earthed mains socket-outlet installed nearby and easily accessible. 3.Power supply AC input voltage, Volt:100-240V Caution: Wrong input voltage may probably cause equipment damaged 4.The typical current of power cable is 10A. |
| Network Connection | Confirm that your network environment is stable. It’s recommended to use a wired connection to ensure reliability. |
| Installation Location | 1.Place the miner in a well-ventilated area to prevent overheating. 2.Please make sure the storage and operation temperature are both within 0- 40°C. Otherwise the miner may be damaged. 3.Do not remove the server cover during normal operation. Ensure screws are tightly fastened and the cover is sealed. 4.DO NOT remove any screws or cables tied to the product. |
| Account Preparation | Register and create an account on a mining pool website to facilitate the configuration of the DG HOME 1 |
How to Set Up Your DG HOME 1 for Mining?
The Miner comes with a detailed user manual that users can refer to when getting started with it.
Connect the Miner
| Step | Description |
|---|---|
| 1 | Plug one end of the Ethernet cable into your miner’s Ethernet port. |
| 2 | Connect the other end of the Ethernet cable to your network source (e.g., router or switch). |
| 3 | Power on your miner by connecting it to a power socket. |
| 4 | After powering on, the green indicator light will remain steady, indicating a successful startup. |
Configuring the Miner
Get the IP of the miner and enter the miner’s dashboard:
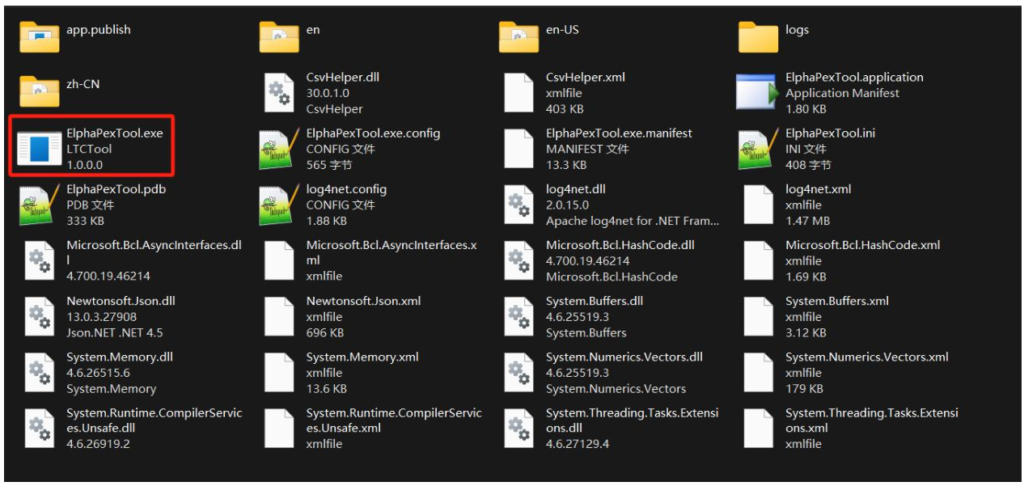
- Get software pack ElphaPexTool from Elphapex website,ElphaPexTool is now only available on windows platforms
- Extract the file.
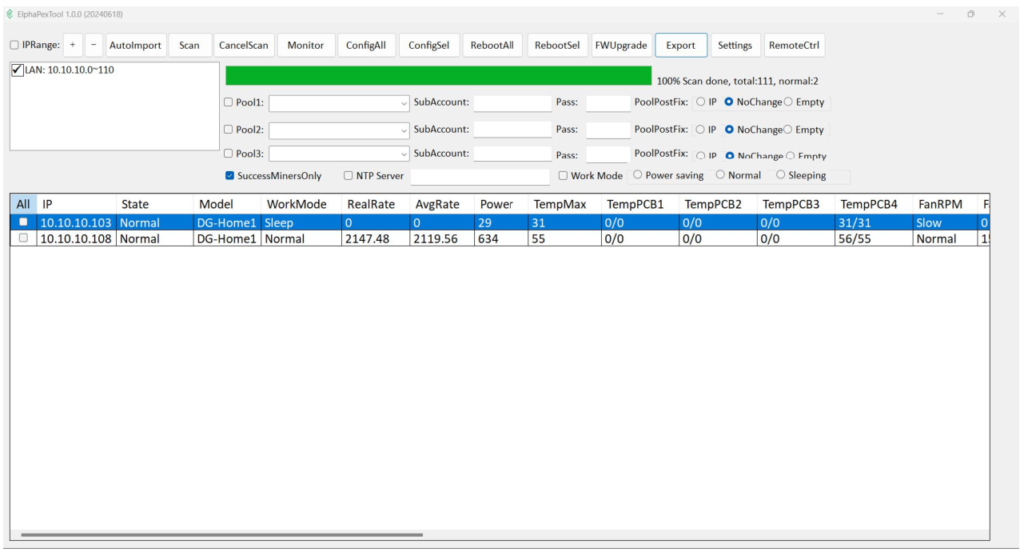
- Open the software ElphaPexTool.exe and click on 【+】, Add the corresponding network segment range
- Press the Scan button.The information about servers in the current network segment is displayed in a list.
- Double-click the selected line, this will open the browser to the server’s web page.
- Proceed to login using root for both the username and password.
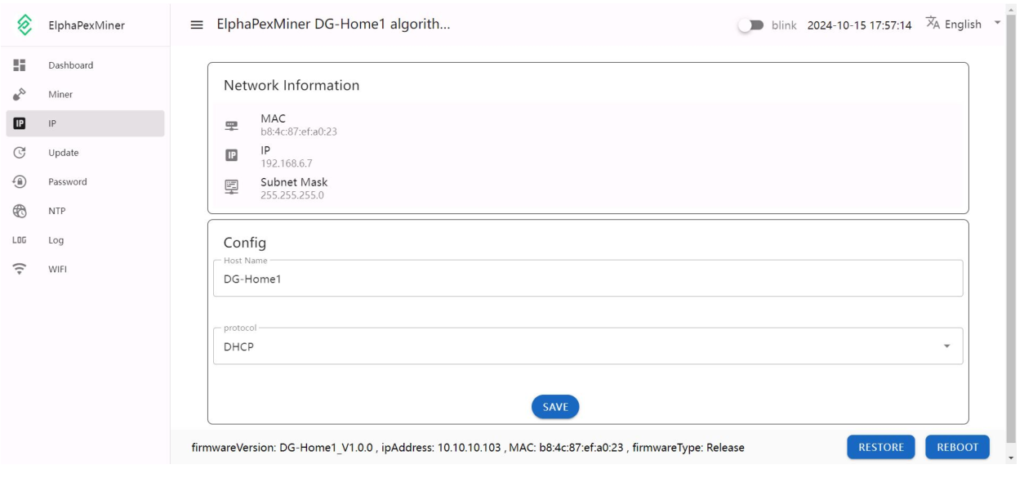
- In the IP section, you can assign a Static IP address (optional).
- Enter the IP address, Subnet mask, gateway and DNS Server.
- Click SAVE button.

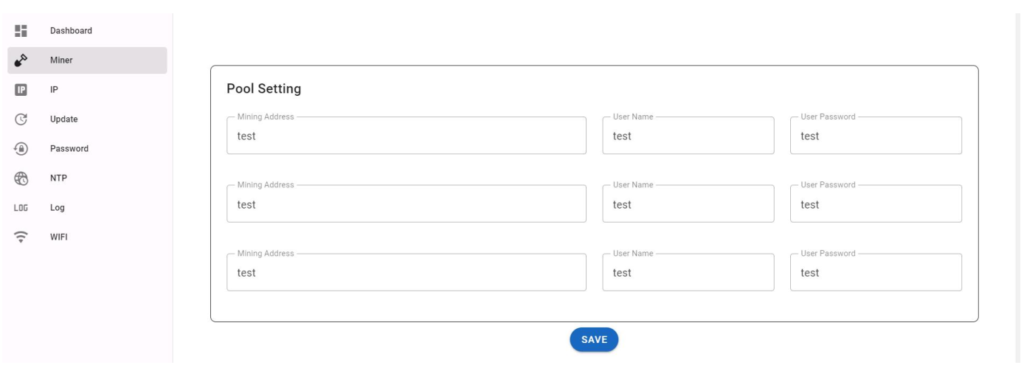
Pool Configuration
Enter server web page, click Miner Section:
| Option | Description |
|---|---|
| Mining Address | Enter your pool address. |
| User Name | Your worker ID on the selected pool. |
| User Password | The password for your selected worker. |
1.The DG Home 1 server can set up three mining pools(pool 1 to pool 3) at the same time.
2.The priority of pools 1 through 3 is reduced in turn, and when a pool with a higher priority is offline, a pool with a lower priority will be put into use.
3.please DO NOT adjust the fan speed by yourself although it can be configured. The server itself will tune the fan speed automatically going along with the environment temperature changes.
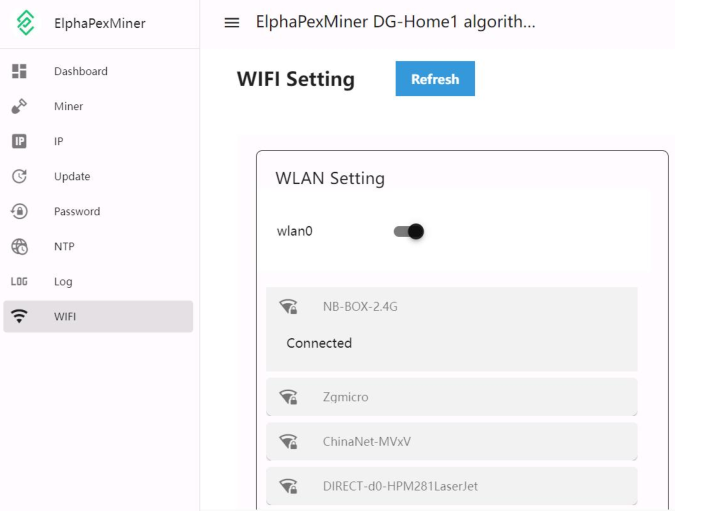
WiFi Configuration
1.Connect the server to Ethernet, then enter the web page
2.Enter WIFI Section, click Refresh Button
3.Select the corresponding WiFi hotspot and enter the password. The server will
connect to the corresponding WiFi hotspot.
4.After that, you can disconnect the Ethernet connection, then use ElphaPexTool to rescan the server IP. After configuring the mining pool, you can enjoy wireless network mining.
Password Change
1.In Web site page, click Password.
2.Enter the current password and the new password, then click SAVE.
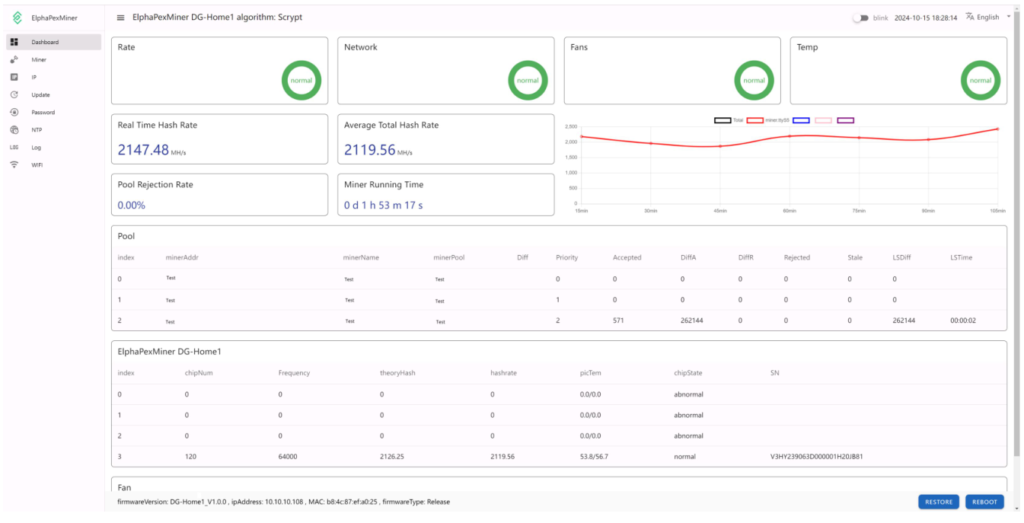
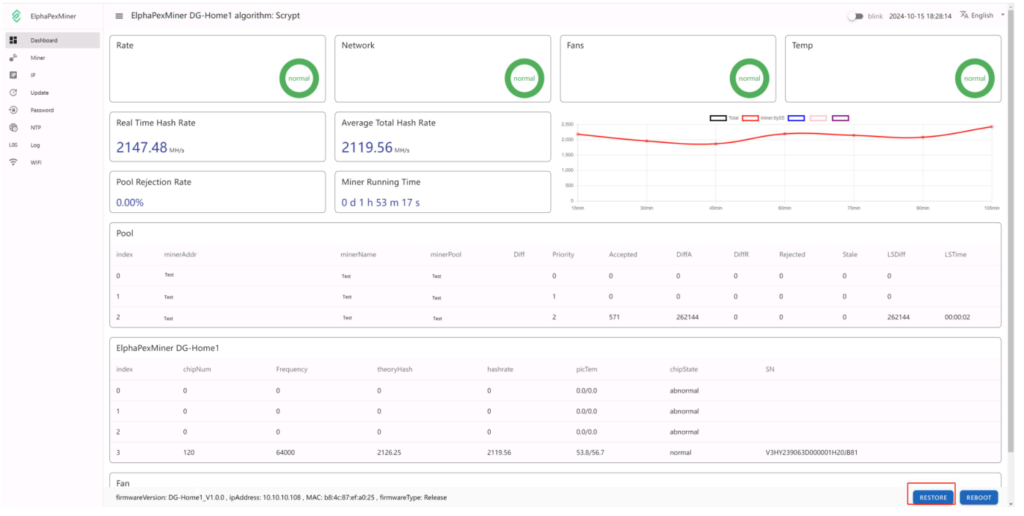
Server Monitoring
In the ElphaPexTool , double-click the corresponding IP line to enter the server background page, click dashboard to check the server status.
| Option | Description |
|---|---|
| index | Hash board interface number. |
| chipNum | Number of chips detected in the chain. |
| Frequency | ASIC frequency. |
| theoryHash | Theoretical hash rate of each hash board (MH/s). |
| hashrate | Board level hash rate of each hash board (MH/s). |
| picTem | Onboard temperature of each hash board (inlet/outlet) in °C. |
| chipState | Chip operating state (normal or abnormal). |
| SN | Series number of each hash board. |
Firmware Version Check
1.Enter the backstage web site of your server, find the firmware version on the bottom.
2.firmwareVersion displays the current release version your server uses. In the examples below, the server is using firmware version: DG-Home1_V1.0.0

System Update
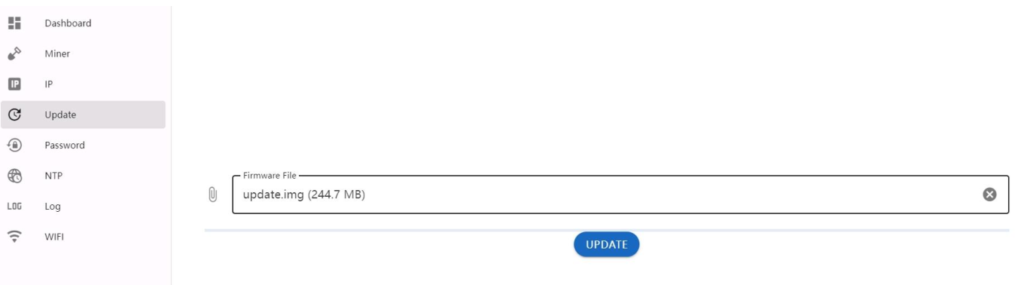
1.In Web site page, click Update to enter the firmware upgrade page.
2.Click Firmware File input field, select the .img or .zip firmware file, and then click UPDATE, The server will start the firmware update process.
3.When the update process is completed, the server will restart and it will turn to the Dashboard page.
Notes:
○During the firmware upgrade, ensure that the server remains powered on and no other operations are conducted.
○The DG Home 1 server provides support for firmware upgrades using the .img and .zip file extensions.
○The DG Home 1 server supports firmware updates in both wired and wireless networks
Restoring Initial Settings
In Web site page,Click RESTORE button.
The RESTORE operation will clear the pool Settings and restore the original password. Exercise caution when performing this operation.
How to Troubleshoot Common Issues with the DG HOME 1?
Encountering issues? Here’s how to diagnose and fix common problems.
Common issues include network connectivity, abnormal hash rates, and power failures, which can often be resolved with simple checks.

Unable to Connect to the Network:
- Check if network settings and connection cables are correct.
- Ensure that the interfaces of the miner and the router are not damaged.
- Restart the device to see if the connection can be restored.
Abnormal Mining Power:
- Verify that mining pool settings are correct and confirm that the network is stable.
- Check the miner’s temperature to ensure normal heat dissipation.
Miner Cannot Be Turned On:
- Ensure that the power cord connection is not loose.
- Try using a different power socket.
What Information Should You Prepare for Customer Support?
When contacting support, having the right information can speed up the process.
Prepare your miner’s model, serial number, a description of the issue, and any relevant logs or error messages.

Required Details
- Miner Model and Serial Number(SN): Provide the correct device model and serial number.
- Fault Description: Briefly describe the problem, such as failure to start, connection issues, etc.
- Operation Log: Provide system logs and error information if possible.
- Miner dashboard complete shotscreen:complete information will helpful
- Mining Pool Information: Confirm the settings and account information of the mining pool.
What Is the Repair Process for the DG HOME 1?
If your miner needs repair, here’s what to expect.
Contact Elphapex support, provide necessary details, and follow their instructions to send the device for repair.
Step-by-Step Repair Process
- Contact Customer Service: Reach out to Elphapex’s after-sales service through the official website or customer service hotline.
- Fault Confirmation: Customer service will request necessary device information and fault description for preliminary diagnosis.
- Mailing Device: After confirming that repair is needed, send the device back according to customer service instructions.
- Repair and Testing: Elphapex will repair and test the device to fix hardware or software issues.
- Return Device: The repaired device will be returned to the user via express delivery.
Conclusion
From unboxing to hashing, proper Elphapex DG HOME 1 setup requires meticulous preparation and real-time monitoring. Whether you’re in Toronto or Dubai, follow these steps to achieve 98% operational uptime.
If you need more news about DG HOME 1, Please click to get more help.
