
What Should You Do Before Setting Up your Antminer S21 Pro?
Antminer S21 Pro: The Ultimate Bitcoin Mining Rig – 234 TH/s Hash Rate & 15.0 J/TH Efficiency
The Antminer S21 Pro is Bitmain’s most advanced and energy-efficient Bitcoin miner, delivering a groundbreaking hash rate of 234 TH/s with an unmatched power efficiency of 15.0 J/TH. Designed to outperform its predecessor, the Antminer S21 (200 TH/s, 17.5 J/TH), the S21 Pro maximizes mining profitability while reducing operational costs.
Before mining with your Antminer S21 Pro, follow this inspection guide to ensure safety and optimal performance.

Antminer S21 Pro Unboxing & Setup: Ultimate Post-Delivery Checklist
Meta Description: “Step-by-step guide to inspect your Antminer S21 Pro after delivery. Verify mining performance, avoid defects, and maximize ROI with our pro checklist.”
Why This Checklist Matters
Before deploying your Antminer S21 Pro (234TH/s), this 10-point inspection ensures:
✔️ No shipping damage or missing parts
✔️ Full hash rate performance (234TH/s)
✔️ Stable mining operation from Day 1
Antminer S21 Pro Post-Delivery Checklist
| Step | Inspection Area | Key Actions | Ideal Result |
|---|---|---|---|
| 1 | Packaging | Check for dents/water damage | Intact packaging with sealed tapes |
| 2 | Accessories | Confirm: Miner, PSU cables, manual | All items match seller’s list |
| 3 | Physical Unit | Inspect heatsinks/fans | No cracks, all screws tightened |
| 4 | Power Test | Connect to 220V/380V PSU | Green LED lights, fan spins smoothly |
| 5 | Network Setup | Ethernet connection test | <1% packet loss in miner dashboard |
| 6 | Dashboard Login | Access via IP | Firmware version: vXX.XX (latest) |
| 7 | Performance | Monitor 15-min avg hashrate | 230-234 TH/s (±3% variance) |
| 8 | Temperature | Check after 1hr operation | Chip temp: 60-75°C (fan 70-80%) |
| 9 | Pool Config | Validate Antpool/F2Pool address | “Accepted” shares in pool dashboard |
| 10 | Error Logs | Review HW errors & rejects | <0.1% error rate |

How to Set Up Your Antminer S21 Pro for Mining?
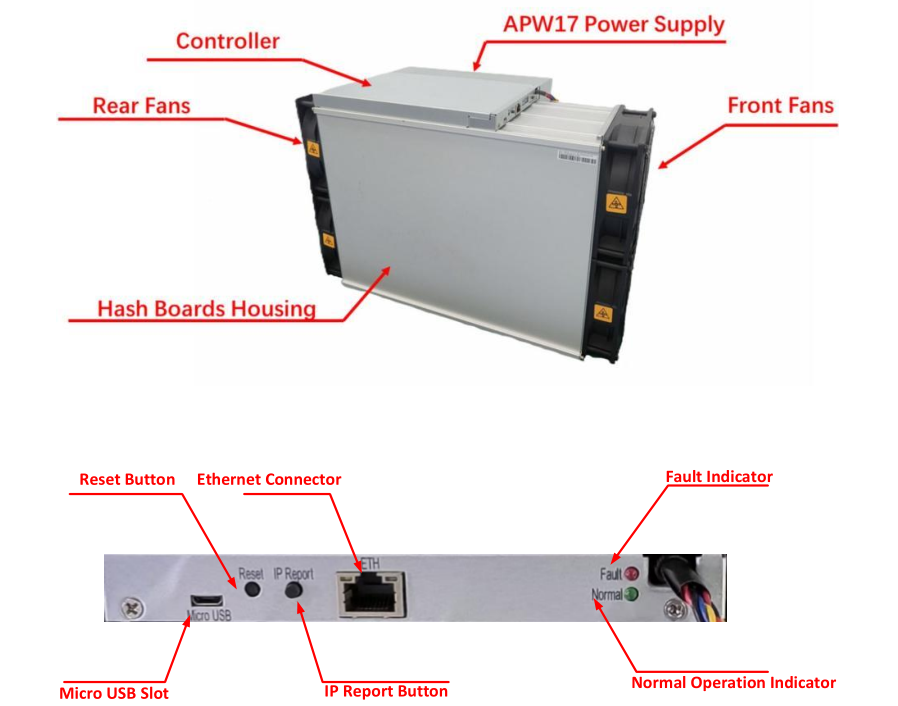
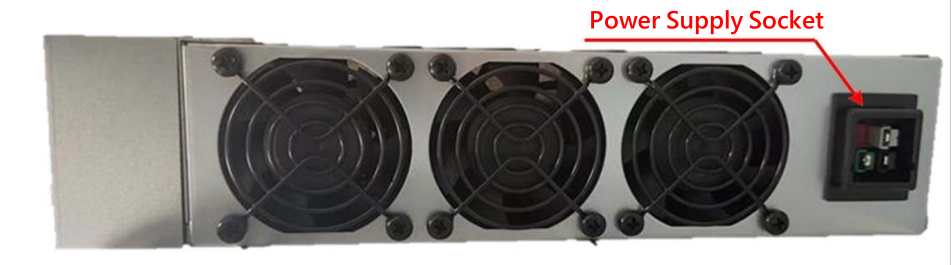
The main components and controller front panel of S21 Pro servers are shown as below
NOTE:
(1) Power supply APW171215 is part of S21 Pro server.
(2) One ANTWIRE‐20SP power cord is needed and should be connected to PDU.
Setting up the Miner
| Step | Action | Details |
|---|---|---|
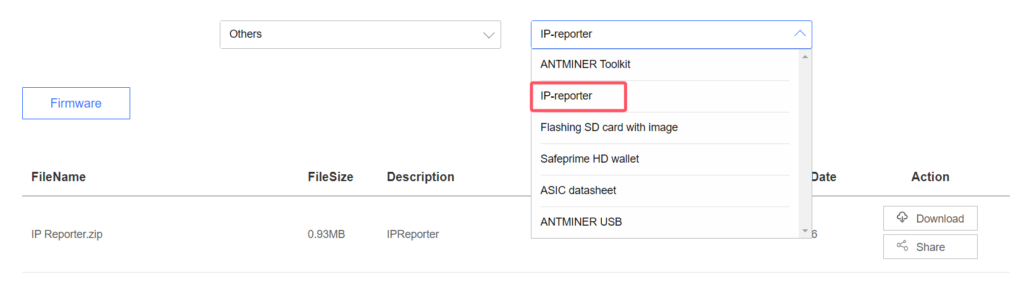
| 1 | Go to the official website | Visit: BITMAIN firmware download link Select “Others” on the left, then “IP reporter” on the right. |
| 2 | Download the file | Download: IPReporter.zip |
| 3 | Extract the file | Unzip the downloaded file. |
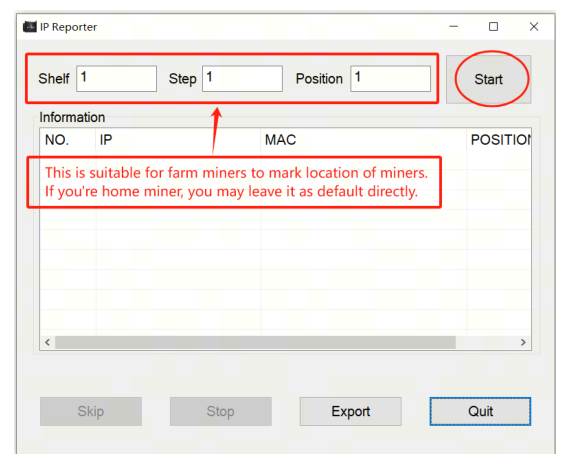
| 4 | Run IPReporter.exe as Administrator | Right-click IPReporter.exe and select “Run as Administrator.” |
| 5 | Select an option | Choose one: – Shelf, Step, Position (for farm servers) – Default (for home servers) |
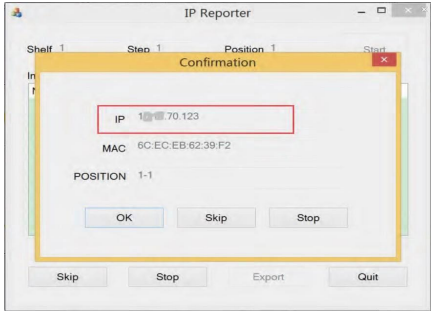
| 6 | Start the process | Click “Start.” |
| 7 | Press the IP Report button | On the control panel, press and hold the IP Report button until it beeps (~5 seconds). The IP address will appear on your computer screen. |
| 8 | Enter the IP in a browser | Type the displayed IP address into your web browser. |
| 9 | Log in | Username: root Password: root |
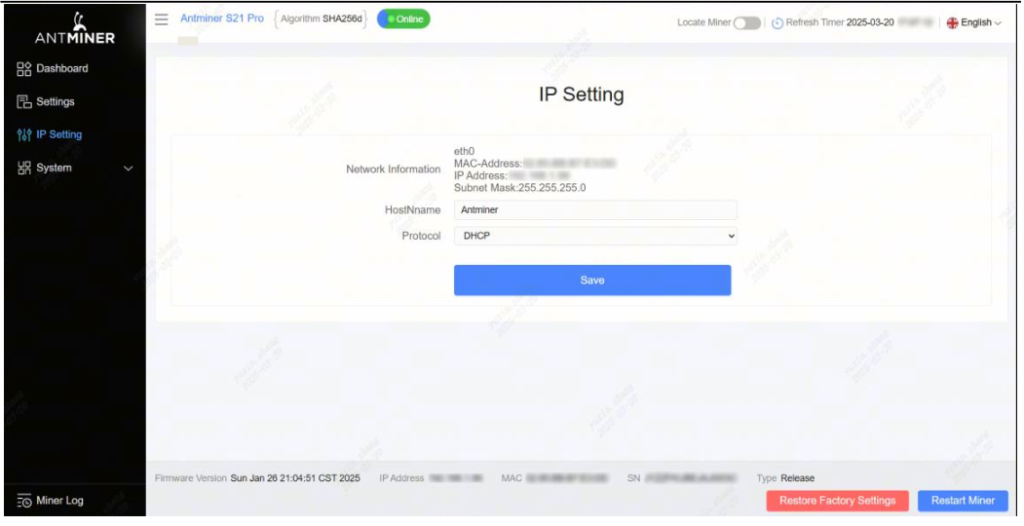
| 10 (Optional) | Assign a Static IP | In the Protocol section, configure: – IP Address – Subnet Mask – Gateway – DNS Server |
| 11 | Enter network details | Fill in the required network settings. |
| 12 | Save settings | Click “Save.” |
| 13 | Learn more | For gateway & DNS help: BITMAIN Support Article |
Configuring the Miner
Setting up the Pool
Click Settings >Set the options according to the following table>Click Save after the configuration
| Option | Description |
|---|---|
| Mining address | Enter the address of your desired pool. The S21 Pro. servers support three mining pools, with priority order: – Pool 1 (highest priority) – Pool 2 (used if Pool 1 is offline) – Pool 3 (used if Pools 1 & 2 are offline). |
| Name | Your worker ID on the selected pool. |
| Password (optional) | The password for your selected worker (if required by the pool). |
2.There are two working modes of S21 Pro server: Normal mode and Sleep mode. The server enters the sleep mode under the condition that the control board is powered while hashboards are not powered.

Monitoring Your Miner
To check the operating status of your server (taking S21 Pro 245T as an example):
Click dashboard marked below to check the server status.
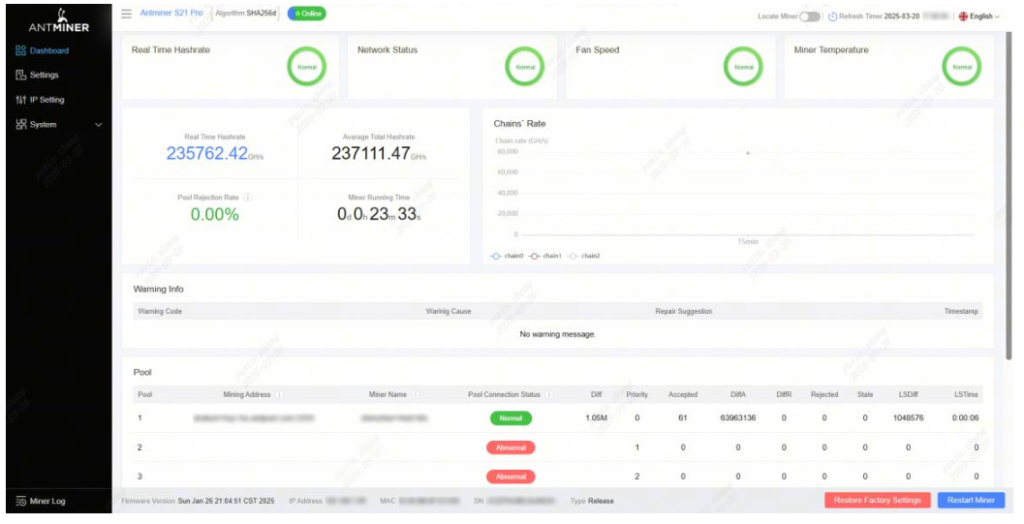
Monitor your server according to the descriptionsin the following table
| Option | Description |
|---|---|
| Number of chips | Number of chips detected in the chain. |
| Frequency | ASIC frequency setting. |
| Real Hashrate | Real-time hashrate of each hash board (GH/s). |
| Inlet Temp | Temperature of the inlet (°C). |
| Outlet Temp | Temperature of the outlet (°C). |
| Chip state | Status indicators: ● Green Icon – Normal operation ● Red Icon – Abnormal condition |
Monitor your server according to the LED indicator light:
| Status | Fault Indicator (RED) | Normal Indicator (GREEN) |
|---|---|---|
| Normal | OFF | ON |
| Over temperature | ON | OFF |
| Network disconnection | ON | OFF |
| Fan failure | ON | OFF |
Administering Your S21 Pro Miner
1 Checking S21 Pro Firmware Version
| Step | Action | Details |
|---|---|---|
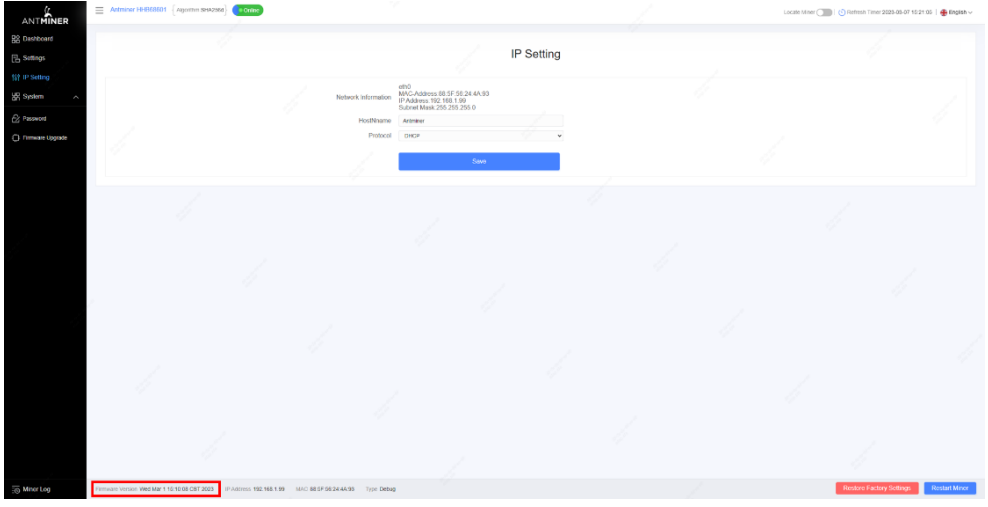
| 1 | Enter server backstage | Locate the firmware version at the bottom of the page. |
| 2 | Check File System Version | Displays the firmware date (e.g., 20241206113738). |
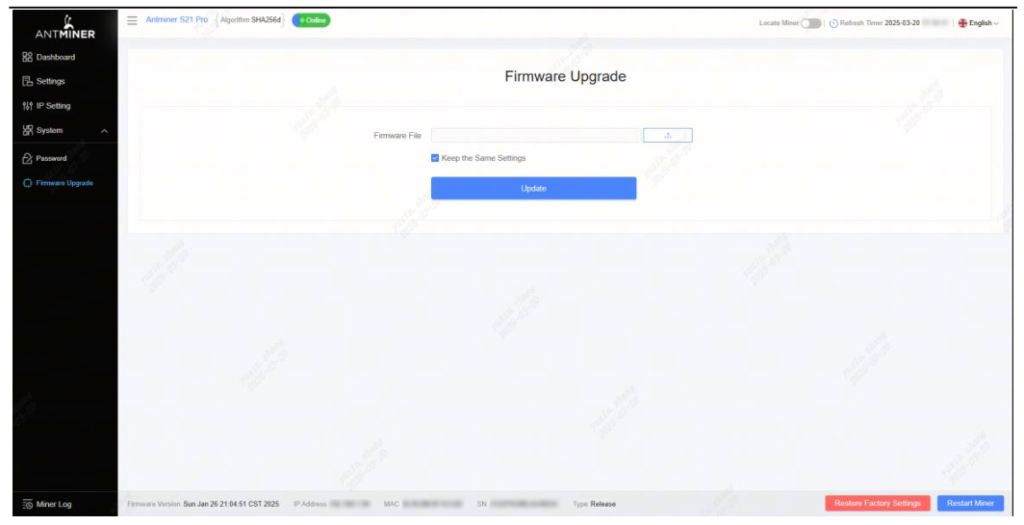
2 Upgrading S21 Pro System
| Step | Action | Details |
|---|---|---|
| 1 | Go to System > Firmware Upgrade | Click to open the upgrade interface. |
| 2 | Keep Settings option | – ✔ Keep settings (retains current configurations, default) – ✖ Unselect (resets to factory defaults) |
| 3 | Upload & update | Select the upgrade file and click Update. |
| 4 | Post-upgrade restart | After completion, the server reboots to the settings page. |
| 5 | Choose action | – Reboot: Applies new firmware immediately. – Go Back: Continues mining; new firmware loads on next restart. |
fails before the upgrade is completed, you will need to return it to BITMAIN for repair
3 Modifying Your Password
| Step | Action | Details |
|---|---|---|
| 1 | Navigate to System > Password | Open the password settings tab. |
| 2 | Set new password | Enter the new password and click Save. |

4 Restoring Initial Settings
| Step | Action | Details |
|---|---|---|
| 1 | Power on & wait | Let the server run for 5 minutes. |
| 2 | Hard reset | Press and hold the Reset button for 10 seconds. |
Antminer S21 Pro Environmental Requirements
| Description | Requirement |
|---|---|
| Operating Temperature | -20°C to 45°C |
| Operating Humidity | 10% to 90% RH (non-condensing) |
| Storage Temperature | -20°C to 70°C |
| Storage Humidity | 10% to 90% RH (non-condensing) |
| Maximum Altitude | <2000 meters |
| Pollution Level | Example Sources | Minimum Distance Requirement | Additional Notes |
|---|---|---|---|
| Heavy Pollution | Smelters, Coal Mines | >5 km | – |
| Moderate Pollution | Chemical Plants, Rubber Factories, Electroplating Industries | >3.7 km | – |
| Light Pollution | Food Processing Plants, Leather Tanneries | >2 km | If unavoidable, choose upwind location |
| Coastal Areas | Seaside, Saltwater Lakes | Avoid within 3.7 km | If unavoidable, ensure airtight structure with AC cooling |
Electromagnetic Environmental Conditions
Please keep your site away from transformers, high-voltage cables, transmission lines,and high-current equipment. For example, there should be no high-power AC transformers (>10KA) within 20 meters, and no high-voltage power lines within 50 meters. Additionally, keep your site away from high-power radio transmitters; for example, there should be no high-power radio transmitters (>1500W) within 100 meters.
How to Troubleshoot Common Issues with the Antminer S21Pro?
Bitmain Miner Troubleshooting Guide: Fix Common Issues Quickly
Is your Bitmain miner experiencing problems? Follow this step-by-step troubleshooting guide to resolve network, power, and startup issues efficiently.

1. Miner Not Connecting to Network? Try These Fixes
- ✅ Check network cables – Ensure Ethernet cables are securely connected.
- ✅ Inspect router & miner ports – Look for physical damage or loose connections.
- ✅ Restart the miner – A simple reboot often resolves connectivity issues.
- ✅ Verify network settings – Confirm correct pool configuration and stable internet.
2. Abnormal Mining Performance? Check These
- 🔌 Stable power supply – Ensure voltage matches miner requirements.
- 🌡 Monitor temperature – Overheating reduces efficiency; improve cooling if needed.
- 🌐 Confirm mining pool settings – Incorrect pool details can halt mining.
3. Miner Won’t Turn On? Quick Solutions
- ⚡ Test the power supply – Check if PSU is functioning properly.
- 🔌 Secure power connections – Loose cables can prevent startup.
- 🔄 Try a different power outlet – Rule out socket issues.
Friendly Troubleshooting Guide for Bitmain S21 Pro
If your miner is experiencing issues, you can check the logs for error codes. These codes help identify the problem so you can take the right steps to fix it. Below is a simple guide to understanding and resolving common errors.
How to Troubleshoot Using Error Codes
- Check the Miner’s Logs – Find the error code in your miner’s logs
- Match the Code – Look up the code in the table below.
- Follow the Suggested Fix – Try the recommended solution to resolve the issue.
| Error Code | Reason | Suggested Solution |
|---|---|---|
| R:1 | Average total hashrate is low | Update firmware, replace power supply, or return for repair |
| R1:1 | Chain1 is broken or has low hashrate | Check chain1 connection, update firmware, replace hashboard, or return for repair |
| R2:1 | Chain2 is broken or has low hashrate | Check chain2 connection, update firmware, replace hashboard, or return for repair |
| R4:1 | Chain3 is broken or has low hashrate | Check chain3 connection, update firmware, replace hashboard, or return for repair |
| R8:1 | Chain4 is broken or has low hashrate | Check chain4 connection, update firmware, replace hashboard, or return for repair |
| J1:1 | Chain1 has bad ASIC | Update firmware, replace power supply, or return for repair |
| J2:1 | Chain2 has bad ASIC | Update firmware, replace power supply, or return for repair |
| J4:1 | Chain3 has bad ASIC | Update firmware, replace power supply, or return for repair |
| J8:1 | Chain4 has bad ASIC | Update firmware, replace power supply, or return for repair |
| N:1 | Average hashrate exceeds sale hashrate too much | Update firmware |
| N:2 | Frequency is reduced too much | Update firmware |
| V:1 | Power initialization error or voltage error | Check power wiring, update firmware, replace power supply, or return for repair |
| V:2 | Power supply is not calibrated | Update firmware, replace power supply, or return for repair |
| F:1 | Fan error | Check fan connection, replace power supply, or replace fan |
| F1:1 | Fan1 not detected or speed low | Check fan1 connection, replace power supply, or replace fan |
| F2:1 | Fan2 not detected or speed low | Check fan2 connection, replace power supply, or replace fan |
| F4:1 | Fan3 not detected or speed low | Check fan3 connection, replace power supply, or replace fan |
| F8:1 | Fan4 not detected or speed low | Check fan4 connection, replace power supply, or replace fan |
| J:8 | Number of hashboards is less than design | Check hashboard connection or replace hashboard |
| P:1 | High temperature protection | Check environment temperature or hashboard thermal gel |
| P:2 | Low temperature protection | Check environment temperature |
| J1:4 | Chain1 EEPROM data error | Redo factory test for chain1 |
| J2:4 | Chain2 EEPROM data error | Redo factory test for chain2 |
| J4:4 | Chain3 EEPROM data error | Redo factory test for chain3 |
| J8:4 | Chain4 EEPROM data error | Redo factory test for chain4 |
| J:6 | Temperature sensor error | Check hashboard connection, update firmware, replace hashboard, or return for repair |
| J1:5 | Chain1 PIC error | Check chain1 connection, update firmware, replace hashboard, or return for repair |
| J2:5 | Chain2 PIC error | Check chain2 connection, update firmware, replace hashboard, or return for repair |
| J4:5 | Chain3 PIC error | Check chain3 connection, update firmware, replace hashboard, or return for repair |
| J8:5 | Chain4 PIC error | Check chain4 connection, update firmware, replace hashboard, or return for repair |
| M:1 | Memory allocation error | Update firmware, replace control board, or return for repair |
| J1:2 | Number of chain1 chips is less than design | Check chain1 connection, update firmware, replace hashboard, or return for repair |
| J2:2 | Number of chain2 chips is less than design | Check chain2 connection, update firmware, replace hashboard, or return for repair |
| J4:2 | Number of chain3 chips is less than design | Check chain3 connection, update firmware, replace hashboard, or return for repair |
| J8:2 | Number of chain4 chips is less than design | Check chain4 connection, update firmware, replace hashboard, or return for repair |
| L1:1 | Chain1 voltage/frequency exceeds limit | Update firmware or return for repair |
| L2:1 | Chain2 voltage/frequency exceeds limit | Update firmware or return for repair |
| L4:1 | Chain3 voltage/frequency exceeds limit | Update firmware or return for repair |
| L8:1 | Chain4 voltage/frequency exceeds limit | Update firmware or return for repair |
| L:2 | Cannot find mixed level | Update firmware or return for repair |
| L1:2 | Chain1 voltage/frequency mismatch | Update firmware or return for repair |
| L2:2 | Chain2 voltage/frequency mismatch | Update firmware or return for repair |
| L4:2 | Chain3 voltage/frequency mismatch | Update firmware or return for repair |
| L8:2 | Chain4 voltage/frequency mismatch | Update firmware or return for repair |
| N:4 | Network connection lost | Check network connection |
Quick Tips for Common Issues
✅ Low Hashrate? → Update firmware, check power, and inspect hashboard connections.
✅ Overheating? → Clean dust, improve airflow, or replace faulty fans.
✅ No Network? → Restart the miner, check Ethernet cables, and router settings.
✅ Power Errors? → Ensure stable power supply and proper voltage.
If the issue persists after troubleshooting, contact Bitmain support for further assistance.
What Information Should You Prepare for Customer Support?
When contacting support, having the right information can speed up the process.
Prepare your miner’s model, serial number, a description of the issue, and any relevant logs or error messages.

Essential Information to Provide When Reporting Miner Issues
1. Miner Model & Serial Number
🔹 Why it matters: Helps identify exact hardware specifications.
🔹 What to provide:
- Full miner model (e.g., Bitmain Antminer S21 Pro)
- Serial number (found on the device or in the dashboard)
2. Clear Fault Description
🔹 Why it matters: Speeds up diagnosis.
🔹 What to include:
- Is the miner not powering on?
- Are there network connection problems?
- Is the hashrate unstable?
- Any error messages or flashing lights?
3. Operation Logs & Error Codes
🔹 Why it matters: Reveals hidden software/hardware issues.
🔹 How to get them:
- Access the miner’s web dashboard → System Logs
- Take screenshots of any error codes (e.g., “R1:1” or “F:1”)
4. Miner Dashboard doc file(Full Page)
🔹 Why it matters: Shows real-time status (hashrate, temp, fan speed).
🔹 What to capture:
- Main dashboard (showing all stats)
- Pool configuration tab
- Error logs (if any)
5. Mining Pool Configuration Details
🔹 Why it matters: Incorrect pool settings cause mining failures.
🔹 What to check:
- Pool URL & port (e.g.,
stratum+tcp://cloverpool.example:3333) - Worker name & password
- Wallet address (if applicable)
What Is the Repair Process for the Antminer S21Pro?
Step-by-Step Repair Process
Antminer S21 Pro Repair Guide: Fast & Reliable After-Sales Service
If your Antminer S21 Pro is underperforming or malfunctioning, BITMAIN’s after-sales support ensures a quick and hassle-free repair process. Follow these steps to get your miner back to peak efficiency:
1️⃣ Contact Customer Support
📞 Reach out via BITMAIN’s official website or customer service hotline
2️⃣ Fault Diagnosis
🛠️ Provide device details (serial number, error logs) to help support identify the issue (hardware/software failure).
3️⃣ Ship Your Miner for Repair
📦 If a repair is needed, BITMAIN will guide you on safe packaging & shipping to their service center.
4️⃣ Professional Repair & Testing
⚙️ BITMAIN’s technicians will fix, upgrade (if needed), and rigorously test your device for stability.
5️⃣ Fast Return Delivery
🚀 Your fully functional Antminer S21 Pro will be shipped back via express delivery—minimizing downtime!
💡 Pro Tip: Always keep your purchase receipt and warranty details for smoother service
Conclusion
Maximizing BTC Mining Efficiency with the Antminer S21 Pro: Advanced Setup & Maintenance Protocol
Elevate your mining performance by implementing industry-best practices for optimal operation, systematic maintenance, and precision tuning of your Antminer S21 Pro. This guide delivers data-driven strategies to enhance efficiency, prolong hardware longevity, and maximize ROI.
Avoid suboptimal performance—implement professional-grade optimization for your Antminer S21 Pro today.
If you need more information about Antminer S21 Pro, Please click to get more help.
