
What Should You Do Before Setting Up your Antminer L9?
Bitmain Antminer L9: Overview & Key Features
The Bitmain Antminer L9 is a high-performance Scrypt-algorithm ASIC miner designed for mining cryptocurrencies like Litecoin (LTC), Dogecoin (DOGE), and other Scrypt-based coins. As Bitmain’s flagship model for Scrypt mining, the L9 combines energy efficiency, stable hash rate, and low maintenance—making it a top choice for both home miners and large-scale operations.
Before mining with your Antminer L9, follow this inspection guide to ensure safety and optimal performance.
Bitmain Antminer L9: Unboxing & Hardware Checklist
Why This Checklist Matters
Before deploying your Antminer L9, this inspection ensures:
✔️ No shipping damage or missing parts
✔️ Full hash rate performance
✔️ Stable mining operation from Day 1
Category | Details | Notes |
|---|---|---|
| Included Items | • Antminer L9 Unit • Power Cables (exclude-it need to prepare by user) • User Manual | Verify all parts against the packing list. |
| Power Supply | • PSU: included • Voltage: 110V-240V | Use only Bitmain-recommended PSUs |
| Environment | • Temperature: 5–35°C (41–95°F) • Humidity: 10–90% (non-condensing) • Ventilation: 2+ feet clearance around miner | Avoid dusty/damp locations. |
| Network | • Wired Connection: Gigabit Ethernet (Wi-Fi not supported) • Router Port Forwarding: Optional for remote access | Static IP recommended for stability. |
| Safety Checks | • Inspect for shipping damage (Miner appearance,noise, fans, PSU) • Ground the power supply • Ensure stable voltage input | Contact support if damage is found. |

How to Set Up Your Antminer L9 for Mining?
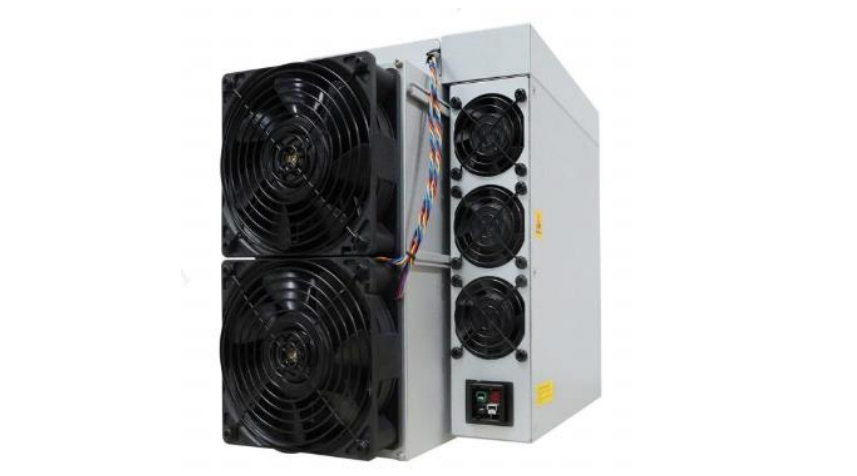
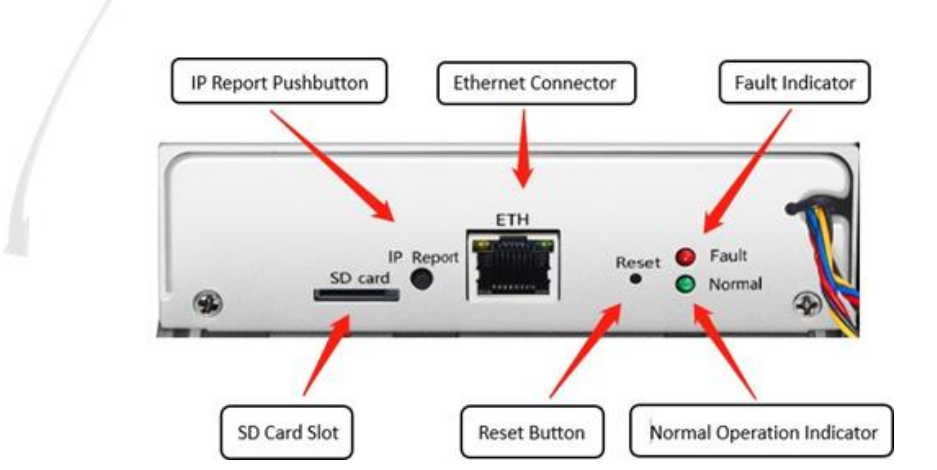
The main components and controller front panel of L9 servers are shown in the following figure:
NOTE:
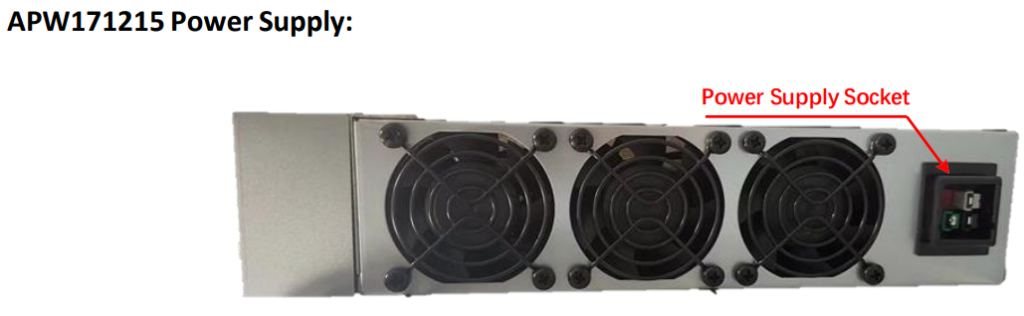
(1) Power supply APW171215 is part of L9 server.
(2)One ANTWIRE-20SP power cord is needed and should be connected to PDU.

Bitmain Antminer L9: Critical Safety Alerts
⚡ POWER REQUIREMENTS
- MUST use properly grounded outlets (110V-240V)
- BOTH power inputs must be connected simultaneously
- ALWAYS disconnect all power before maintenance
🛑 HARDWARE PRECAUTIONS
- NEVER remove factory screws/cable ties
- DO NOT PRESS the metal cover button (anti-tamper protection)
- REFER to original component layout if damage occurs
⚠️ OPERATIONAL WARNINGS
- Actual parameters prevail over documentation
- Install outlets within 1m of miner for easy access
🚨 EMERGENCY PROTOCOL
- IMMEDIATELY cut all power if:
- Smoke/odd smells detected
- Abnormal fan noises
- CONTACT Bitmain Support with:
- SN: [Located on back label]
- Error codes (if any)
Setting up the Miner
| Step | Action | Details |
|---|---|---|
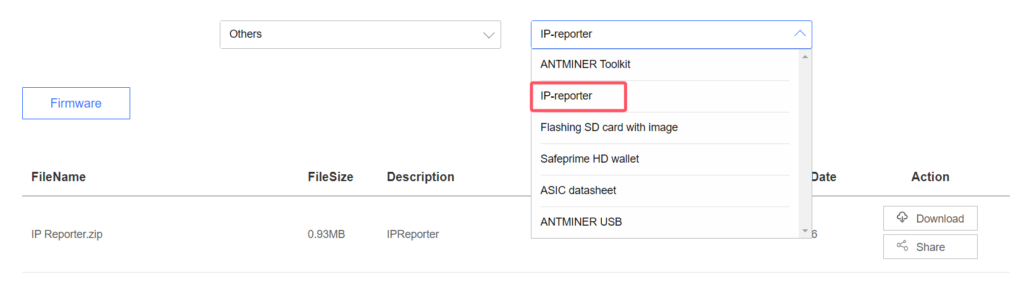
| 1 | Go to the official website | Visit: BITMAIN firmware download link Select “Others” on the left, then “IP reporter” on the right. |
| 2 | Download the file | Download: IPReporter.zip |
| 3 | Extract the file | Unzip the downloaded file. |
| 4 | Run IPReporter.exe as Administrator | Right-click IPReporter.exe and select “Run as Administrator.” |
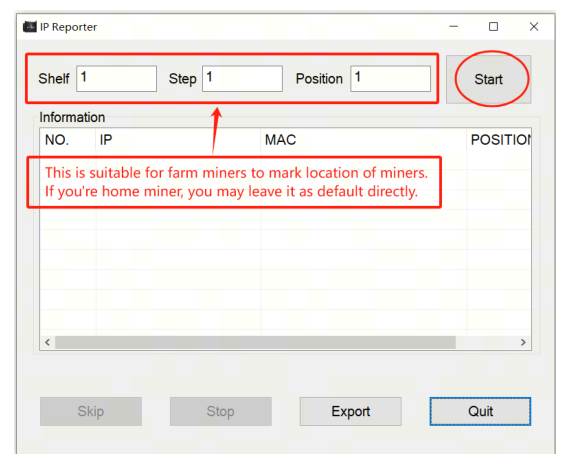
| 5 | Select an option | Choose one: – Shelf, Step, Position (for farm servers) – Default (for home servers) |
| 6 | Start the process | Click “Start.” |
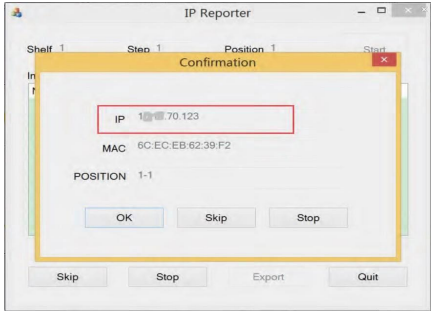
| 7 | Press the IP Report button | On the control panel, press and hold the IP Report button until it beeps (~5 seconds). The IP address will appear on your computer screen. |
| 8 | Enter the IP in a browser | Type the displayed IP address into your web browser. |
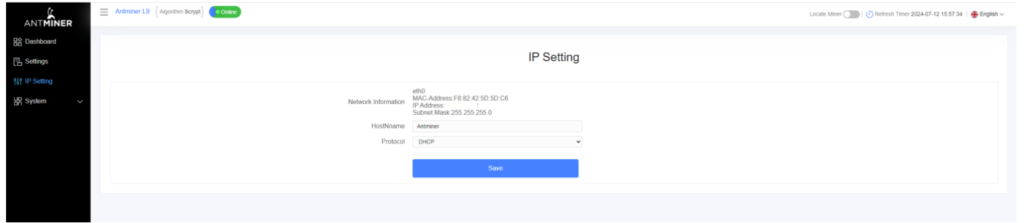
| 9 | Log in | Username: root Password: root |
| 10 (Optional) | Assign a Static IP | In the Protocol section, configure: – IP Address – Subnet Mask – Gateway – DNS Server |
| 11 | Enter network details | Fill in the required network settings. |
| 12 | Save settings | Click “Save.” |
| 13 | Learn more | For gateway & DNS help: BITMAIN Support Article |
Configuring the Miner
Setting up the Pool
Click Settings >Set the options according to the following table>Click Save after the configuration
| Option | Description |
|---|---|
| Mining address | Enter the address of your desired pool. The servers support three mining pools, with priority order: – Pool 1 (highest priority) – Pool 2 (used if Pool 1 is offline) – Pool 3 (used if Pools 1 & 2 are offline). |
| Name | Your worker ID on the selected pool. |
| Password (optional) | The password for your selected worker (if required by the pool). |
2.There are two working modes of L9 server: Normal mode and Sleep mode. The server enters the sleep mode under the condition that the control board is powered while hashboards are not powered.

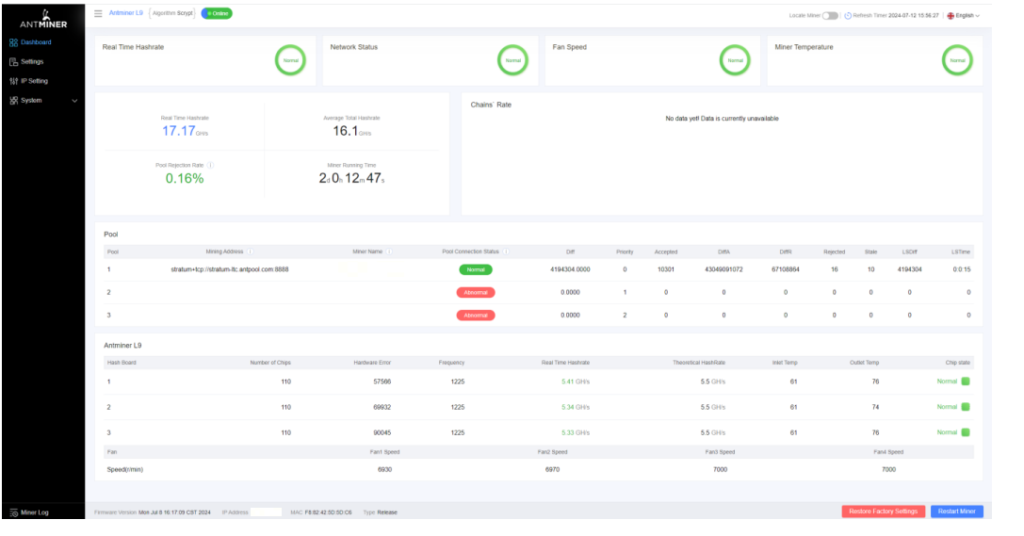
Monitoring Your Miner
To check the operating status of your server (taking L9 16G as an example):
Click dashboard marked below to check the server status.
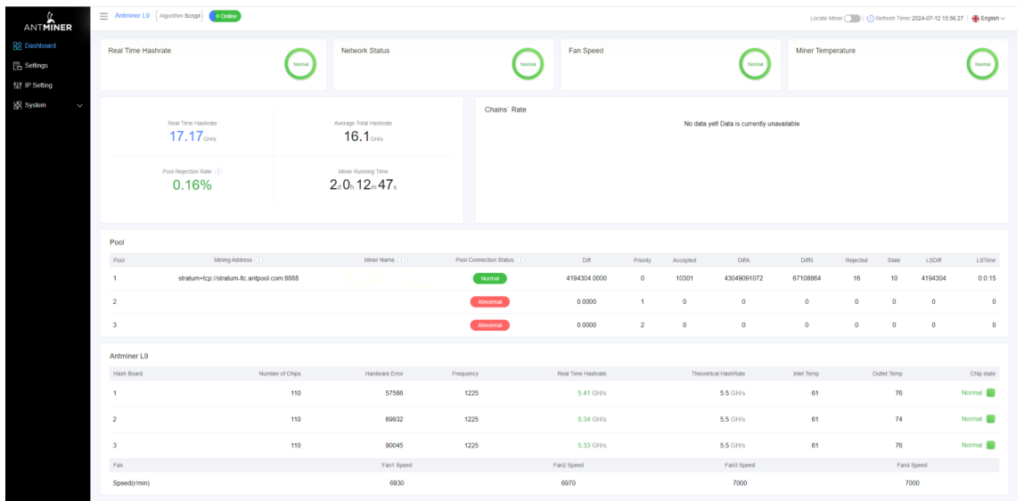
Monitor your server according to the descriptionsin the following table
| Option | Description |
|---|---|
| Number of chips | Number of chips detected in the chain. |
| Frequency | ASIC frequency setting. |
| Real Hashrate | Real-time hashrate of each hash board (GH/s). |
| Inlet Temp | Temperature of the inlet (°C). |
| Outlet Temp | Temperature of the outlet (°C). |
| Chip state | Status indicators: ● Green Icon – Normal operation ● Red Icon – Abnormal condition |
Administering Your Miner
1 Checking Firmware Version
| Step | Action | Details |
|---|---|---|
| 1 | Enter server backstage | Locate the firmware version at the bottom of the page. |
| 2 | Check File System Version | Displays the firmware date (e.g., 20240708). |
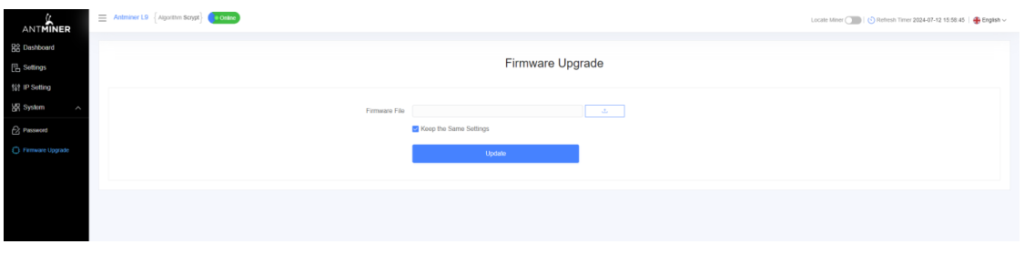
2 Upgrading your System
| Step | Action | Details |
|---|---|---|
| 1 | Go to System > Firmware Upgrade | Click to open the upgrade interface. |
| 2 | Keep Settings option | – ✔ Keep settings (retains current configurations, default) – ✖ Unselect (resets to factory defaults) |
| 3 | Upload & update | Select the upgrade file and click Update. |
| 4 | Post-upgrade restart | After completion, the server reboots to the settings page. |
| 5 | Choose action | – Reboot: Applies new firmware immediately. – Go Back: Continues mining; new firmware loads on next restart. |
fails before the upgrade is completed, you will need to return it to BITMAIN for repair
3 Modifying Your Password
| Step | Action | Details |
|---|---|---|
| 1 | Navigate to System > Password | Open the password settings tab. |
| 2 | Set new password | Enter the new password and click Save. |

4 Restoring Initial Settings
| Step | Action | Details |
|---|---|---|
| 1 | Power on & wait | Let the server run for 5 minutes. |
| 2 | Hard reset | Press and hold the Reset button for 10 seconds. |
Antminer L9 Environmental Requirements
| Description | Requirement |
|---|---|
| Operating Temperature | -20°C to 45°C |
| Operating Humidity | 10% to 90% RH (non-condensing) |
| Storage Temperature | -20°C to 70°C |
| Storage Humidity | 10% to 90% RH (non-condensing) |
| Maximum Altitude | <2000 meters |
| Pollution Level | Example Sources | Minimum Distance Requirement | Additional Notes |
|---|---|---|---|
| Heavy Pollution | Smelters, Coal Mines | >5 km | – |
| Moderate Pollution | Chemical Plants, Rubber Factories, Electroplating Industries | >3.7 km | – |
| Light Pollution | Food Processing Plants, Leather Tanneries | >2 km | If unavoidable, choose upwind location |
| Coastal Areas | Seaside, Saltwater Lakes | Avoid within 3.7 km | If unavoidable, ensure airtight structure with AC cooling |
Electromagnetic Environmental Conditions
Please keep your site away from transformers, high-voltage cables, transmission lines,and high-current equipment. For example, there should be no high-power AC transformers (>10KA) within 20 meters, and no high-voltage power lines within 50 meters. Additionally, keep your site away from high-power radio transmitters; for example, there should be no high-power radio transmitters (>1500W) within 100 meters.
Mechanical Active Substance Requirements
| Substance Type | Maximum Allowable Concentration | Measurement Standard |
|---|---|---|
| Sand | ≤ 30 mg/m³ | Airborne particles |
| Suspended Dust | ≤ 0.2 mg/m³ | PM2.5/PM10 |
| Deposited Dust | ≤ 1.5 mg/m²·h | Surface accumulation |
| Gas | Maximum Allowable Concentration | Unit | Notes |
|---|---|---|---|
| H₂S (Hydrogen Sulfide) | < 3 | ppb | Highly corrosive to electronics |
| SO₂ (Sulfur Dioxide) | < 10 | ppb | Causes sulfurization |
| Cl₂ (Chlorine) | < 1 | ppb | Accelerates metal corrosion |
| NO₂ (Nitrogen Dioxide) | < 50 | ppb | Forms corrosive acids |
| HF (Hydrogen Fluoride) | < 1 | ppb | Damages silicon components |
| NH₃ (Ammonia) | < 500 | ppb | Degrades soldering joints |
| O₃ (Ozone) | < 2 | ppb | Oxidizes materials |
How to Troubleshoot Common Issues with the Antminer L9?
Bitmain Miner Troubleshooting Guide: Fix Common Issues Quickly
Is your Bitmain miner experiencing problems? Follow this step-by-step troubleshooting guide to resolve network, power, and startup issues efficiently.

Bitmain Antminer L9 Troubleshooting Guide
1. Network Connection Issues
Problem: Miner fails to connect to network or pool
Solutions:
- Physical Inspection:
- Verify Ethernet cable integrity (Cat5e/Cat6 recommended)
- Check RJ45 ports for damage on both miner and router
- Network Diagnostics:
- Restart miner + network equipment (30-sec power cycle)
- Confirm DHCP/Static IP settings in miner configuration
- Test with alternative cable/port to isolate faults
Pro Tip: Useping [miner_IP]to test basic connectivity
2. Performance Degradation
Symptoms: Low hash rate, high hardware errors
Action Plan:
- Power Delivery:
- Validate PSU output meets L9’s 1600W+ requirement
- Measure voltage stability (±5% tolerance)
- Thermal Management:
- Maintain ambient temperature <35°C (95°F)
- Clean dust from heatsinks/fans monthly
- Pool Configuration:
- Recheck stratum URL (e.g.,
stratum+tcp://ltc.f2pool.com:8888) - Update worker credentials (user.worker format)
- Recheck stratum URL (e.g.,
3. Power-On Failure
Diagnostic Steps:
- PSU Verification:
- Test with known-good ≥1600W mining PSU (e.g., Bitmain APW7)
- Use multimeter to confirm 12V rail output
- Connection Audit:
- Reseat all PCIe power connectors (both PSU and miner side)
- Inspect for bent pins or melted connectors
- Circuit Test:
- Bypass power strips – connect directly to 220V outlet
- Check breaker/fuse rating (≥20A dedicated circuit)
Quick Tips for Common Issues
✅ Low Hashrate? → Update firmware, check power, and inspect hashboard connections.
✅ Overheating? → Clean dust, improve airflow, or replace faulty fans.
✅ No Network? → Restart the miner, check Ethernet cables, and router settings.
✅ Power Errors? → Ensure stable power supply and proper voltage.
If the issue persists after troubleshooting, contact Bitmain support for further assistance.
What Information Should You Prepare for Customer Support?

When contacting support, having the right information can speed up the process.
Prepare your miner’s model, serial number, a description of the issue, and any relevant logs or error messages.
1. Hardware Identification
- Model: Exact name (e.g., Bitmain Antminer L9 16G)
- Serial No.: Found on back label or web dashboard
(Helps verify warranty status and specs)
2. Fault Description
- Symptoms: No power? Network drops? Hashrate fluctuations?
- Visual Cues: Error LEDs (e.g., red blinking), abnormal noises
- First Occurrence: When did the problem start?
3. Diagnostic Data
- Logs: From web dashboard → System → Logs (Current log and history log)
- Dashboard: Full-page showing:
- Real-time stats (temp/fan/hashrate)
- Pool configuration tab
4. Pool Configuration
- Stratum URL:
stratum+tcp://pool.example.com:443 - Worker:
yourwallet.worker1 - Password: (if customized)
What Is the Repair Process for the Antminer L9?

Step-by-Step Repair Process
Bitmain Antminer L9 Official Repair Process
(Maximize Warranty Coverage & Minimize Downtime)
Step 1: Initiate Service Request
- Contact Methods:
- Bitmain Support Portal:https://www.bitmain.com/-bottom right corn-online chat
- https://support.bitmain.com/hc/en-us/requests/new
- Phone:+1(717)502-4531
Step 2: Pre-Repair Diagnostics
- Required Information:
✅ Serial Number (Located on rear label)
✅ Error Logs (Download from web interface → System Logs)
✅ Video/Photos of Fault (e.g., LED error codes, unusual noises)
Step 3: Secure Shipping Protocol
- Bitmain-Approved Packaging:
- Use original foam inserts + anti-static bag
- Double-box with 2″ cushioning material
- Recommended Carriers:
DHL/FedEx with full insurance coverage
Step 4: Service Center Operations
- Repair Stages:
- Component-level diagnosis (72hr avg.)
- Board replacement/refurbishment
- 48-hour burn-in testing (Hashrate + Thermal validation)
Step 5: Return & Verification
- Delivery: 3-5 business days via tracked express
- Post-Repair Checklist:
- Verify matching S/N on returned unit
- Test hash rate against factory specs
- Inspect for new warranty
Conclusion
Ensuring Stable Mining Operations
Proper configuration and maintenance of your Bitmain Antminer L9 are critical for maximizing uptime, efficiency, and profitability. A well-optimized miner reduces hardware wear, minimizes power waste, and extends operational lifespan.
Join the Conversation
Have questions or insights? We’d love to hear from you!
- 💬 Leave a comment: Share your setup tips or troubleshooting experiences.
- 📩 Contact us: Email:info@minersource.shop for direct assistance.
- 📢 Join our community: Discuss real-time fixes on wechat or join Telegram to get latest news
Your expertise helps others—let’s build a stronger mining network together! 🚀
