
What Should You Do Before Setting Up Mini Doge III?
So, you’ve got yourself a shiny new Goldshell Mini Doge III—congrats! You’re now officially one step closer to joining the elite ranks of “I mine Dogecoin while binge-watching Netflix” enthusiasts.
But before you start dreaming of Lambos paid for in Doge, you’ll need to set this little beast up. Don’t worry; it’s easier than assembling IKEA furniture (and way more profitable). Let’s dive in!
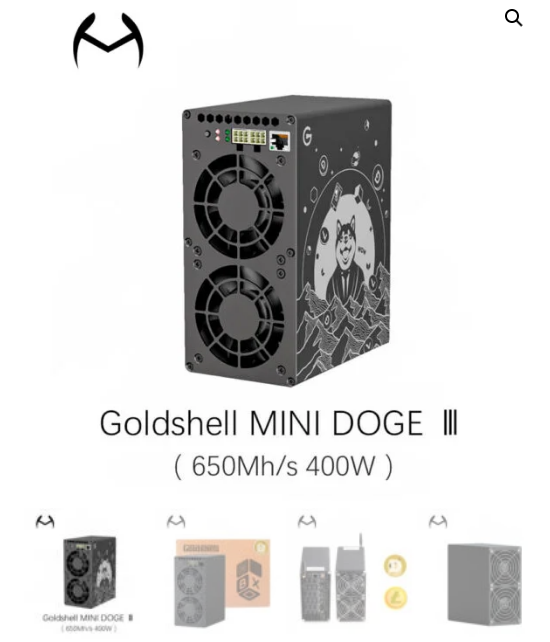
First, open the box and admire your Mini Doge III. It’s small, it’s efficient, and it won’t scream like an angry jet engine (unlike some other miners we know).When purchasing a miner machine, ensure you have acquired a PSU,it recommend to choose 80 PLUS GOLD power supply. Power consumption requirement: 500W or higher, wire gauge 16AWG, 12V 25A or higher output.
Before you unleash your Goldshell miner’s crypto-crunching powers, give it a quick “health check”—because nobody wants a sickly miner!
Goldshell Miner Inspection Guide – Check for Damage Before Use
Before powering on your Goldshell miner, inspect it carefully to avoid issues:
1. Check for Physical Damage
- Look for dents, cracks, or shipping damage on the box & miner.
2. Test the Cooling Fan
- Ensure the fan is intact and spins smoothly (no obstructions).
3. Listen for Strange Noises
- Turn on the miner—grinding or rattling sounds may indicate a problem.
- Confirm the heatsink is firmly attached (prevents overheating).
⚠️ Found Damage? Do This:
- Take photos of the issue.
- Contact Goldshell Support—do not open the miner (voids warranty).
Prepare
Category | Details |
|---|---|
| Power Supply | – Recommended PSU: Goldshell custom power supply (supports 4 Box miners). – Alternative PSU: Non-Goldshell 80 PLUS GOLD, 500W+, 16AWG wire, 12V 25A+ output. |
| Important Notes | 1. For optimal performance and safety, connect the PSU and Ethernet cable (if needed) while power is off, then power on. 2. Insert the PSU in the correct orientation to avoid short circuits. |
| Ethernet Cable | – Only required if the miner does not support Wi-Fi. – If Wi-Fi is supported, an Ethernet cable is unnecessary. |
Usage Precautions
| Category | Pre-Start Checklist & Important Notes |
|---|---|
| Physical Inspection | – Check for physical damage or loose screws. – Be cautious of electric shock risks. |
| Cable Connections | – Ensure all cables are securely connected. – Prioritize electrical safety. |
| Environment | – Keep away from water and high humidity. – Maintain ambient temperature: 10–35°C, humidity <65%. – Avoid dust, hair, catkins, or foreign objects. |
| Power Supply | – Ensure stable voltage at all times. |
| Important Notes | – Warranty void if damage occurs due to improper handling or environmental conditions. – Do not disassemble the miner without approval from Goldshell’s after-sales team. |

How to Set Up Your Mini Doge III for Mining?
The Miner comes with a detailed “how to start” user manual that users can refer to when getting started with Mini Doge III
Connect the Miner
| Step | Action | Indicator Light Status |
|---|---|---|
| 1. Ethernet Connection | – Plug one end into the miner’s Ethernet port, the other into a router/switch. – For Wi-Fi-capable miners, refer to [Goldshell Wi-Fi Guidelines]. | — |
| 2. Power On | Connect the miner to the power supply and turn it on. | – Power Interface Lights: Briefly flash red + green → then only steady green. – IP Button Lights: Flash red + blue → then only steady blue. |
| 3. Successful Startup | — | Steady green (power) + steady blue (IP button) indicates normal operation. |
| 4. Troubleshooting | If lights behave abnormally, consult [Interpretation of Indicator Lights]. | — |
Get the IP of the miner and enter the miner’s dashboard
Get the IP of the miner and enter the miner’s dashboard
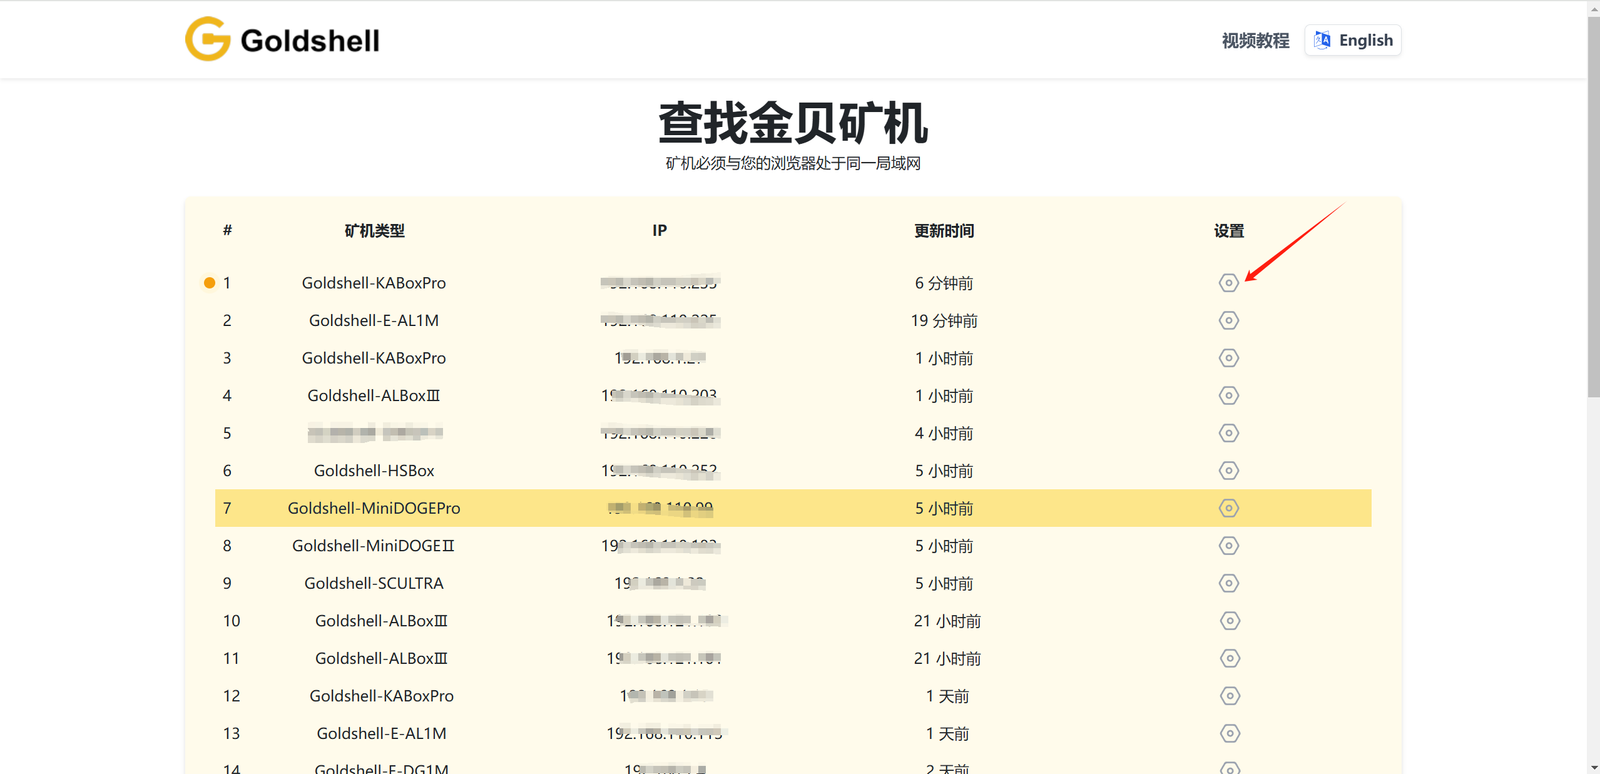
- Visit find.goldshell.com using a browser like Google Chrome on your phone or computer.
- Make sure your miner and device are on the same network and frequency band.
- The website will detect the miner’s IP address within 6 minutes of startup.
- If the IP doesn’t match, press the miner’s IP button and refresh the website.
- Click the settings icon to access the miner’s dashboard.
Miner settings
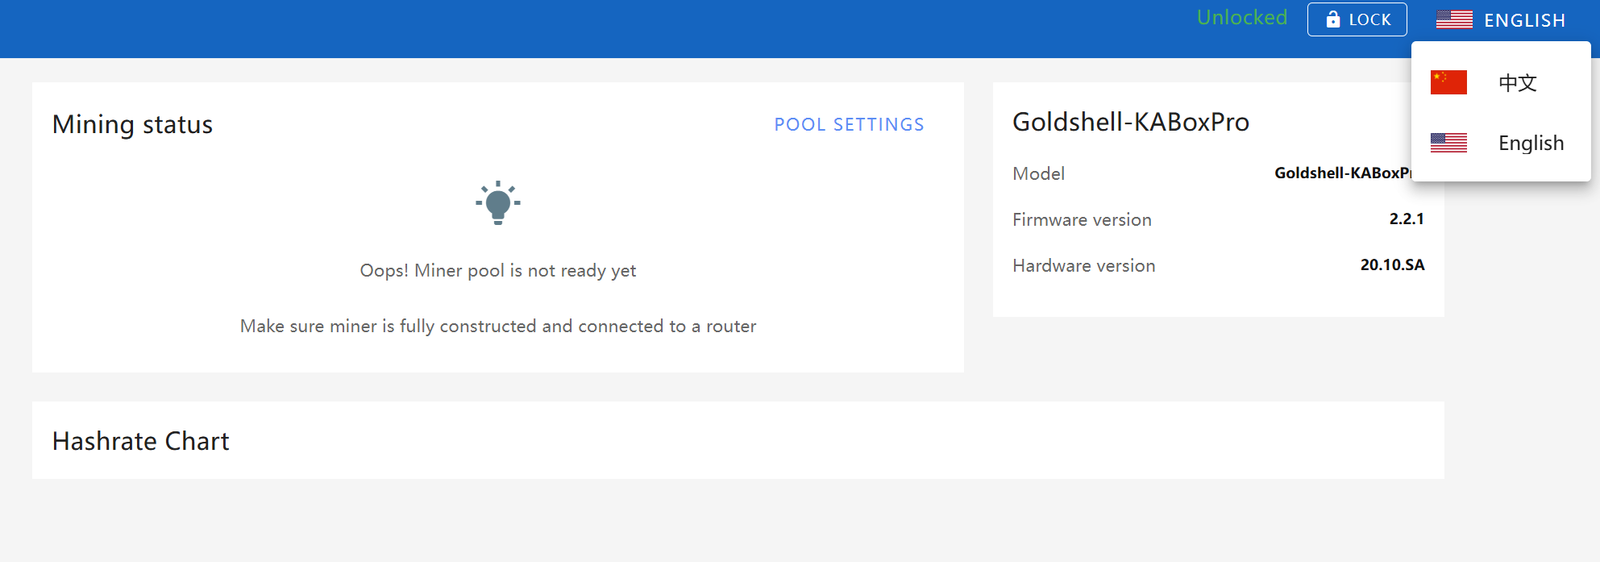
Language Switch
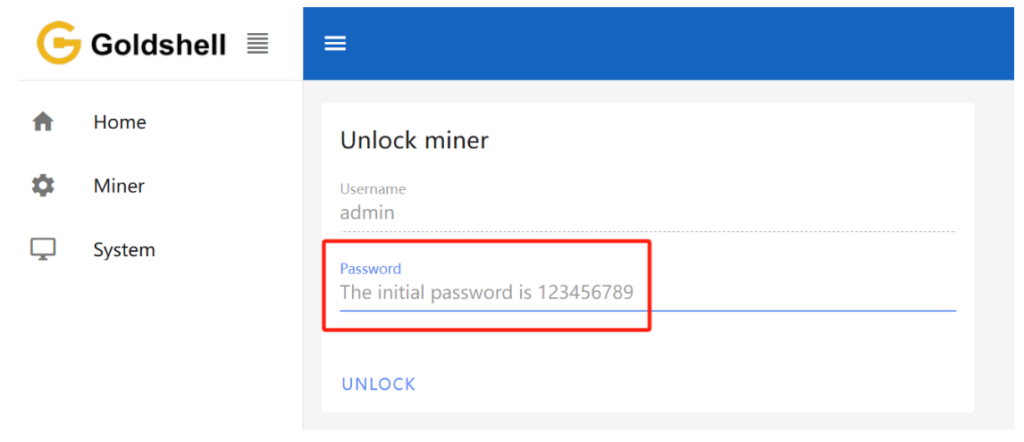
Unlock the Miner
Change the Password

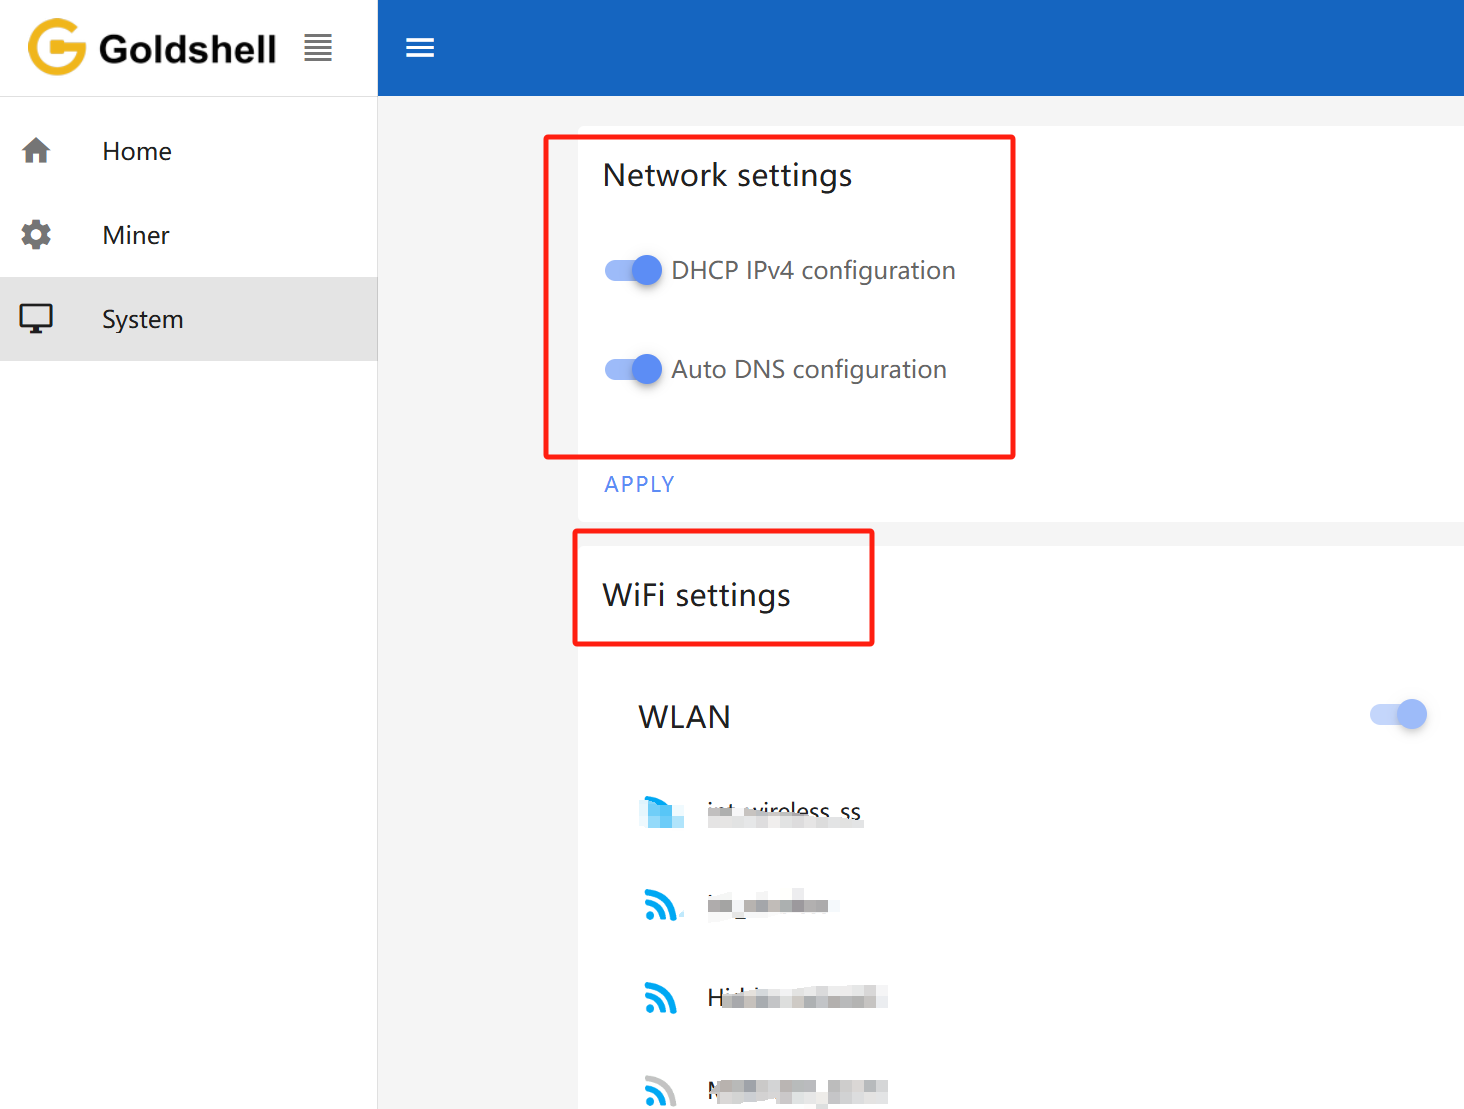
Network Settings
The default configuration is set to DHCP mode. You can adjust the IP mode based on your requirements.
Here’s how to proceed:
- Unlock your miner.
- Go to the [System] page and disable the [DHCP IPv4 configuration] and [Auto DNS configuration] under the [Network Settings] section.
- Input the IP details according to your specific situation.
- Click the [Apply] button to save the changes.
WIFI settings:If your miner supports WIFI, after connecting to WIFI, you can check the connected WIFI here. Guidelines for Using or Disabling the Wi-Fi Functionality of Goldshell Miners
Add a Mining Pool
You may need to first browse the mining tutorials on the official websites of various mining pools, such as https://www.dxpool.com/help/en/category/course.
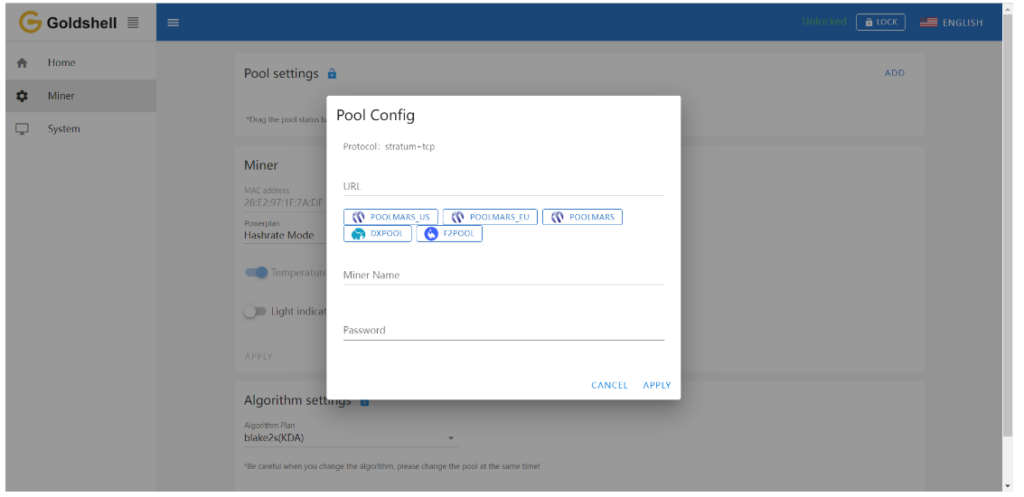
After the miner is unlocked, click [Miner] on the left side of the page, and enter the pool setting page. Finally, click “ADD” to enter Pool Config to set up your mining pool information.
Here we use “DxPool” as an example, and the parameters are set as follows:
Pool URL: your choice
Miner name : dxpool account name. worker name (The “worker name” is not mandatory here; it’s simply used to distinguish your miner. This is particularly useful if you have multiple miners connected to the same mining pool and using the same mining pool account.)
Password: your choice
Once you’ve completed the configuration, click the “Apply” button and wait for the Pool setting to turn green. This indicates a successful connection to the pool.
Wait for a successful pool connection, then navigate to the [Home] section and monitor the chart. If you observe a hashrate curve, it indicates a successful pool configuration.
Note:
- Make sure that the pool information matches the mined cryptocurrency. If you switch to a different algorithm to mine different cryptocurrency, you need to remove the original pool addresses and add a new one (different pools corresponding to each currency cannot exist simultaneously). Connecting to the wrong pool could result in miner malfunctions.
- All miners can be set up with 3 mining pools, with priority decreasing from the top pool to the botton pool. The pools with lower priority will only be used if all higher priority pools are offline.
Introduction to Miner Dashboard Data
Home Page

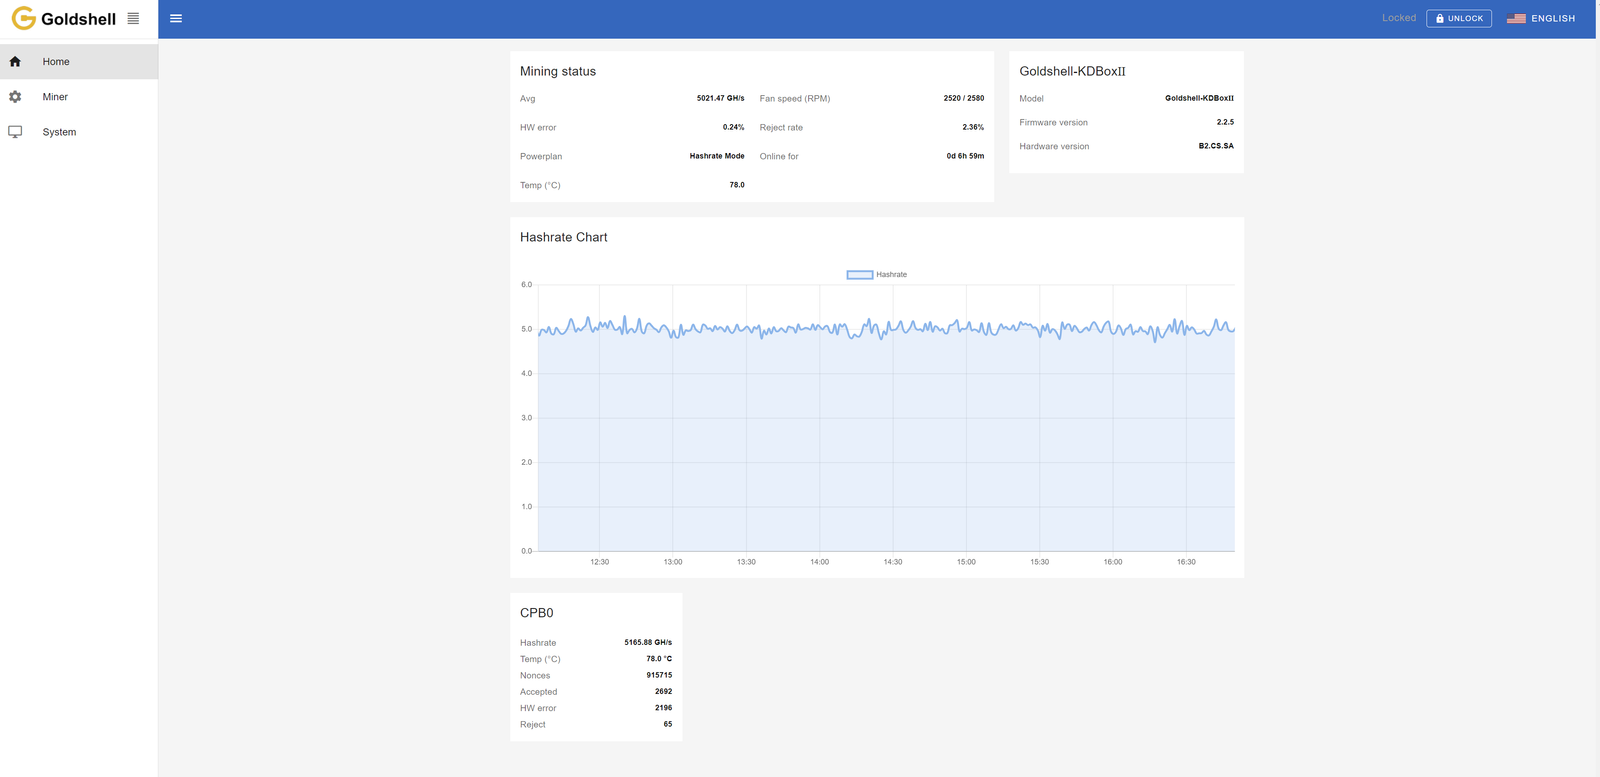
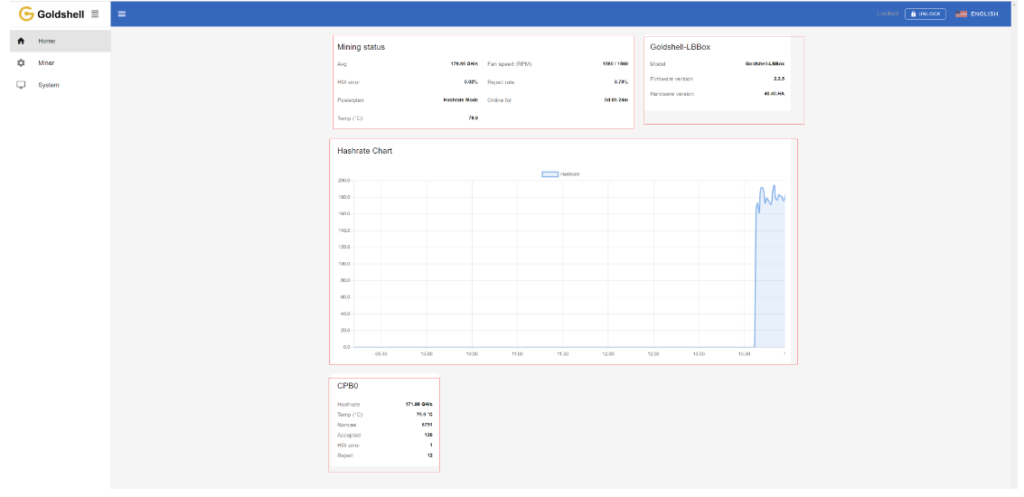
The Home page consists of four modules: Mining Status, Miner Model Information, Hashrate Chart, and Hash Board Status. The Mining Status module consolidates the hash board information and serves as a crucial information section for monitoring miner status.
The following diagram illustrates the Home page data for the LB-Box as an example, other devices follow a similar format.
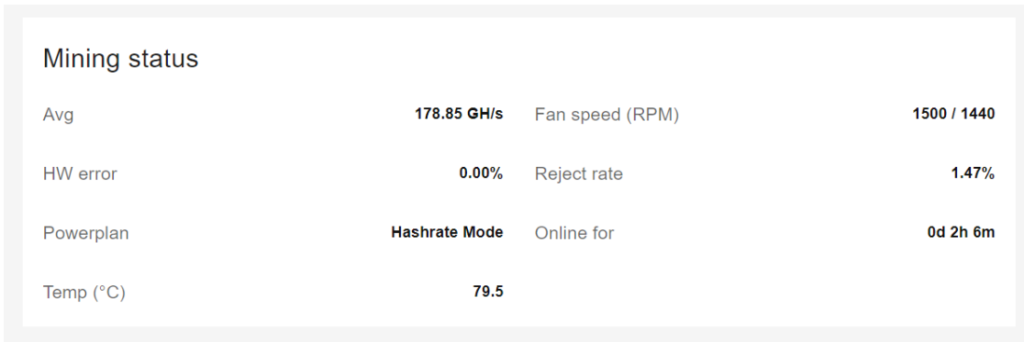
Mining status
| Parameter | Description | Normal Range | Troubleshooting |
|---|---|---|---|
| Avg (Average Hashrate) | Stable hashrate over time, reflecting operational status. Varies by model. | ±5% of the value in [Miner Specifications] | — |
| HW Error Rate | Errors occur when control board discards invalid calculations. Affected by environment, voltage, wear, or chip quality. | ≤5% (if exceeds and hashrate is low → issue) | – Check power stability. – Ensure proper cooling. – Contact support if persistent. |
| Reject Rate | Invalid submissions due to network latency/fluctuations. Impacts earnings. | 1%–10% (if hashrate unaffected → normal) | – Optimize network connection. – Check pool latency. |
| Power Plan | BOX miners have only one power plan. | — | — |
| Temp (Temperature) | Average hash board temperature. | Refer to [Miner Normal Operating Temperature] | Ensure cooling/fan function. |
| Fan Speed (RPM) | Current fan speed (e.g., Fan #1: 1500RPM, Fan #2: 1440RPM). | Model-dependent | Clean fans if dusty; replace if faulty. |
| Online For | Miner’s continuous running duration. | — | — |
Miner Model Information
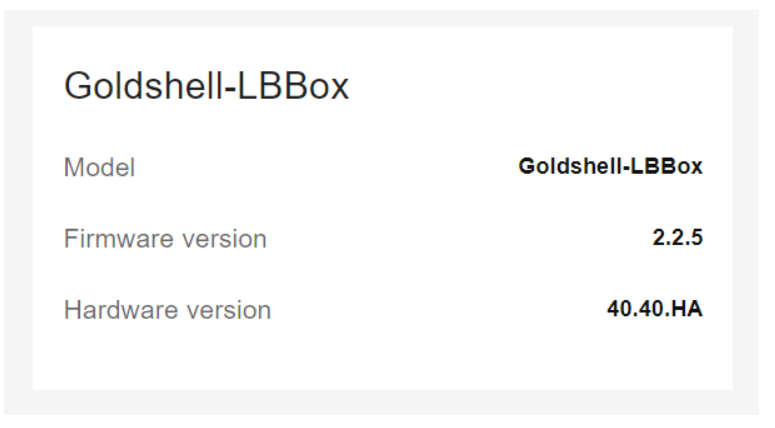
Model: The current miner type of the control board firmware.
Firmware version: The version number of the current firmware on the control board.
Hardware version: The current hardware version of the miner.
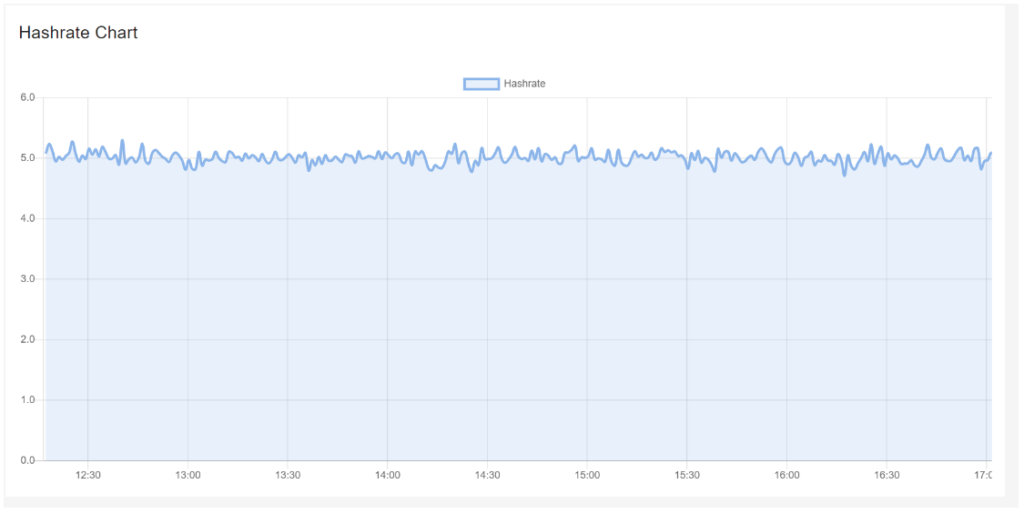
The curve in the graph is generated based on the real-time hashrate of the miner. Due to various factors such as network conditions and operating environment, the miner’s hashrate is not constant. Therefore, the hashrate graph is intended solely for observing whether there are periods of no hashrate or low hashrate within the displayed timeframe on the page. The specific hashrate situation needs to be assessed by observing the average hashrate.
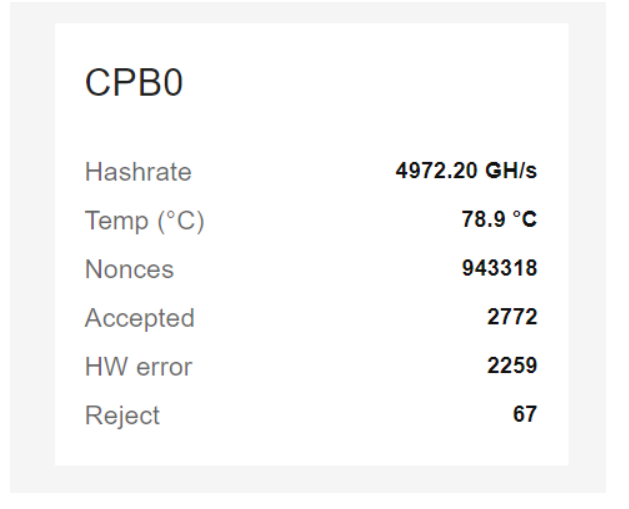
Hash Board Status
| Parameter | Description | Notes |
|---|---|---|
| Hash Board Number (CPB 0) | Identifies the position of the hash board within the miner (starts from 0). | For Box series, there is only one hash board. |
| Hashrate | Real-time hashrate of the hash board in its current position. | The miner’s overall hashrate should be assessed by the average hashrate. |
| Temp | Temperature of the hash board. | Monitor to ensure it stays within normal operating range. |
| Nonces | Number of valid computation results stored by the miner. | — |
| Accepted | Number of correct computation results accepted by the mining pool. | — |
| HW Errors | Count of invalid results discarded by the control board before submission (accumulates per session). | Assess HW error rate for actual impact. High rates may indicate power or hardware issues. |
| Reject | Number of submitted results rejected by the pool (accumulates per session). | Check Reject rate for pool-related issues (network, latency, etc.). |
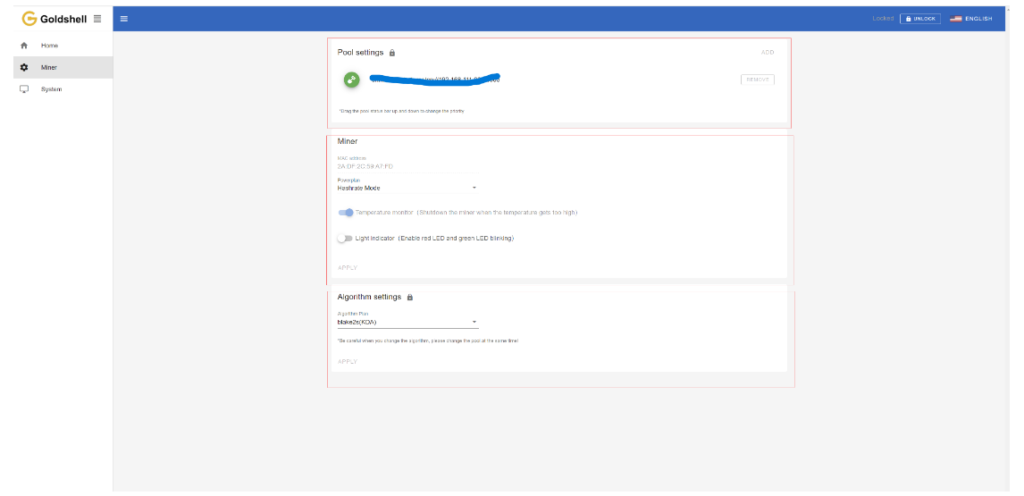
Miner Page
The Miner page consists of three modules: Pool settings, Miner and Algorithm settings.

| Parameter | Description | Notes |
|---|---|---|
| Pool Settings | Displays the currently connected mining pool. | Ensure the pool address matches the mined cryptocurrency. |
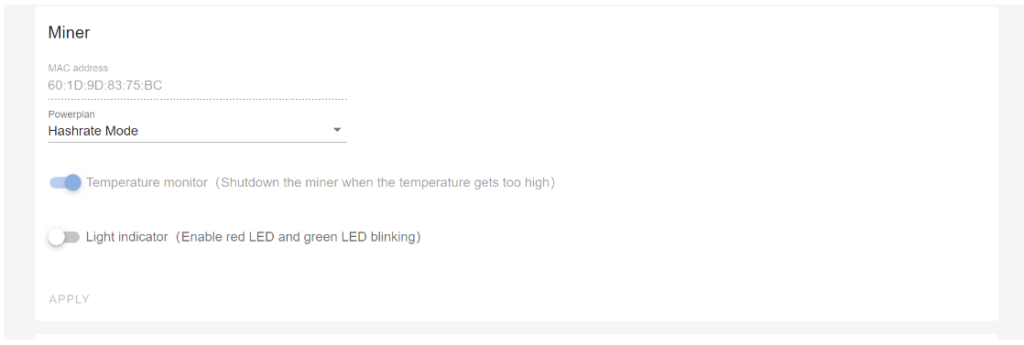
| MAC Address | Unique hardware identifier (Media Access Control address). | Used for network identification. |
| Temperature Monitor | Enables automatic shutdown if temperature exceeds safe limits. | Turn ON for overheat protection. |
| Light Indicator | Rapid red-blue flashing lights near the IP button for easy miner location. | Turn ON to visually identify the miner. |
| Power Plan | Predefined power configuration. | Box miners have only one power plan. |
| Algorithm Settings | Selects the mining algorithm (determines cryptocurrency). | – Must match the pool address. – Switching algorithms requires updating the pool. – Incorrect pairing may cause malfunctions. |
| Multi-Coin Support (HSBOX) | Allows mining different cryptocurrencies by switching algorithms. | Refer to the tutorial for proper switching steps. |
System Page
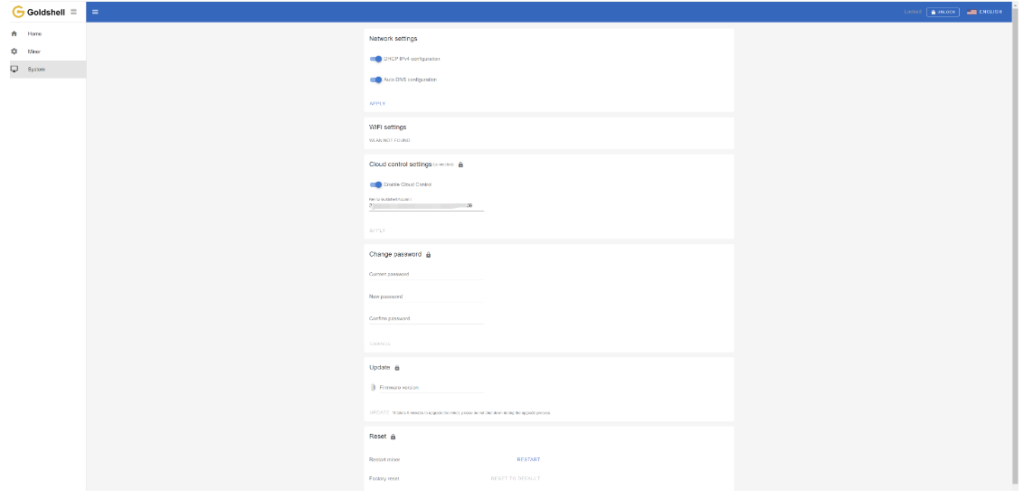
System page includes Network settings, WiFi settings, Cloud control settings, Change password, Update miner firmware, Reset and Restart miner.
Network Settings: As previously mentioned, you can set your network here.
Cloud control settings:
Check how to use the cloud control.


Change password:As previously mentioned, you can change password here.
Update: You can upgrade the miner firmware here.
Restart miner: Click the [Restart] button, the miner will restart.
Factory reset: Click the [Reset] button, the miner will restore to its factory settings. All configuration information will be lost after the miner is restored to factory settings.
How to Troubleshoot Common Issues with the Mini Doge III?
Encountering issues? Here’s how to diagnose and fix common problems.
Common issues include network connectivity, abnormal hash rates, and power failures, which can often be resolved with simple checks.

Goldshell Mini Doge III Troubleshooting Guide: Fix Common Issues Fast
1. Network Connection Problems
🌐 Can’t Connect to Network? Try These Fixes:
- Inspect all Ethernet cables for damage or loose connections
- Verify router ports are functioning properly
- Reboot both miner and router to refresh connections
- Check for IP conflicts in your network settings
2. Mining Performance Issues
⚡ Low Hashrate Solutions:
- Double-check mining pool address and port settings
- Monitor real-time miner temperature (ideal: 60-75°C)
- Test with alternative stable power source (110V/220V)
- Ensure proper ventilation around your mining device
3. Power Failure Troubleshooting
🔋 Miner Won’t Turn On? Follow These Steps:
- Test power outlet with another device
- Examine power cord for frays or damage
- Try different power cable if available
- Check for tripped circuit breakers in your electrical panel
Pro Tip: Always keep your miner’s firmware updated for optimal performance and bug fixes. Visit Goldshell’s support portal for the latest updates.
What Information Should You Prepare for Customer Support?
When contacting support, having the right information can speed up the process.
Prepare your miner’s model, serial number, a description of the issue, and any relevant logs or error messages.

📋 Required Information for Efficient Technical Support
To help us resolve your issue quickly, please provide the following details:
1. Device Identification
- Miner Model: (Example: Mini Doge III)
- Serial Number: (Located on the back of your device)
2. Problem Description
- Clearly describe your issue:
- Startup failure?
- Network connectivity problems?
- Performance degradation?
- Error messages received?
3. Diagnostic Data
- System Logs: Share recent operation logs
- Error Screenshots: Capture any error messages
- Dashboard Screenshot: Full miner status page
4. Mining Pool Configuration
- Pool name and URL
- Your wallet/account details
- Port settings being used
🔍 Pro Tip: Including this information in your first support request can reduce resolution time by up to 50%.
📸 How to Capture Helpful Screenshots
- Press “Print Screen” on your keyboard
- Paste into Paint or Word document
- Save as JPEG or PNG
- Attach to your support ticket
What Is the Repair Process for the Mini Doge III?
If your miner needs repair, here’s what to expect.
Contact Goldshell support, provide necessary details, and follow their instructions to send the device for repair.
1️⃣ Contact Goldshell Support
📞 How to Reach Goldshell:
- Visit [Goldshell Official Support Page]
- Submit a ticket
Pro Tip: Have your serial number ready for faster service!
2️⃣ Initial Diagnosis
🩺 What Goldshell Need From You:
- Clear description of the issue
- Device model & serial number
- Recent error logs/screenshots
- Mining pool configuration details
3️⃣ Shipping Instructions
📦 Preparing Your Miner for Return:
- Use original packaging if possible
- Include all accessories
- Follow Goldshell provided shipping label instructions
- Insure your shipment (recommended)
4️⃣ Professional Repair Service
🛠️ Goldshell Service:
- Certified technicians handle all repairs
- Full hardware diagnostics
- Firmware updates if needed
- 48-hour testing period post-repair
5️⃣ Fast Return Delivery
🚚 Getting Your Miner Back:
- Typically shipped within 3 business days after repair
- Trackable express shipping
- Signature required upon delivery
⏳ Estimated Turnaround Time
- Diagnosis: 1-2 business days
- Repair: 3-5 business days
- Total process: 7-10 business days
Conclusion
Unlike bulky, noisy ASIC miners, the Mini-DOGE III offers a perfect balance of performance and convenience. Whether you’re a small-scale miner or just starting with Dogecoin mining, this miner provides reliable hashing power without high electricity costs.
Best for:
Home miners looking for a quiet, efficient Dogecoin miner
Beginners wanting an easy-to-set-up crypto miner
Low-power mining with high ROI potential
Want to stay updated with the latest tips and news about the Mini-DOGE III? Click here for more helpful resources and support!
