
Why Choose the Goldshell E-AE1M?
Before diving into the setup, let’s quickly highlight why this miner is popular:
- Enterprise-Ready Performance
- 230MH/s hash rate ensures competitive mining efficiency.
- 3U rack-mountable design maximizes space utilization in data centers.
- Optimized for ALEO’s zero-knowledge proof (zk-SNARKs) consensus, ensuring long-term relevance.
- Energy-Efficient Operation
- 2000W power draw balances performance with energy costs.
- Ideal for custom cooling solutions to minimize overhead.
- Scalable Deployment for Businesses
- Designed for large-scale mining farms and repurposed data centers.
- End-to-end configuration support ensures seamless integration with existing infrastructure.
Now, let’s get your Goldshell E-AE1M up and running!

What Should You Do Before Setting Up E-AE1M?
Before powering up your miner, let’s give it a quick check to ensure everything looks good:
✅ Inspect the Packaging & Miner Body – Look for any dents, cracks, or damage during shipping.
✅ Check the Fan – Make sure it’s intact and spins freely.
✅ Give It a Gentle Shake – Listen for any loose parts inside (no rattles = good to go!).
Found an issue? No worries! Just:
- 📸 Snap a photo of the problem.
- 🚀 Reach out to Goldshell support team
⚠️ Heads Up!
- 🔒 No DIY Repairs – Your miner has an anti-tamper seal. Opening it yourself voids the warranty.
- 🔧 Leave it to the pros – Our support team will handle any repairs safely.
Prepare
Category | Details |
|---|---|
| Power Supply | The miner will come with 2 power cords, one has a type i plug and IEC C19 power connector (16A), and another has a type b plug and IEC C19 power connector (16A). |
| Important Notes | If the power cords provided with the miner doesn’t match your local socket, you can opt to purchase an adapter or a power cord that meets the specifications C19 connector; 2.5mm² (13AWG). 2.5mm² indicates a wire cross-sectional area of 2.5 square millimeters, indicating the wire’s conductivity and load-bearing capacity. Please note: Using a different power cord may impact troubleshooting any potential issues later on. |
| Ethernet Cable | The miner supports WIFI connection, so the Ethernet cable is not necessary. |
Usage Precautions
Before firing up your miner, give it a quick check for any signs of damage—better safe than sorry! Always watch out for electrical hazards.
🔌 Power Up Safely:
- Double-check all cable connections to avoid loose wiring.
- Keep your miner dry—water and humidity are its worst enemies!
🌡️ Ideal Operating Conditions:
- Maintain a comfy temperature between 10°C – 35°C (50°F – 95°F).
- Humidity should stay below 65% to prevent moisture issues.
🧹 Dust & Debris Prevention:
- A clean setup = a happy miner! Avoid dust, pet hair, and floating particles that could clog your device.
⚡ Stable Power Supply:
- Ensure steady voltage to keep your miner running efficiently.
- Never plug or unplug cables while the power is on—safety first!
⚠️ Important Notes:
- Proper installation and care are key! Damage from improper use (like crushing or mishandling) won’t be covered under warranty.
- Don’t take apart your miner without approval from Goldshell’s support team—tinkering voids warranty!

How to Set Up Your E-AE1M for Mining?
Easy Step-by-Step Guide to Setting Up Your Miner
🔧 Step 1: Attach the Handles
- Secure the handles on both sides of your miner for easy carrying and placement.
🌐 Step 2: Connect to the Network
- Plug one end of the Ethernet cable into your miner’s port.
- Connect the other end to your router or switch for a stable internet connection.
⚡ Step 3: Power Up Safely
- Connect the power cable and flip the switch to turn it on.
- The indicator lights will briefly flash red and green, then settle into a steady green light when ready.
⚠️ Troubleshooting Tip:
- If the lights behave unexpectedly, check our Indicator Light Guide for help.
📶 WiFi Option Available (ECHO Series Only!)
- Prefer wireless? Our ECHO miners support WiFi!
- Learn how to enable or disable WiFi in our Goldshell Miner WiFi Setup Guide.
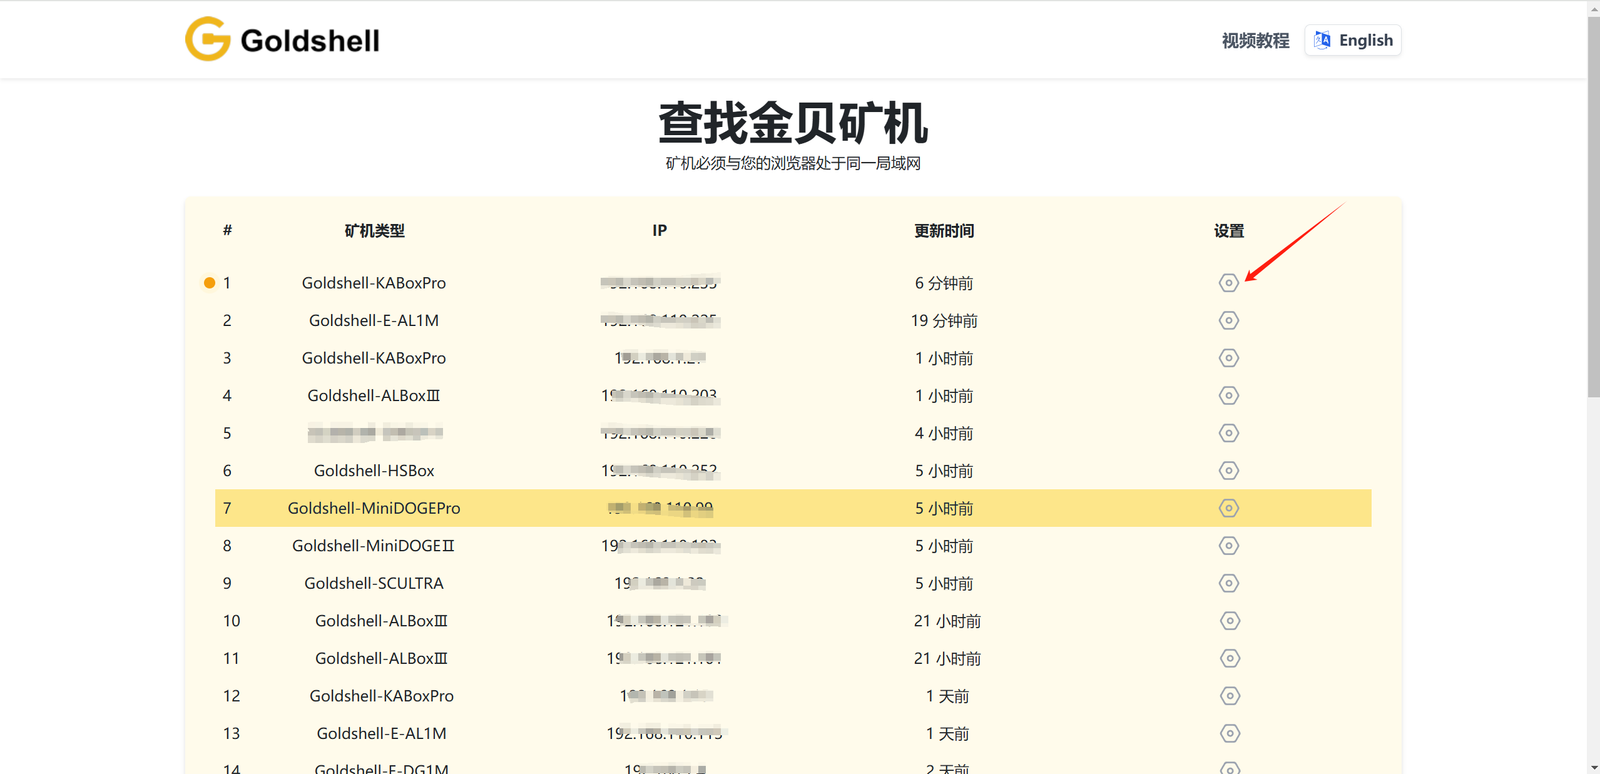
Get the IP of the miner and enter the miner’s dashboard
Get the IP of the miner and enter the miner’s dashboard
- Visit find.goldshell.com using a browser like Google Chrome on your phone or computer.
- Make sure your miner and device are on the same network and frequency band.
- The website will detect the miner’s IP address within 6 minutes of startup.
- If the IP doesn’t match, press the miner’s IP button and refresh the website.
- Click the settings icon to access the miner’s dashboard.
Miner settings
Language Switch
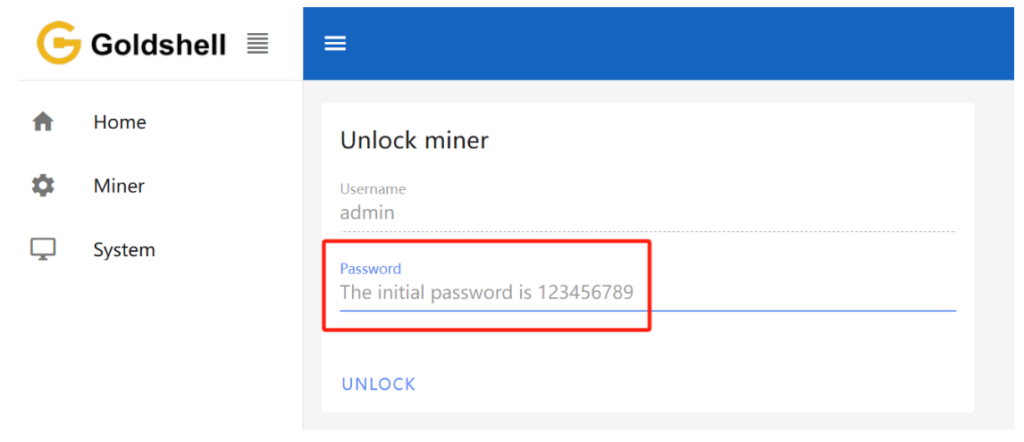
Unlock the Miner
Change the Password

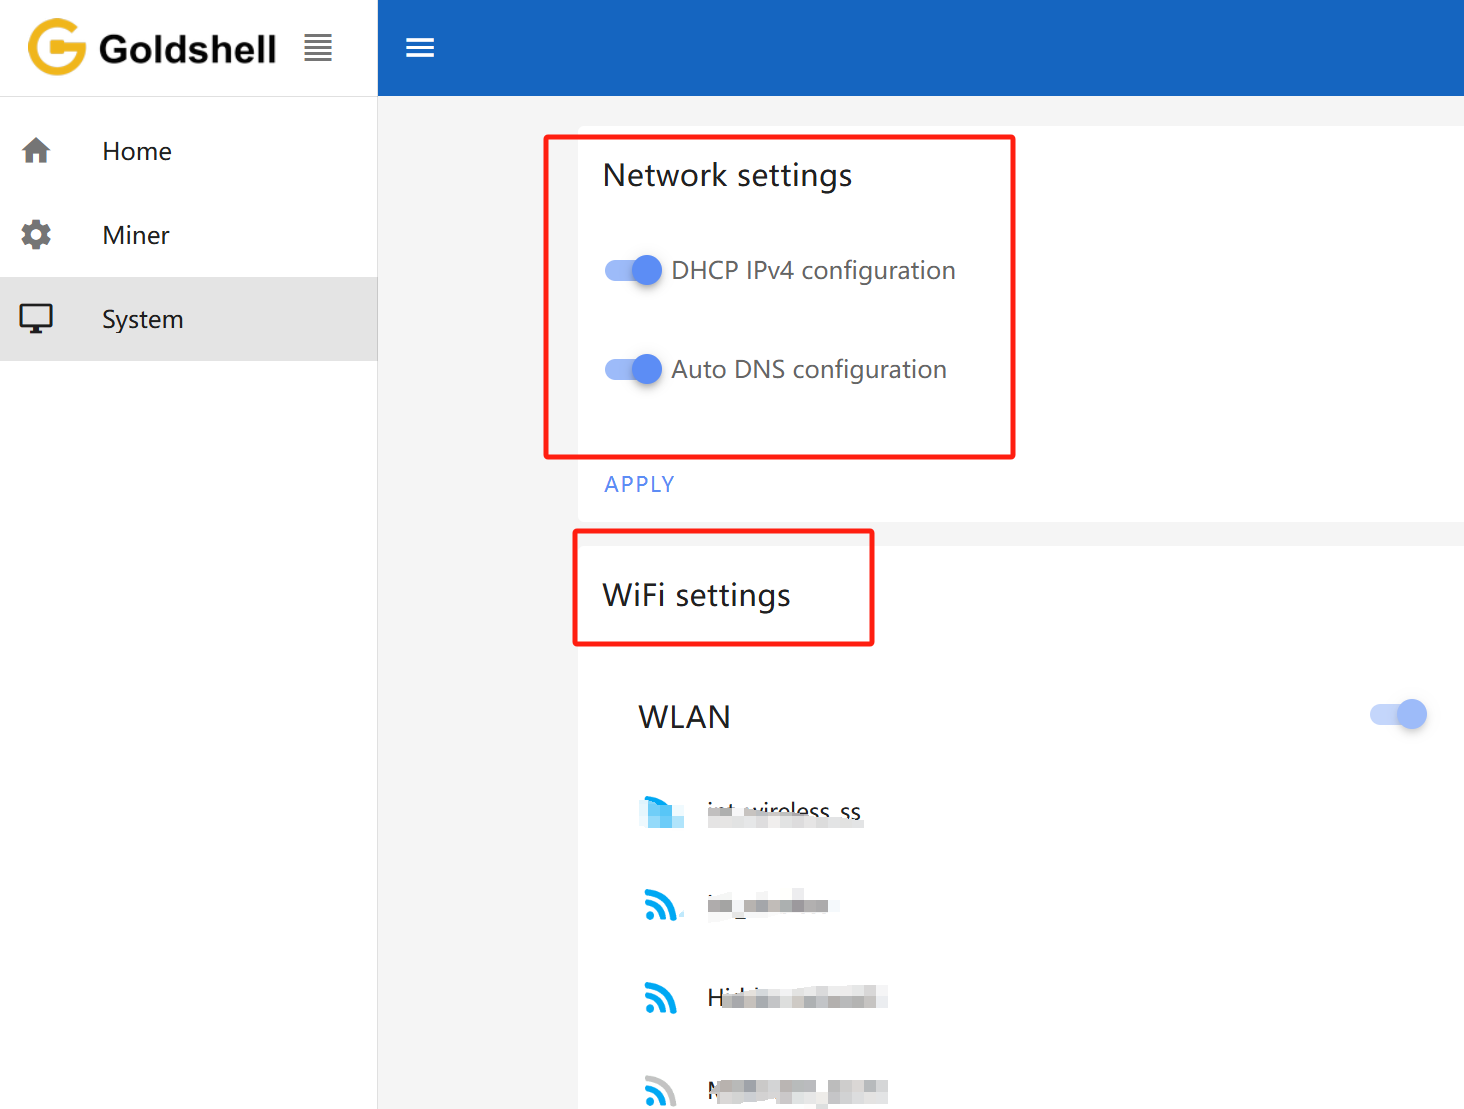
Network Settings
The default configuration is set to DHCP mode. You can adjust the IP mode based on your requirements.
Here’s how to proceed:
- Unlock your miner.
- Go to the [System] page and disable the [DHCP IPv4 configuration] and [Auto DNS configuration] under the [Network Settings] section.
- Input the IP details according to your specific situation.
- Click the [Apply] button to save the changes.
WIFI settings:If your miner supports WIFI, after connecting to WIFI, you can check the connected WIFI here. Guidelines for Using or Disabling the Wi-Fi Functionality of Goldshell Miners
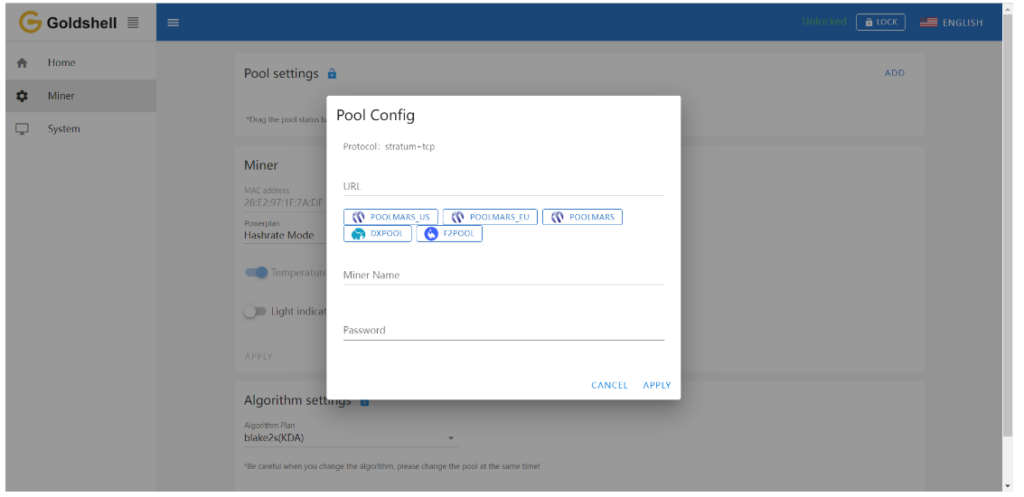
Add a Mining Pool
You may need to first browse the mining tutorials on the official websites of various mining pools, such as https://www.dxpool.com/help/en/category/course.
After the miner is unlocked, click [Miner] on the left side of the page, and enter the pool setting page. Finally, click “ADD” to enter Pool Config to set up your mining pool information.
Here we use “DxPool” as an example, and the parameters are set as follows:
Pool URL: your choice
Miner name : dxpool account name. worker name (The “worker name” is not mandatory here; it’s simply used to distinguish your miner. This is particularly useful if you have multiple miners connected to the same mining pool and using the same mining pool account.)
Password: your choice
Once you’ve completed the configuration, click the “Apply” button and wait for the Pool setting to turn green. This indicates a successful connection to the pool.
Wait for a successful pool connection, then navigate to the [Home] section and monitor the chart. If you observe a hashrate curve, it indicates a successful pool configuration.
Note:
- Make sure that the pool information matches the mined cryptocurrency. If you switch to a different algorithm to mine different cryptocurrency, you need to remove the original pool addresses and add a new one (different pools corresponding to each currency cannot exist simultaneously). Connecting to the wrong pool could result in miner malfunctions.
- All miners can be set up with 3 mining pools, with priority decreasing from the top pool to the botton pool. The pools with lower priority will only be used if all higher priority pools are offline.
Introduction to Miner Dashboard Data
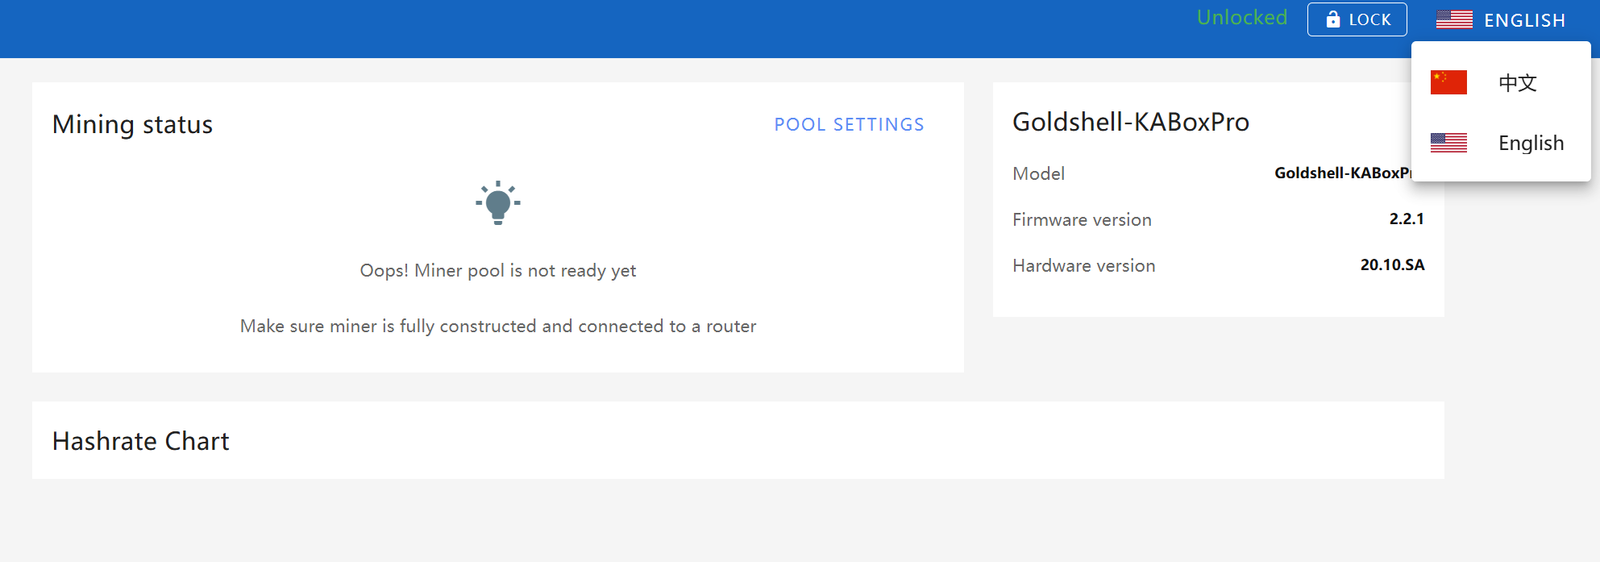
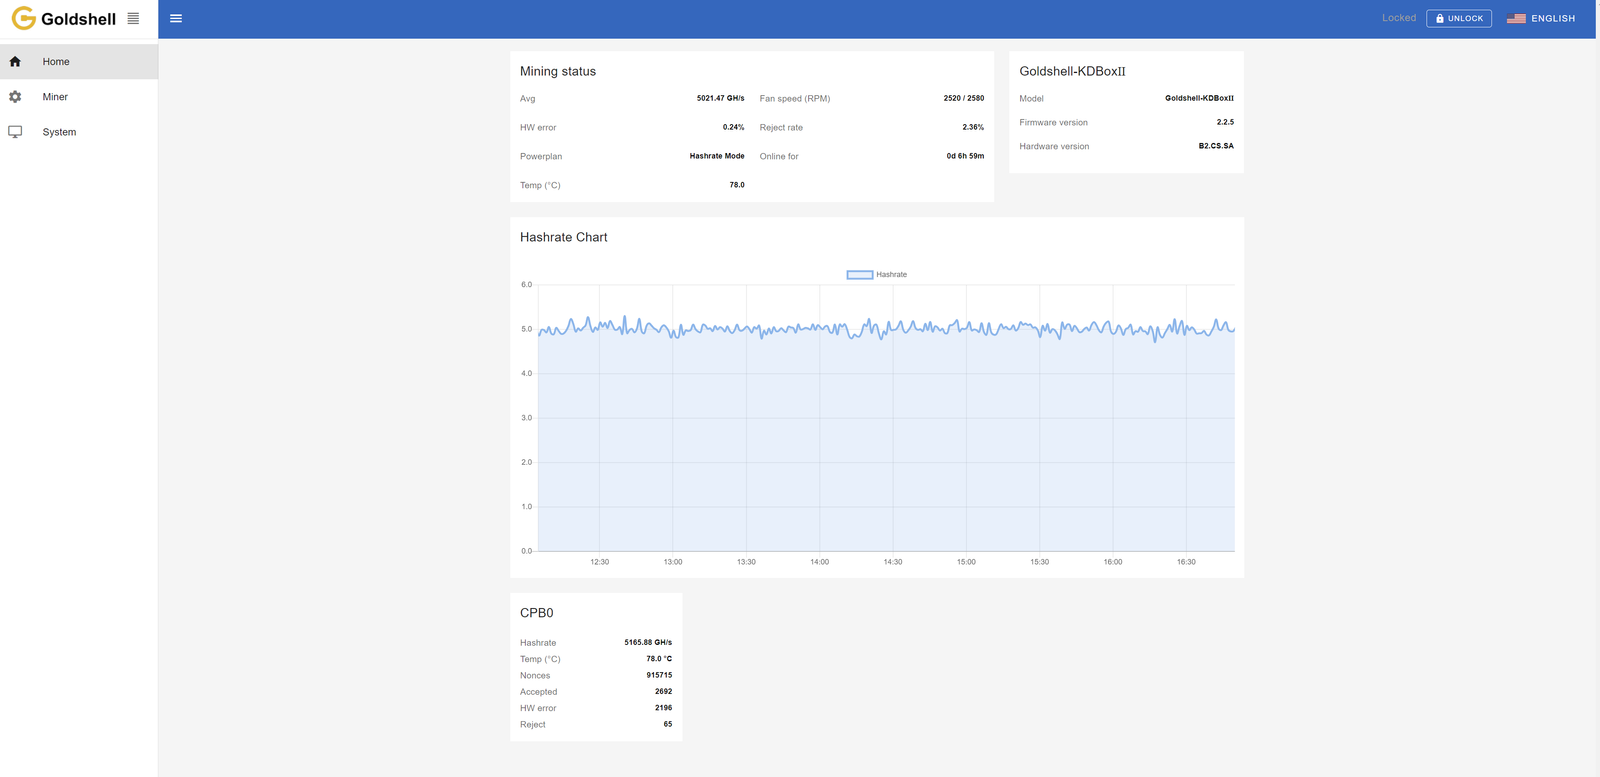
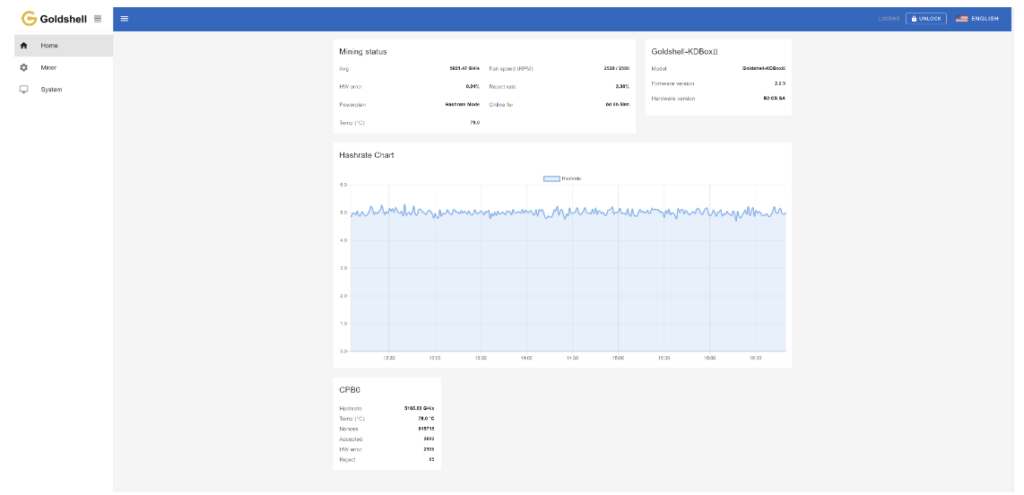
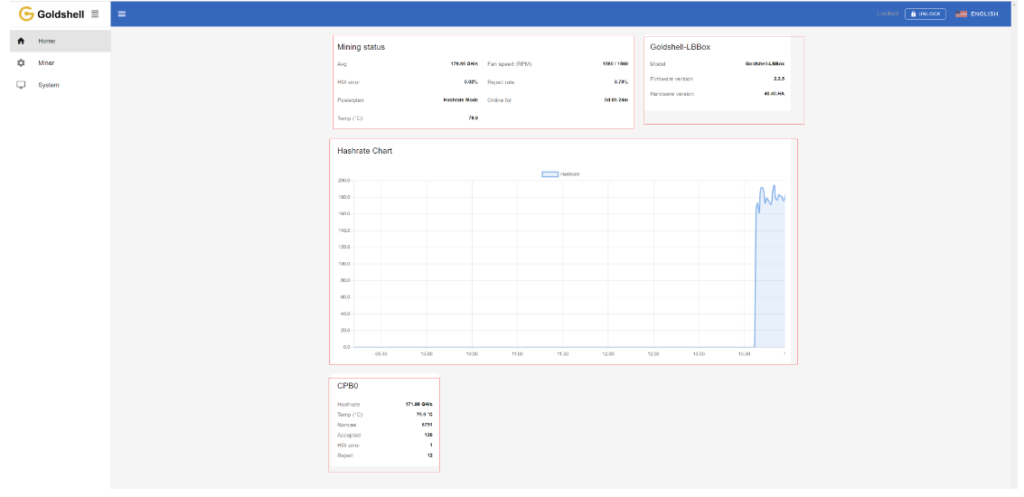
Home Page

The Home page consists of four modules: Mining Status, Miner Model Information, Hashrate Chart, and Hash Board Status. The Mining Status module consolidates the hash board information and serves as a crucial information section for monitoring miner status.
The following diagram illustrates the Home page data for the LB-Box as an example, other devices follow a similar format.
Mining status
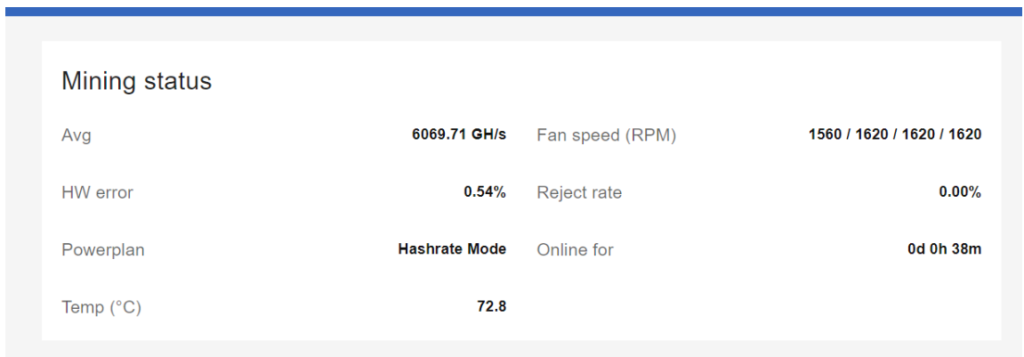
Understanding Your Miner’s Performance Metrics
⚡ Avg (Average Hashrate)
- Represents your miner’s stable performance over time.
- Should be within ±5% of the model’s specified hashrate (check your Miner Specifications).
- Varies slightly between models – minor fluctuations are normal!
❗ HW Error Rate (Hardware Errors)
- Occurs when invalid calculations are detected and discarded.
- Common causes: Environmental factors, voltage instability, or normal wear-and-tear.
- When to worry? Only if HW errors exceed 5% and hashrate drops below standard.
🔧 How to Fix High HW Error Rate:
✅ Ensure stable power supply.
✅ Keep miner in a cool, dust-free environment.
✅ Check for firmware updates.
❌ Reject Rate (Invalid Submissions)
- Happens due to network delays or blockchain congestion.
- Normal range: 1%–10% (if hashrate remains stable).
- High reject rates reduce earnings but don’t always indicate hardware issues.
🌐 How to Fix High Reject Rate:
✅ Use a stable Ethernet connection (WiFi can increase rejects).
✅ Choose a low-latency mining pool server.
✅ Check router/network stability.
🔋 Power Plan (ECHO Series Only)
- Different modes optimize efficiency vs. performance.
- Learn how to switch modes: Goldshell Power Plan Guide
🌡️ Temp (Hash Board Temperature)
- Monitor to prevent overheating.
- Check your model’s Normal Operating Temperature range.
💨 Fan Speed (RPM)
- Shows cooling performance (e.g., 1560 RPM = 1560 rotations/minute).
- Example: Fan #1: 1560 | Fan #2: 1620 | Fan #3: 1620 | Fan #4: 1620
⏳ Online For (Uptime)
- Tracks how long your miner has been running.
- Helps monitor stability and performance trends.
Miner Model Information
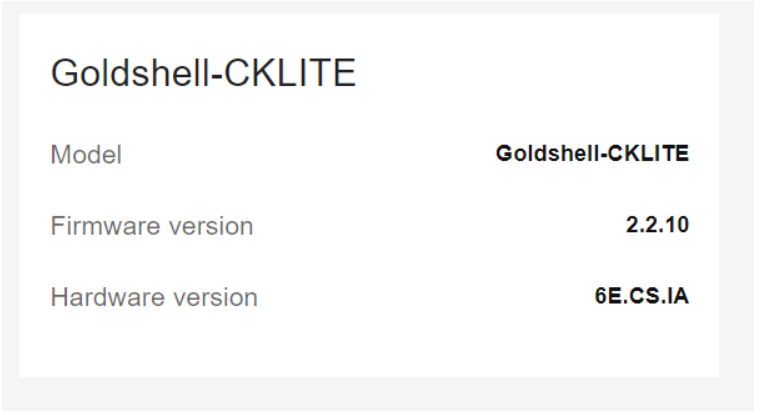
Model: The current miner type of the control board firmware.
Firmware version: The version number of the current firmware on the control board.
Hardware version: The current hardware version of the miner.
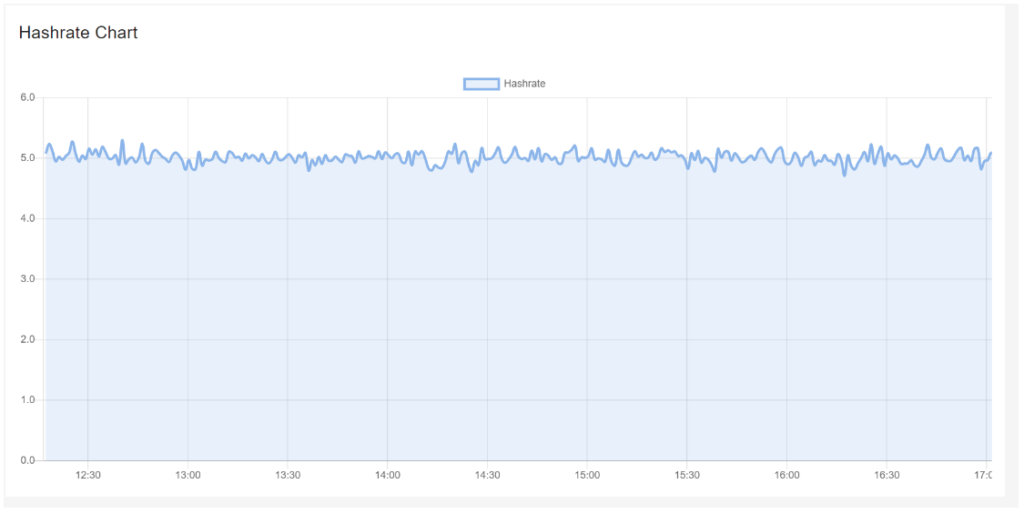
The curve in the graph is generated based on the real-time hashrate of the miner. Due to various factors such as network conditions and operating environment, the miner’s hashrate is not constant. Therefore, the hashrate graph is intended solely for observing whether there are periods of no hashrate or low hashrate within the displayed timeframe on the page. The specific hashrate situation needs to be assessed by observing the average hashrate.
Hash Board Status
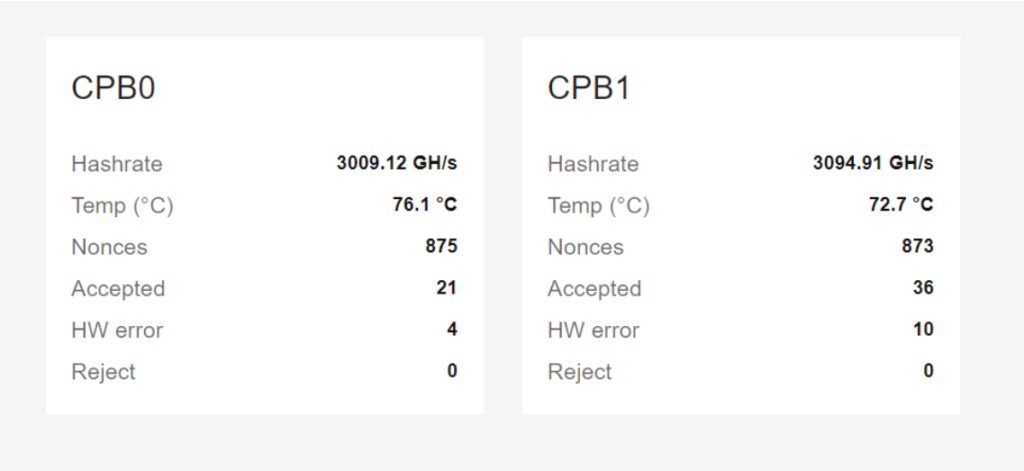
Understanding Your Miner’s Hash Board Metrics
🔢 Hash Board Number (CPB0, CPB1, etc.)
- Each hash board has a unique identifier (e.g., CPB0 = Hash Board #1, CPB1 = Hash Board #2).
- Helps locate and troubleshoot specific boards inside your miner.
⚡ Hashrate (Real-Time Performance)
- Shows the current hashrate of each hash board.
- For overall miner performance, check the average hashrate instead.
🌡️ Temp (Board Temperature)
- Monitors heat levels to prevent overheating.
- Keep within your model’s recommended temperature range for optimal performance.
🔢 Nonces (Valid Computations Stored)
- Tracks how many correct calculations your miner has processed.
- Higher nonces = more potential earnings!
✅ Accepted (Approved by Mining Pool)
- Counts how many results were successfully accepted by the pool.
- More acceptances = better rewards!
❗ HW Errors (Hardware Verification Failures)
- Occurs when invalid calculations are detected and discarded before submission.
- Accumulates per session—check the HW error rate for severity.
❌ Reject (Pool Rejections)
- Tracks submissions denied by the mining pool (due to delays or errors).
- Monitor the reject rate to assess network/pool stability.
💡 Pro Tip: For the best performance, keep an eye on HW error rate & reject rate—if they spike, check your power, cooling, or network connection!
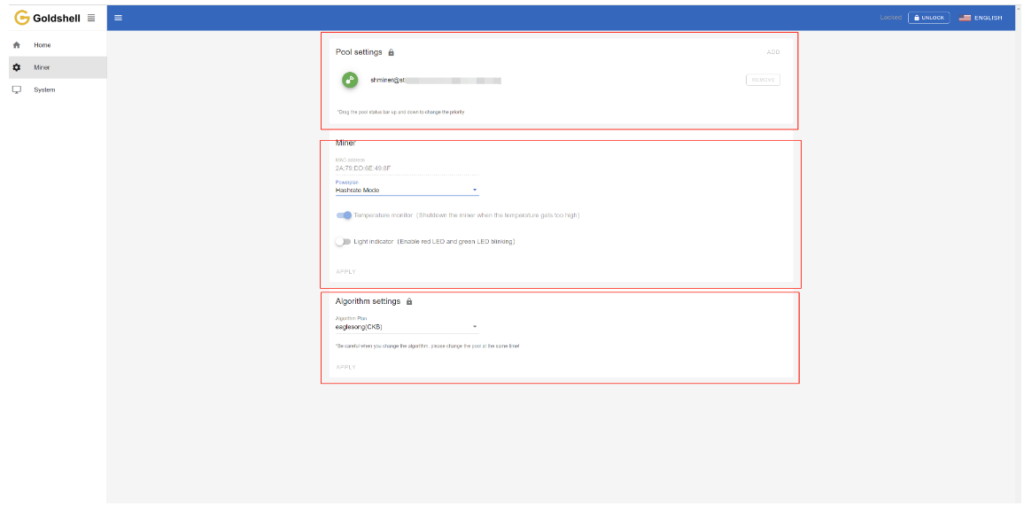
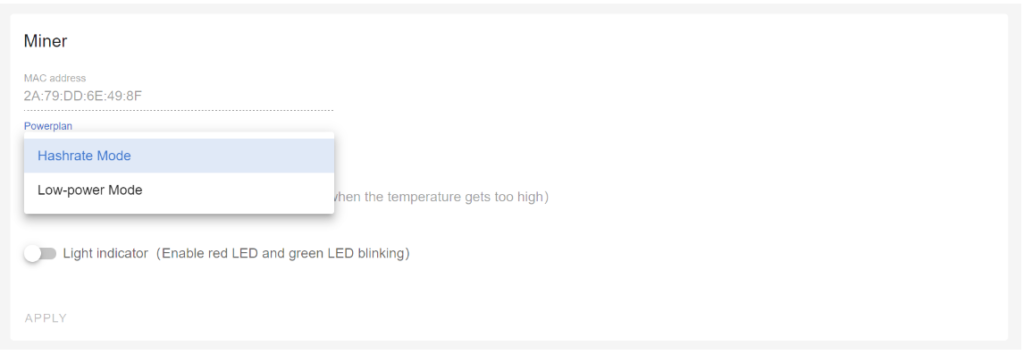
Miner Page
The Miner page consists of three modules: Pool settings, Miner and Algorithm settings.

Mastering Your Miner’s Settings & Features
⛏️ Pool Settings
- Add, remove, or check your mining pools here
- Keep multiple backup pools for maximum uptime
🔌 MAC Address
- Your miner’s unique network identifier (like a digital fingerprint)
⚡ Power Plan (ECHO Series Only)
- Switch between performance modes for efficiency optimization
- Customize based on your power needs
🌡️ Temperature Monitor (Safety First!)
- Auto-shutdown if temperatures exceed safe limits
- Protects your hardware from overheating damage
💡 Light Indicator (Quick Locator)
- Enable to make your miner flash red/green
- Super helpful for identifying your device in a mining farm
🔄 Algorithm Settings
- Note: ECHO series miners currently don’t support algorithm switching
- Always mines using its native algorithm for peak performance
Pro Tip: Regularly check these settings to optimize performance and prevent downtime!
System Page
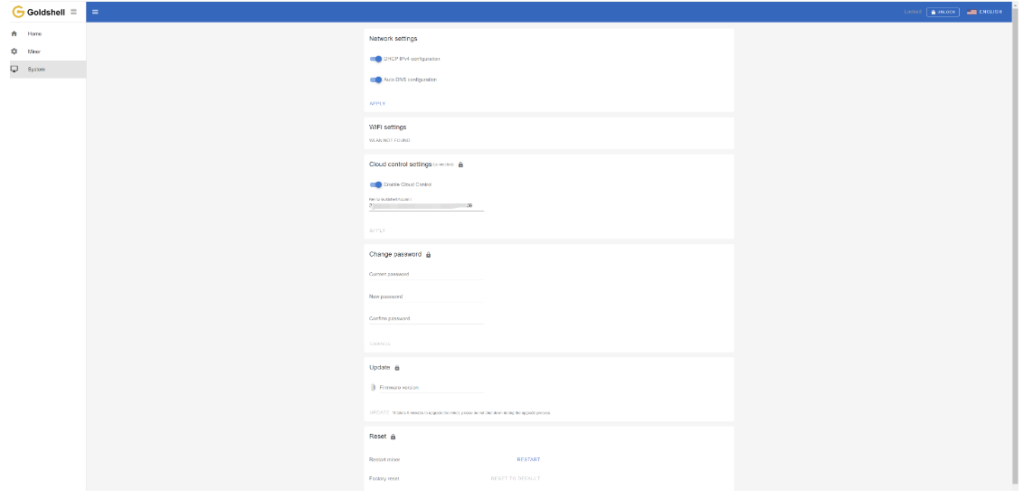
System page includes Network settings, WiFi settings, Cloud control settings, Change password, Update miner firmware, Reset and Restart miner.
Network Settings: As previously mentioned, you can set your network here.
Cloud control settings:
Check how to use the cloud control.


Change password:As previously mentioned, you can change password here.
Update: You can upgrade the miner firmware here.
Restart miner: Click the [Restart] button, the miner will restart.
Factory reset: Click the [Reset] button, the miner will restore to its factory settings. All configuration information will be lost after the miner is restored to factory settings.
How to Troubleshoot Common Issues with the E-AE1M?
Stuck with a problem? Don’t worry—most miner issues can be fixed with a few simple checks! Here’s how to diagnose and resolve the most frequent hiccups.

🌐 Can’t Connect to the Network?
✅ Check cables & ports – Are Ethernet cables securely plugged in? Any visible damage?
✅ Verify network settings – Correct pool address? No typos in the configuration?
✅ Restart your miner – Sometimes, a quick reboot solves connection glitches!
⚡ Abnormal Hashrate?
✅ Check pool settings – Ensure you’re connected to the right mining pool.
✅ Monitor temperature – Overheating throttles performance—keep cooling optimal!
✅ Test power stability – Voltage drops? Try a different outlet or PSU.
🔌 Miner Won’t Power On?
✅ Inspect the power supply – Is the PSU working? Try another one if possible.
✅ Check power connections – Loose cables? Reseat all power plugs firmly.
✅ Test the power outlet – Plug in another device to confirm the socket works.
What Information Should You Prepare for Customer Support?
Need Support? Here’s How to Get Faster Help!
Before contacting Goldshell team, gather these key details to help resolve your issue quickly:

📋 Essential Information to Provide
🔹 Miner Model & Serial Number – Found on your device or packaging
🔹 Clear Problem Description – What’s happening? (e.g., “Won’t power on,” “Low hashrate,” etc.)
🔹 Operation Logs & Error Messages – Screenshots or text logs help diagnose issues faster
🔹 Full Dashboard Screenshot – Shows hashrate, temps, errors, and other critical stats
🔹 Mining Pool Details – Pool address, worker name, and connection status
🚀 Pro Tips for Faster Support
✅ Double-check connections before submitting a ticket
✅ Note when the issue started – Did it happen after a power outage or update?
✅ Try a quick restart – Sometimes it’s that simple!
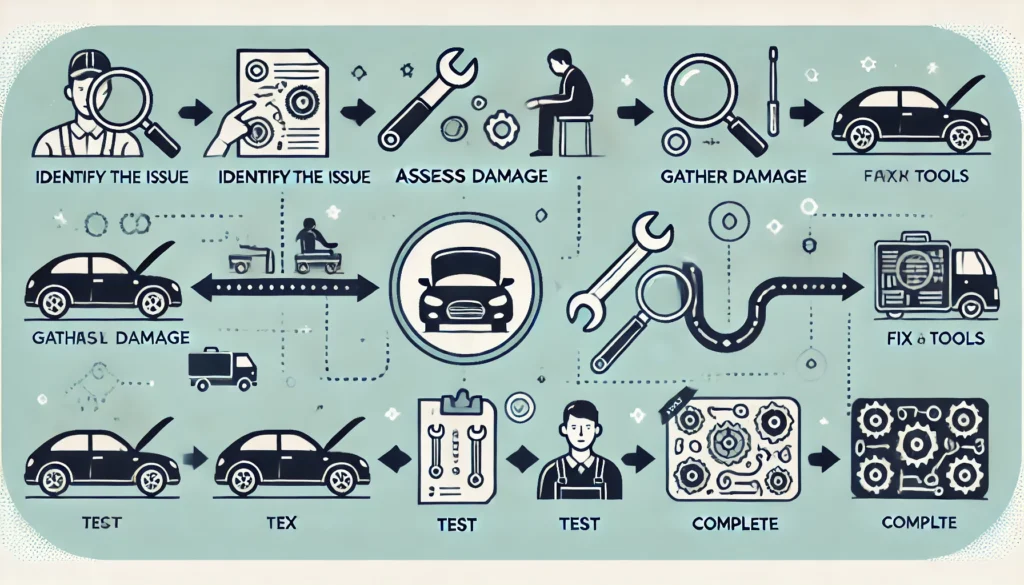
What Is the Repair Process for the E-AE1M?
If your miner needs repair, here’s what to expect.
Contact Goldshell support, provide necessary details, and follow their instructions to send the device for repair.
1️⃣ Contact Goldshell Support Team
📞 How to Reach Goldshell:
- Visit [Goldshell Official Support Page]
- Submit a ticket
Pro Tip: Have your serial number ready for faster service!
2️⃣ Diagnose the Issue
🔍 Goldshell team will:
- Review your device info (model/serial number)
- Analyze your fault description
- Determine if repair is needed
3️⃣ Ship Your Miner (If Needed)
📦 They’ll provide:
- Clear return instructions
- Shipping address details
- Packaging guidelines to prevent transit damage
4️⃣ Expert Repair & Testing
🛠️ Their technicians will:
- Fix all hardware/software issues
- Run full performance tests
- Ensure mining-ready condition
5️⃣ Fast Return Delivery
🚚 Your fully repaired miner will be:
- Professionally packaged
- Shipped via reliable courier
- Trackable via provided tracking number
Pro Tip: Keep your original packaging for easier returns!
Conclusion
The Goldshell E-AE1M is a powerful yet beginner-friendly miner. By following this guide, you should be up and running in no time. Happy mining!
🔗 Want more crypto mining guides? Click here for more helpful resources and support!
