
What Should You Do Before Setting Up ElphaPex DG1+?
Meet the DG1+ – Elphapex’s newest ASIC monster, built to crush Litecoin (LTC), Dogecoin (DOGE), and Bells (BEL) mining like a boss.
🔥 14.4 GH/s Hashrate – Mines faster than you can say “To the moon!”
⚡ 0.27 J/MH Efficiency – Sips power like a fine espresso, not a power-guzzling beast.
💸 Max Profit Mode – Because more coins + less electricity = happy miner.
Whether you’re a crypto pro or just stacking DOGE for memes, the DG1+ is your ticket to mining glory. Plug in, power up, and watch the crypto roll in! 🚀
Now that you’re familiar with the ElphaPex DG1+, let’s dive into the step-by-step setup process to get your miner up and running smoothly.

Before you power up your Elphapex DG1+ Scrypt ASIC miner, take 2 minutes to run this essential pre-use checkup. A quick inspection now can prevent costly downtime, protect your warranty, and ensure peak mining performance for Litecoin (LTC), Dogecoin (DOGE), and Bells (BEL).
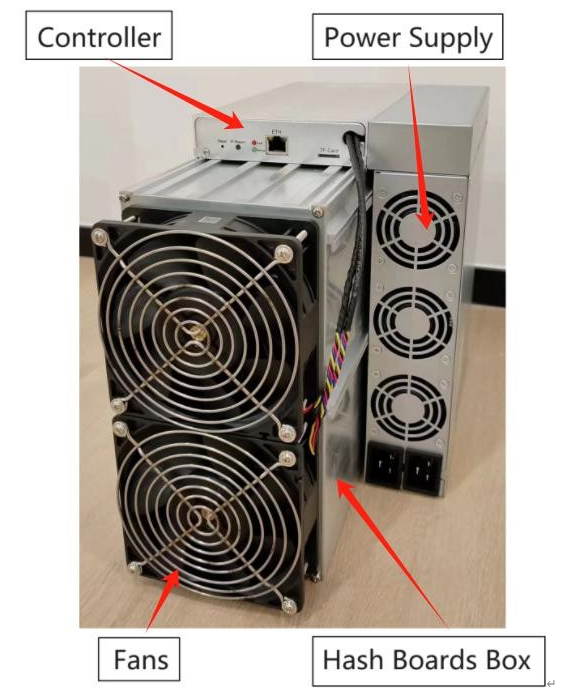
🔍 Step 1: The 60-Second Visual Health Check
Give your miner a quick once-over to catch any red flags before they become expensive problems:
✅ Housing Condition – Look for dents, cracks, or scratches (did shipping play football with your miner?).
✅ Cooling Fans – Are all fan blades intact and secure? A broken fan = overheating = bad news.
✅ Internal Sounds – Gently shake your miner. If it rattles like a maraca 🎵, something’s loose inside!
⚠️ Step 2: Problem Detected? Act Fast!
If you spot anything suspicious, here’s what to do:
1️⃣ Document Everything – Take clear photos/video (evidence is key for warranty claims!).
2️⃣ Contact Elphapex Support ASAP – The sooner you report it, the faster we fix it.
🚫 Critical Warning: Don’t Void Your Warranty!
🔐 Tamper-Proof Seals = Warranty Armor – If you break them, your coverage disappears.
🔧 No DIY Repairs! – Opening the miner yourself = instant warranty void. Leave it to the pros!
💡 Pro Tip: Early Detection = Less Downtime
A 5-minute inspection today can save you days of lost mining profits later. Think of it like checking your car’s oil – skip it, and things get ugly fast!

Before firing up your server, follow these essential cable and power rules to keep it running smoothly (and avoid any “oops” moments).
🔌 Power & Cable Must-Dos
✅ Double-Power Connection – Plug both power sockets into separate outlets for backup safety. One power cut won’t take you down!
✅ Grounded & Accessible – Always use a properly earthed socket (no sketchy extensions!). Keep it within reach for quick shutdowns.
✅ No Peeking Inside! – Do NOT remove the cover while running. Those screws aren’t just for looks—they keep your server safe and sealed.
🚫 Big No-Nos
❌ Don’t Yank Cables – Those tied cables and screws? They’re there for a reason. Mess with them, and you risk chaos.
❌ Never Half-Power Down – Shutting off? Disconnect ALL power inputs. Partial power = potential problems.
💡 Pro Tip: Every Server’s Different
“But my last server…” Nope! Follow THIS server’s manual—settings vary, and guessing can get expensive.
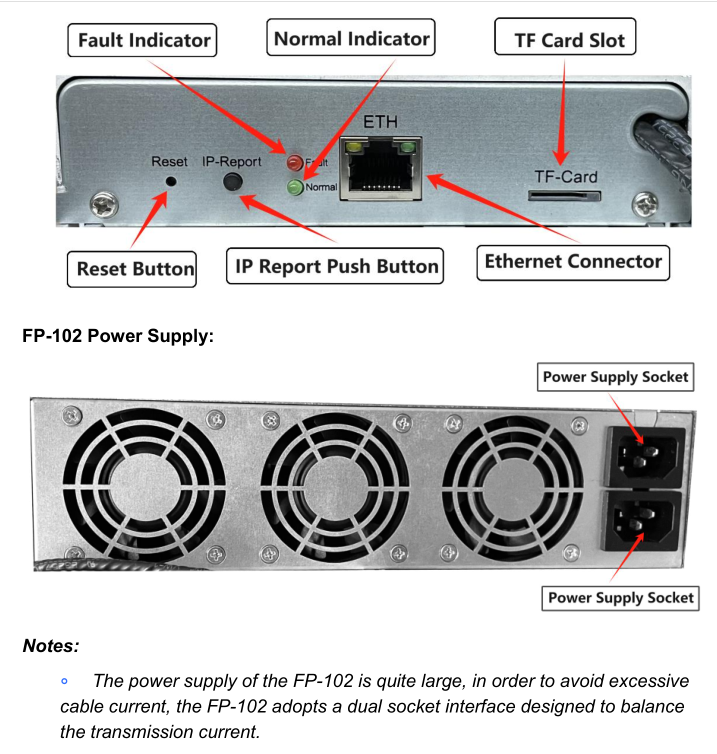
Caution: Wrong input voltage may probably cause equipment damaged (Power supply AC input voltage, Volt:200-240)
Max condition: temperature 0-40°C, altitude 0m.
Ensure that two power cables are used at the same time. The typical current of each cable is 16A.
In the altitude range of 900 ~ 2000m, the maximum operating temperature drops by 1℃ for every 300m increase.
How to Set Up Your ElphaPex DG1+ for Mining?
ElphaPex Miner Configuration Guide
Prerequisite:
Skip this process if you already know your miner’s IP address and can access its web interface directly.
Step-by-Step Setup:
- Download Software
- Get the ElphaPexTool package from www.elphapex.com
Note: Currently only compatible with Windows OS
- Get the ElphaPexTool package from www.elphapex.com
- Prepare the Tool
- Extract the downloaded files
- Launch
ElphaPexTool.exe
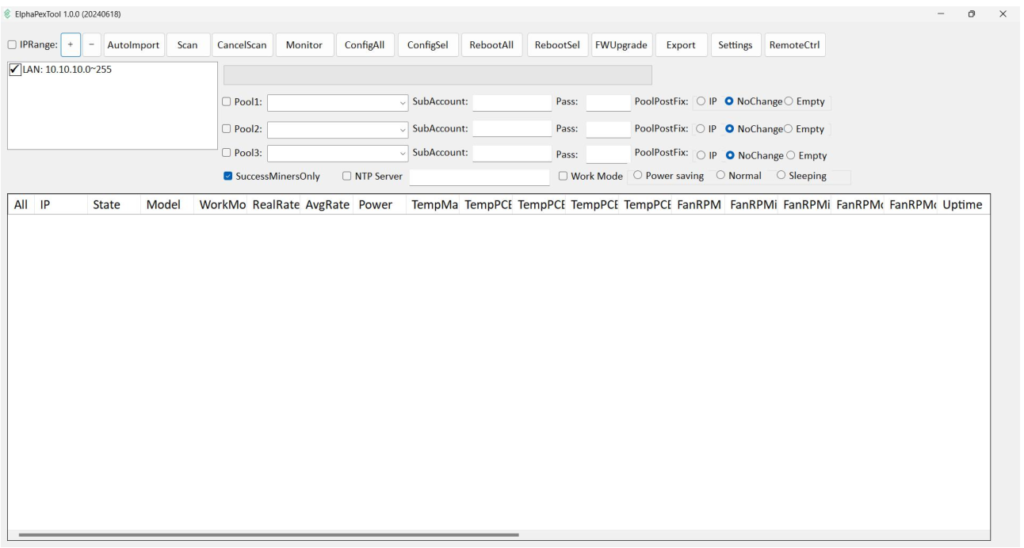
- Network Setup
- Click the 【+】 button to add your network segment range
Critical: Host computer and miner must be on the same local network (wired or wireless)
- Click the 【+】 button to add your network segment range
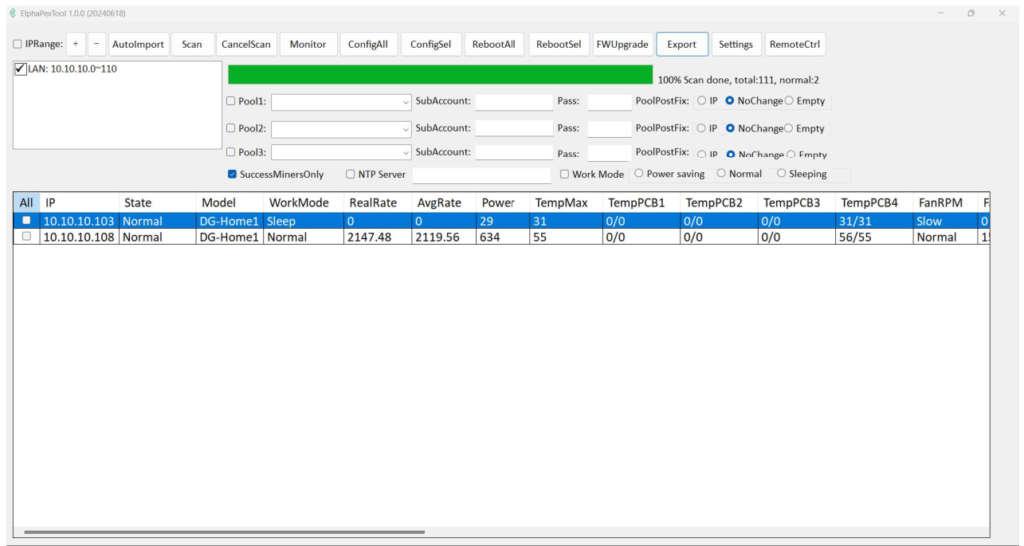
- Scan for Devices
- Press “Scan” to display all detected servers in your network
- Access Web Interface
- Double-click your miner from the list to open its web interface
- Login
- Username:
root - Password:
root
- Username:
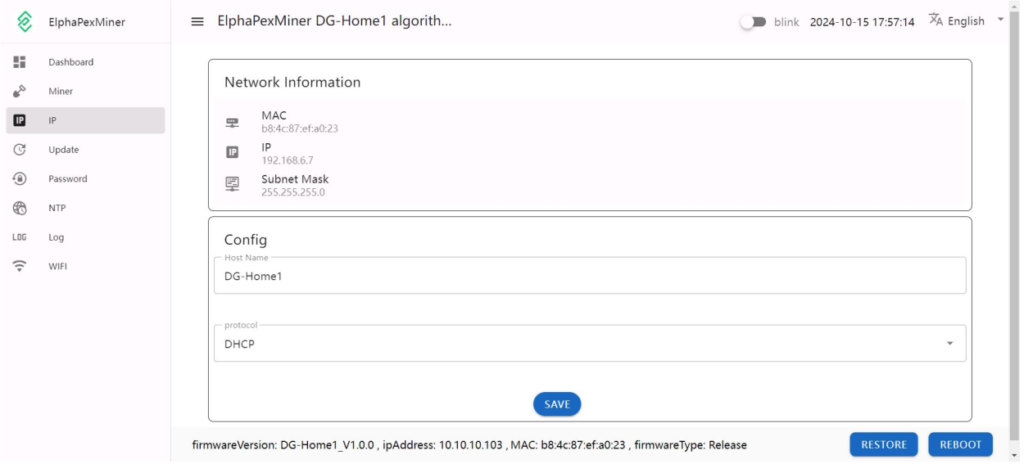
- Network Configuration (Optional Static IP)
- Navigate to IP settings section
- Enter:
• IP Address
• Subnet Mask
• Gateway
• DNS Server - Click “SAVE” to apply settings

Server Configuration
Pool Configuration
1.Enter server web page, click Miner Section:
Note that please DO NOT adjust the fan speed by yourself although it can be configured. The server itself will tune the fan speed automatically going along with the environment temperature changes.
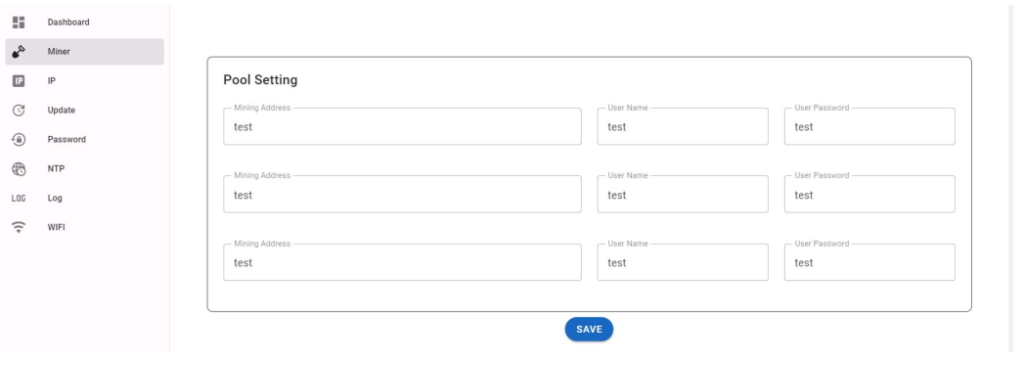
2.Set the options according to the following table:
| Option | Description | Format/Example |
|---|---|---|
| Mining Address | Pool server address | stratum+tcp://pool.example.com:3333 |
| User Name | Worker ID on the mining pool | your_username.worker1 |
| User Password | Password for the worker (if required) | x (or leave blank if not needed) |
The DG1+ server can set up three mining pools(pool 1 to pool 3) at the same time.
The priority of pools 1 through 3 is reduced in turn, and when a pool with a higher priority is offline, a pool with a lower priority will be put into use
3.Click SAVE after the configuration.
Server Monitoring
1.Click dashboard to check the server status
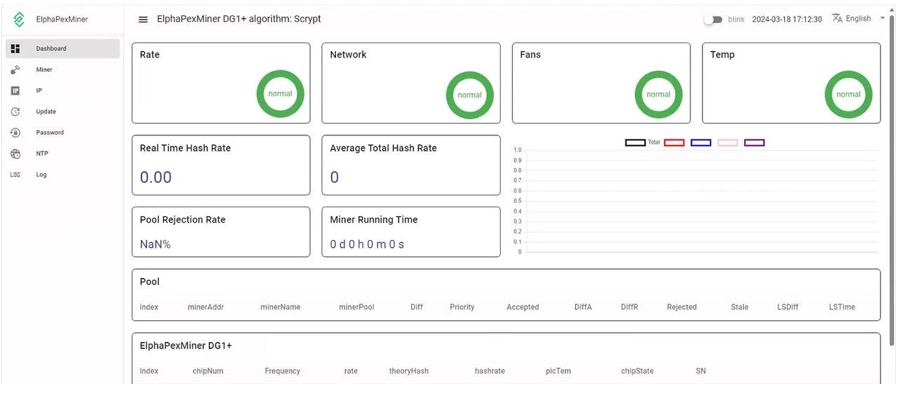
Note:
1.When the temperature of the outlet reaches 85 ℃, the temperature control policy of the DG1+ server will activate the high temperature protection and the mining process will stop
2.Monitor your server according to the descriptions in the following table:
| Option | Description |
| chipNum | Number of chips detected in the chain. |
| Frequency | ASIC frequency. |
| rate | Network level hash rate of each hash board (MH/s). |
| theoryHash | Theoretical hash rate of each hash board (MH/s). |
| hashrate | Board level hash rate of each hash board (MH/s). |
| picTem | Onboard Temperature of each hash board(inlet/outlet) (°C). |
| chipState | Chip operating state NormalAbnormal |
| SN | Series Number of each hash board |
Server Management
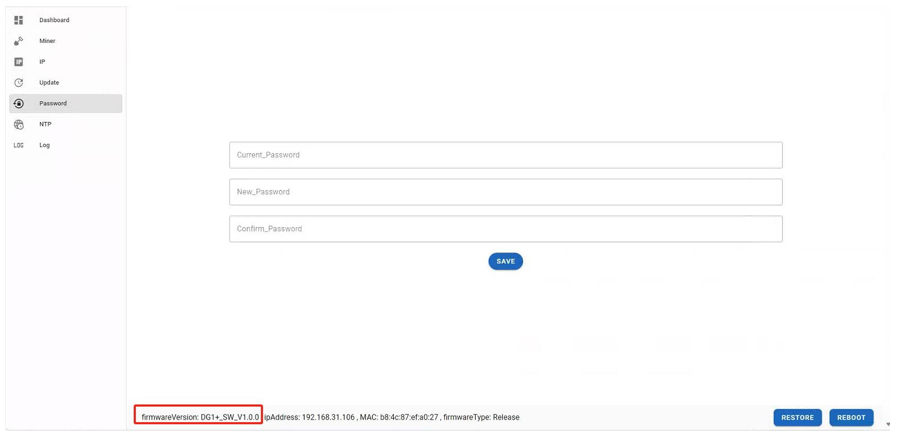
Firmware Version Check
1.Enter the backstage web site of your server, find the firmware version on the bottom.
2.firmwareVersion displays the current release version your server uses. In the examples below, the server is using firmware version: DG1+_SW_V1.0.0
System Update
Notes:
During the firmware upgrade, ensure that the server remains powered on and no other operations are conducted.
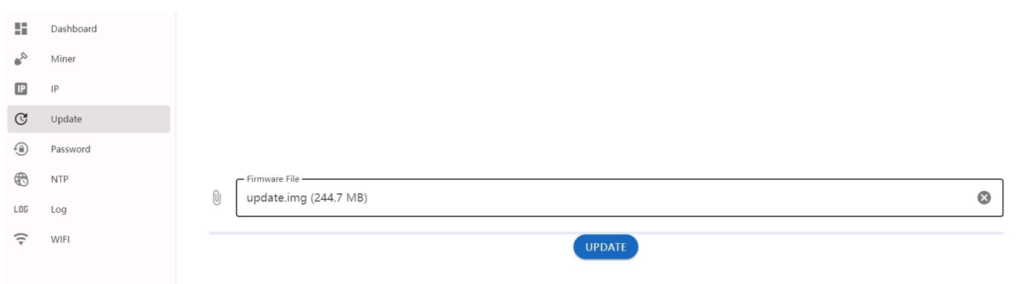
The DG 1+ server provides support for firmware upgrades using the .img and .zip file extensions.
- In Web site page, click Update to enter the firmware upgrade page.
- Click Firmware File input field, select the .img or .zip firmware file, and then click UPDATE, The server will start the firmware update process.
- When the update process is completed, the server will restart and it will turn to the Dashboard page.
Password Change
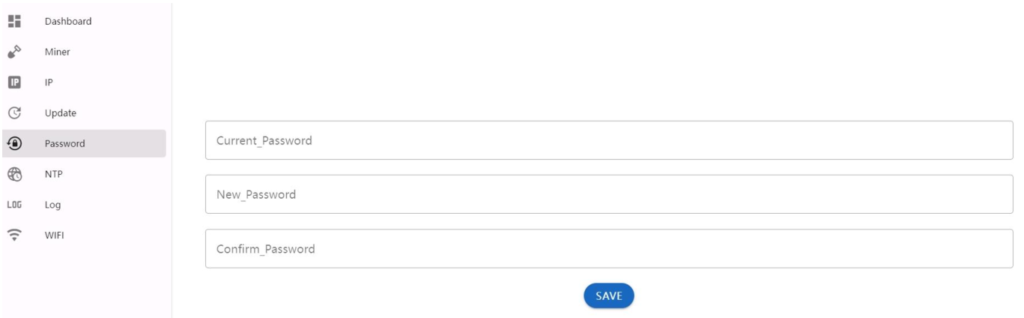
1.In Web site page, click Password.
2.Enter the current password and the new password, then click SAVE.
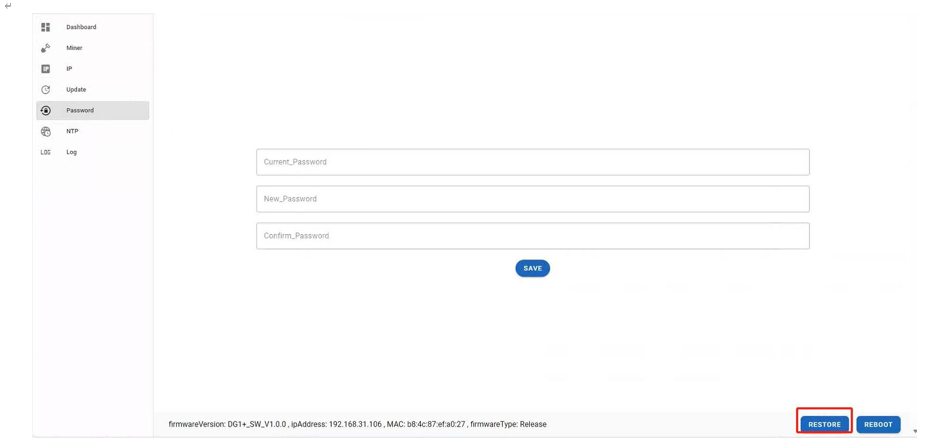
Restoring Initial Settings
In Web site page,Click RESTORE button
Note:The RESTORE operation will clear the pool Settings and restore the original password. Exercise caution when performing this operation.
How to Troubleshoot Common Issues with the ElphaPex DG1+?
Encountering issues? Here’s how to diagnose and fix common problems.
Common issues include network connectivity, abnormal hash rates, and power failures, which can often be resolved with simple checks.

ElphaPex DG1+ Troubleshooting Guide: Fix Common Issues Fast
1️⃣ Network Connection Issues
❌ Symptom: Miner fails to connect to the network
✅ Solutions:
✔ Inspect Ethernet cables for damage or loose connections
✔ Verify router/switch port functionality
✔ Restart miner and networking equipment
✔ Check for duplicate IP addresses in local network
2️⃣ Poor Mining Performance
❌ Symptom: Low hashrate or unstable operation
✅ Solutions:
✔ Confirm correct mining pool address & port (e.g., stratum+tcp://pool.example.com:3333)
✔ Maintain optimal operating temperature
✔ Test with a stable power supply
✔ Ensure proper airflow and cooling around the device
3️⃣ Power Supply Problems
❌ Symptom: Miner does not power on
✅ Solutions:
✔ Test the power outlet with another device
✔ Inspect power cables for damage
✔ Try a different power cord (if available)
✔ Check circuit breakers or power distribution unit
What Information Should You Prepare for Customer Support?
When contacting support, having the right information can speed up the process.
Prepare your miner’s model, serial number, a description of the issue, and any relevant logs or error messages.

For efficient troubleshooting and warranty service, please provide the following details:
- Device Identification
- Full product model name/number
- Valid serial number (located on device label)
- Current firmware version
- Fault Documentation
- Detailed symptom description including:
- Error codes/messages observed
- Device behavior patterns
- Timeline of issue occurrence
- Detailed symptom description including:
- Diagnostic Data
- Complete system logs (last 24 hours preferred)
- Screenshots showing:
- Full miner dashboard interface
- Temperature/power statistics
- Error notification popups
- Mining Configuration
- Pool connection details:
- Stratum URL and port
- Worker naming convention
- Difficulty settings
- Network topology diagram (if complex setup)
- Pool connection details:
- Additional Evidence
- Video documentation of the issue (recommended)
- Previous maintenance records
- Environmental conditions (temp/humidity)
What is the Repair Process for the ElphaPex DG1+?
If your miner needs repair, here’s what to expect.
Contact ElphaPex support, provide necessary details, and follow their instructions to send the device for repair.
- Service Initiation
- Submit repair request through ElphaPex official support channels:
- Diagnostic Phase
- Complete technical questionnaire
- Provide required diagnostic materials:
- Device identification data
- Error logs and visual evidence
- Configuration details
- Receive preliminary fault assessment
- RMA Processing
- Obtain Return Merchandise Authorization (RMA) number
- Follow secure packaging guidelines
- Ship using approved carriers with tracking
- Service Center Operations
- Comprehensive diagnostic testing
- Component-level repair/replacement
- Firmware update to latest stable version
- Device Return
- Quality assurance certification
- Return shipment with full tracking
- Delivery confirmation requirement
- Optional on-site reintegration support
Conclusion
The Scrypt mining landscape is highly competitive, and having the right hardware is crucial. The Elphapex DG1+ ensures you stay ahead with:
✔ Higher earnings thanks to top-tier efficiency.
✔ Future-proof mining for LTC, DOGE, and BEL.
✔ Lower operational costs with optimized power usage.
Want to squeeze every last hash from your Elphapex DG1+? Follow these proven steps to boost efficiency, extend hardware life, and maximize your crypto earnings with minimal effort.
Want to stay updated with the latest tips and news about the ElphaPex DG1+? Click here for more helpful resources and support!
