
What Should You Do Before Setting Up 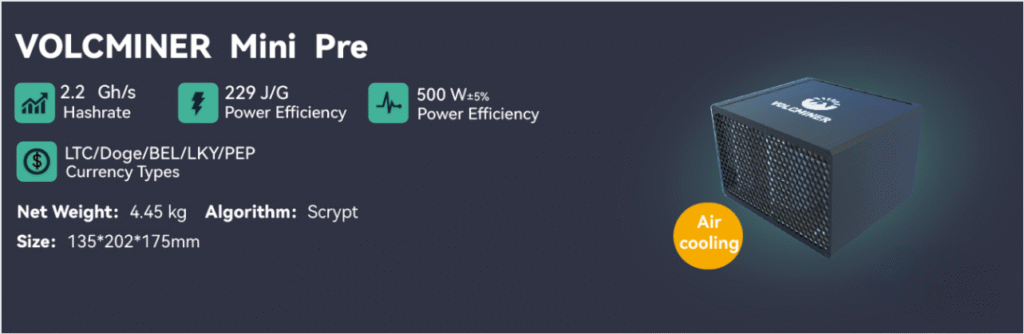
Before you start mining Dogecoin (DOGE) and Litecoin (LTC) with your new VolcMiner D1 Mini Pre, let’s go through the unboxing and initial setup process to ensure optimal performance.
What’s Inside the VolcMiner D1 Mini Pre Box?
When you open your VolcMiner D1 Mini Pre ASIC miner, make sure you have all the essential components for a smooth setup:
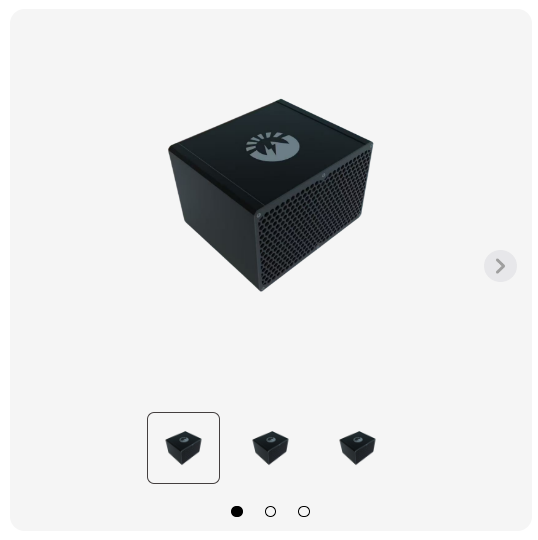
✔ VolcMiner D1 Mini Pre Mining Device – The compact yet powerful Scrypt ASIC miner.
✔ Check your local voltage requirements– Compatible with both 110V and 220V power inputs
✔ Ethernet Cable – For a stable wired internet connection (Wi-Fi is not recommended for mining stability).
✔ User Manual & Quick Start Guide – Essential for troubleshooting and advanced configurations.
Step-by-Step VolcMiner D1 Mini Pre Hardware Setup
Follow these steps to properly install your ASIC miner for maximum efficiency:
1. Choose the Right Location for Your Miner
🔹 Keep it Cool: ASIC miners generate significant heat—place your VolcMiner D1 Mini Pre in a well-ventilated area with good airflow.
🔹 Avoid Dust & Humidity: Dust buildup can cause overheating, reducing lifespan. Consider using an anti-dust filter if needed.
🔹 Stable Surface: Place it on a flat, non-flammable surface away from direct sunlight.
2. Connect the Power Supply Correctly
🔹 Use the Included PSU – Ensure the power supply matches your country’s voltage (110V for North America, 220V for Europe/Asia).
🔹 Secure Connections – Plug the PSU into the miner first, then into a grounded power outlet (avoid power strips to prevent voltage drops).
🔹 Check Power Stability – Fluctuations can damage the miner—consider a UPS (Uninterruptible Power Supply) for protection.
3. Establish a Wired Internet Connection
🔹 Why Ethernet? Mining requires a stable, low-latency connection—Wi-Fi can lead to disconnections and lower profits.
🔹 Connect the Cable – Plug one end into your router/modem and the other into the miner’s Ethernet port.
🔹 Test Connectivity – Once powered on, check if the miner gets an IP address (we’ll cover this in the next section).
Next Steps: Accessing the Miner’s Dashboard & Pool Setup
Now that your VolcMiner D1 Mini Pre is physically set up, the next step is configuring it for mining. In the following section, we’ll cover:
✅ How to Find Your Miner’s IP Address
✅ Logging into the Web Interface
✅ Connecting to the Best Mining Pools (LTC & DOGE)
Stay tuned—or jump to the next section if you’re ready to start mining!
How to Set Up Your How to Find and Set Up IP Address for VolcMiner D1 Mini Pre (Step-by-Step Guide)
Getting your VolcMiner D1 Mini Pre connected to your network is crucial for mining operations. Follow this optimized guide to easily locate and configure your miner’s IP address.
Step 1: Download the IP Reporter Tool
🔹 Visit the official VolcMiner technical support page
🔹 Download the IP Reporter software (Windows compatible)
🔹 Pro Tip: Always download from official sources to avoid malware
Step 2: Install and Run IP Reporter
- Install the software (standard Windows installation process)
- Launch the IP Reporter application
- Keep the program open before proceeding
Step 3: Configure Batch Management (For Multiple Miners)
For users with multiple ASIC miners:
- Set Shelf, Step, and Position values according to your mining farm layout
- Single miner users can skip this and use default values
Step 4: Initiate IP Detection Process
- Click “START” in the IP Reporter software
- Locate the IP Report button on your miner’s control board
- Press and hold until the red indicator light activates
- Release the button when light turns on
Step 5: View and Access Your Miner
✅ The miner’s IP address will appear on your computer screen
✅ Open any web browser and enter this IP address
✅ Default login credentials:
- Username: root
- Password: ltc@dog
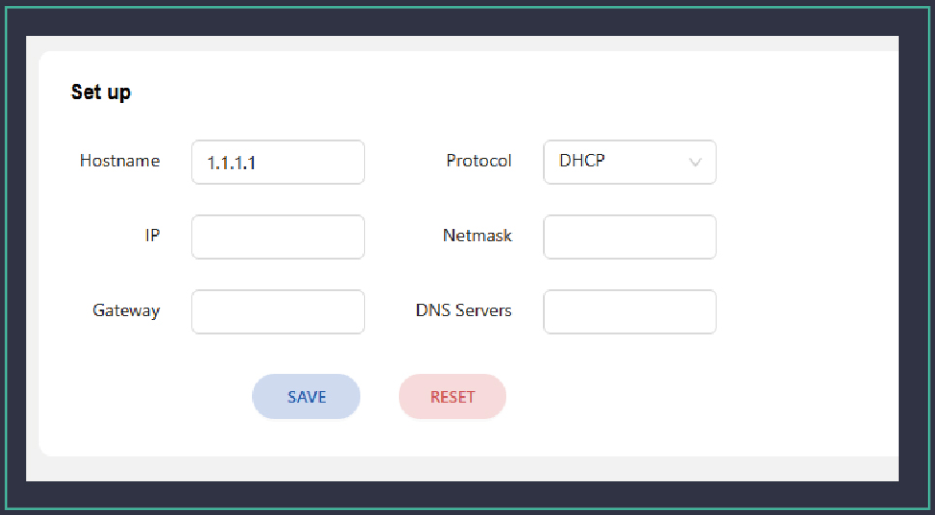
Step 6: Configure Network Settings
Your miner uses DHCP by default, but you can set a static IP for stability:
- After logging in, navigate to:
Configuration → Network Settings
- Choose between:
- DHCP (Automatic IP assignment)
- Static IP (Manual configuration)
- For static IP, enter:
- IP Address
- Subnet Mask
- Gateway
- DNS Server
- Click “Save” to apply changes
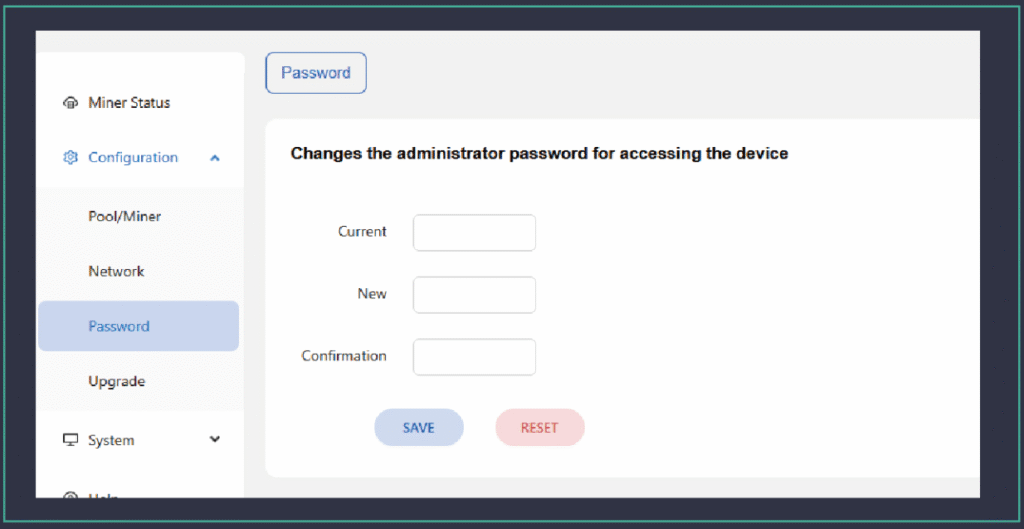
How to log in and set up a password?
1.Log in to the server management interface, the default user name and pass-word are root/ltc@dog

2.Click Configuration-password, enter the current password, and then enter yourpassword, after confirmation, click “Save”, wait for the machine to restart, and thepassword modification is completed
How to set up mining pool and wallet
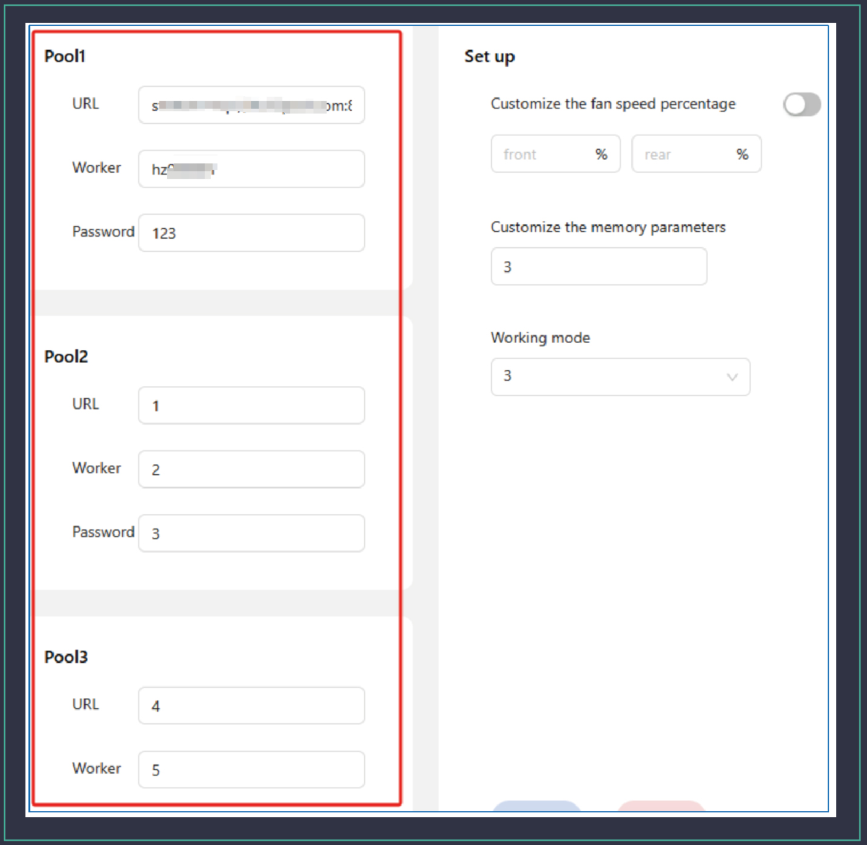
The server supports a maximum of three pool addresses. The priorities areas follows: Pool 1 > Pool 2 > Pool 3
Advanced Configuration
Custom fan speed
By default, the server self-adjusts the fan speed according to the temperatureof the computing board. Users can also set the fan speed according to the per-centage of the maximum fan speed, so that the fan runs at a fixed speed

Work Models
Users can switch different modes according to their own needs
Normal Mode
In this mode, the power consumption ratio parameters are the best

Overlocking Model
In this mode, the mining machine operates at a higher frequency, thereby increas-ing the mining machine’s computing power and income. For users with cheap elec-tricity bills, the income is higher.

Custom memory parameters
It is not recommended that users modify this parameter. 3 is the best memoryparameter value obtained through testing

Usage environment
Power supply
Air Cold Miner-Single-Phase AC Power supply input voltage: 180V~285V Hydro Miner-Three-Phase AC Power supply input voltage: 380V
Environmental requirements:
Operating temperature:-25°C~35°CStorage temperature: -40’C ~70’CWorking humidity (non-condensing):10%~90%RH
Firmware upgrade
SD Card upgrade
Obtain the latest SD card upgrade package from the official website www.volcmin-er.com, copy it into the SD card (FAT format), insert the SD card into the main con-trol SD card slot, and turn on the computer. By default, two LEDs are on duringstartup. After about ten seconds, both LEDs turn off simultaneously, and the SDcard begins to refresh. Once the SD card refresh is complete, the two LEDs lightup again, indicating the refresh was successful. Pull out the SD card after shuttingdown the server.
Network upgrade
Obtain the latest network upgrade package from the official website www.volcmin-er.com, select the upgrade package through the web page, click upload, and select Confirm

The Keep Settings option indicates whether to save the current configurationinformation of the server after the upgrade. lf it is not checked, the mining pool.wallet and other information in the server will be restored to the factory defaultsettings after the upgrade.
Lighting Function
In the site where servers are managed in batches, in order to quickly find the serverand locate the machine location, in the server system/diagnosis page, after clicking[Led on], the machine will keep the traffic light on until [Led off] is clicked or themachine is restarted, the light will go out.

Batch Tool User Manual
Select the machines you want to operate. The batch tool uses the ip seg.ment to specify the machines. lt is recommended that users fix the ip addressto manage the batch machines.
IP block: ip segment
Start/End:indicates the start ip address and end ip addressAfter filling in the lP block and Start/End, click OK and the selected ip will bedisplayed in the following display page:
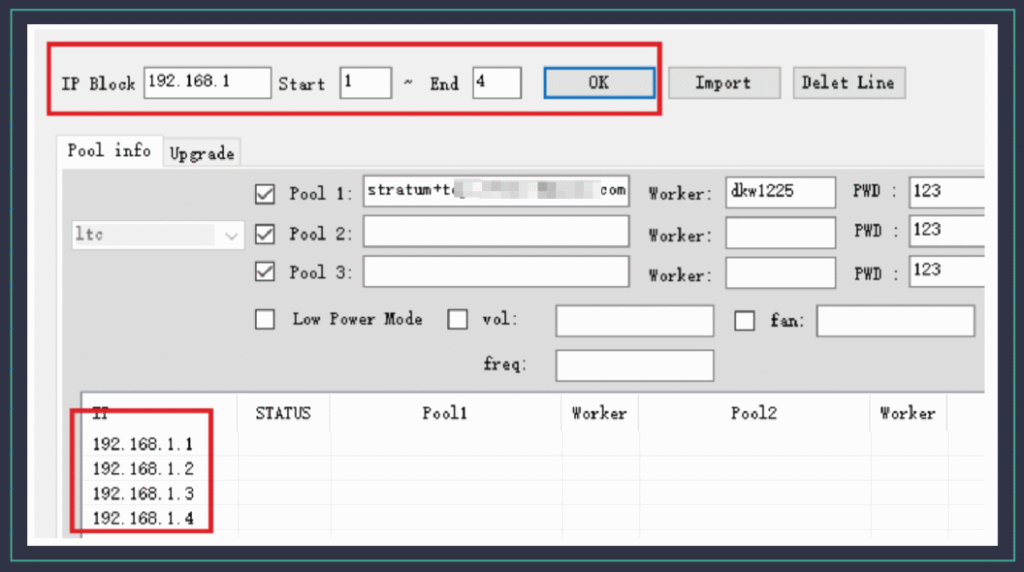
Configure the server information
a) Fill the mining Pool information into the pool and the wallet information into theWorker. Up to 3 groups of mining pools/wallets are supported. lf Suffix needs to beadded to each server Worker, select the lP selection box for Suffix. The default suffixis – as the interval symbol. lf you want to change to. As the interval symbol, manuallyadd full stop mark ., as shown in the picture below:

b) Finally, click the Start button, select “Yes” in the “Are you sure to change poolsdialog box, and then start to configure corresponding machines according to lP.c) The machine operation mode can be selected during the configuration process(only one mode can be selected):

Password use
On the upper right of the tool, you can fill in the password of the machine. lf youdo not fill in the password, you will use the password by default. lf the user haschanged the Password, enter the new password in the Current Password box.

Change passwords in batches
Mining machine password: fill in the current machine passwordNew Password: Fill in the new password you wish to updateConfirm password: Fill in the new password againFill in the lP segment and click OK. At this time, the change password buttonbecomes clickable. Click and select OK
Check the server status
Fill in the ip segment and click OK, click the Check Pools button and the serverstatus will be displayed in the display box.
Batch upgrade firmware
a)Select the Firmware Upgrade button, and the display page switches to theupgrade display screen.
b) Click the Add Firmware button, select the Miner Type/Miner Type as Volcminer,click the Select Firmware button and select the firmware package to be upgraded.c) After the firmware is added to the batch tool, close the Add Firmware dialog boxd) Select Miner Type/Miner type as VolcMiner, select a certain firmware to upload.it is particularly important to keep the configuration box. lf you do not check theupgrade firmware, all data in the machine will be cleared, such as the passwordconfigured by the user, the user’s previous Configured mining pool information.fixed lP, adaptive parameter file, etc. So be especially careful to keep this optionconfigured, it is checked by default.
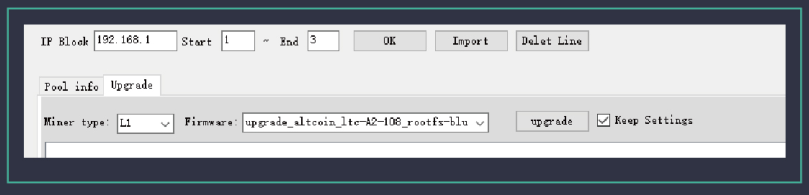
e) Fill in the lP segment information and click OK. Finally, click the upgrade buttonand select OK. The tool will start to upgrade the firmware in batches.
How to Troubleshoot Common Issues with the VolcMiner 
Is your VolcMiner D1 mini Pre underperforming or not working? Follow this fast, step-by-step troubleshooting guide to solve network, performance, and power issues—and get back to mining Litecoin (LTC), Dogecoin (DOGE), and Bells (BEL) at peak efficiency.
1️⃣ Miner Not Connecting to Network? (Fix Fast)
🔴 Symptoms:
- Miner won’t connect to the internet
- No pool connection detected
✅ Quick Fixes:
✔ Check Ethernet cables – Ensure no damage or loose connections
✔ Test router/switch ports – Try a different port or restart networking gear
✔ Reboot miner & network devices – Resets potential glitches
✔ Scan for duplicate IPs – Conflicts can block connectivity
2️⃣ Low Hashrate or Unstable Performance? (Boost Mining Speed)
🔴 Symptoms:
- Slower-than-expected mining speeds
- Frequent disconnections from pool
✅ Quick Fixes:
✔ Verify mining pool URL & port (e.g., stratum+tcp://pool.example.com:3333)
✔ Monitor operating temperature – Overheating throttles performance
✔ Test with a stable power source – Voltage fluctuations hurt efficiency
✔ Improve airflow & cooling – Prevent thermal throttling
3️⃣ Miner Won’t Power On? (Emergency Fixes)
🔴 Symptoms:
- No lights or fan activity
- Miner completely unresponsive
✅ Quick Fixes:
✔ Test power outlet – Plug in another device to confirm it works
✔ Inspect power cables – Look for frayed wires or damage
✔ Swap power cord – Try a known-working cable
✔ Check circuit breakers & PDU – Reset if tripped
🔍 Pro Tip: Prevent Future Issues
Update firmware – Ensures optimal performance
Regularly clean dust buildup – Improves cooling efficiency
Use a surge protector – Protects against power spikes
What Information Should You Prepare for Customer Support?
When contacting support, having the right information can speed up the process.
Prepare your miner’s model, serial number, a description of the issue, and any relevant logs or error messages.

To get quick, accurate support for your VolcMiner D1 mini Pre, please provide these details to our technical team:
1️⃣ Device Identification (Required)
- Full model number
- Serial number (found on the back/bottom label)
- Current firmware version (Check in miner settings)
2️⃣ Problem Documentation (Be Detailed)
- Exact symptoms (What’s happening?)
- Error codes/messages (Screenshot if possible)
- When the issue started (Date/time/frequency)
- Device behavior (Restarts, crashes, performance drops)
3️⃣ Diagnostic Data (Critical for Analysis)
- System logs (Last 24 hours preferred)
- Screenshots of:
- Miner dashboard (full interface)
- Temperature & power stats
- Any error pop-ups
4️⃣ Mining Setup Details
- Mining pool info:
- Stratum URL (e.g.,
stratum+tcp://ltc.pool.com:3032)
- Worker name & password
- Difficulty settings (if customized)
- Network setup (Diagram if using complex configurations)
5️⃣ Additional Evidence (Speeds Up Resolution)
- Video of the issue (Highly recommended)
- Maintenance history (Past repairs/updates)
- Environment conditions:
- Room temperature & humidity
- Cooling system status
Why This Matters for Warranty Claims
✅ Faster response time – Complete info = quicker fixes
✅ Avoid warranty denial – Missing details can delay service
✅ Prevent repeat issues – Helps diagnose root causes
What is the Repair Process for the 
- Service Initiation
- Submit repair request through Volcminer official support channels:
- Diagnostic Phase
- Complete technical questionnaire
- Provide required diagnostic materials:
- Device identification data
- Error logs and visual evidence
- Configuration details
- Receive preliminary fault assessment
- RMA Processing
- Obtain Return Merchandise Authorization (RMA) number
- Follow secure packaging guidelines
- Ship using approved carriers with tracking
- Service Center Operations
- Comprehensive diagnostic testing
- Component-level repair/replacement
- Firmware update to latest stable version
- Device Return
- Quality assurance certification
- Return shipment with full tracking
- Delivery confirmation requirement
- Optional on-site reintegration support
Conclusion
The Click here for more helpful resources and support!
Happy mining! ⛏️💰
✔ Check your local voltage requirements– Compatible with both 110V and 220V power inputs
✔ Ethernet Cable – For a stable wired internet connection (Wi-Fi is not recommended for mining stability).
✔ User Manual & Quick Start Guide – Essential for troubleshooting and advanced configurations.
🔹 Avoid Dust & Humidity: Dust buildup can cause overheating, reducing lifespan. Consider using an anti-dust filter if needed.
🔹 Stable Surface: Place it on a flat, non-flammable surface away from direct sunlight.
🔹 Secure Connections – Plug the PSU into the miner first, then into a grounded power outlet (avoid power strips to prevent voltage drops).
🔹 Check Power Stability – Fluctuations can damage the miner—consider a UPS (Uninterruptible Power Supply) for protection.
🔹 Connect the Cable – Plug one end into your router/modem and the other into the miner’s Ethernet port.
🔹 Test Connectivity – Once powered on, check if the miner gets an IP address (we’ll cover this in the next section).
✅ Logging into the Web Interface
✅ Connecting to the Best Mining Pools (LTC & DOGE)
Getting your VolcMiner D1 Mini Pre connected to your network is crucial for mining operations. Follow this optimized guide to easily locate and configure your miner’s IP address.
Step 1: Download the IP Reporter Tool
🔹 Visit the official VolcMiner technical support page
🔹 Download the IP Reporter software (Windows compatible)
🔹 Pro Tip: Always download from official sources to avoid malware
Step 2: Install and Run IP Reporter
- Install the software (standard Windows installation process)
- Launch the IP Reporter application
- Keep the program open before proceeding
Step 3: Configure Batch Management (For Multiple Miners)
For users with multiple ASIC miners:
- Set Shelf, Step, and Position values according to your mining farm layout
- Single miner users can skip this and use default values
Step 4: Initiate IP Detection Process
- Click “START” in the IP Reporter software
- Locate the IP Report button on your miner’s control board
- Press and hold until the red indicator light activates
- Release the button when light turns on
Step 5: View and Access Your Miner
✅ The miner’s IP address will appear on your computer screen
✅ Open any web browser and enter this IP address
✅ Default login credentials:
- Username: root
- Password: ltc@dog
Step 6: Configure Network Settings
Your miner uses DHCP by default, but you can set a static IP for stability:
- After logging in, navigate to:
Configuration → Network Settings - Choose between:
- DHCP (Automatic IP assignment)
- Static IP (Manual configuration)
- For static IP, enter:
- IP Address
- Subnet Mask
- Gateway
- DNS Server
- Click “Save” to apply changes
How to log in and set up a password?
1.Log in to the server management interface, the default user name and pass-word are root/ltc@dog
2.Click Configuration-password, enter the current password, and then enter yourpassword, after confirmation, click “Save”, wait for the machine to restart, and thepassword modification is completed
How to set up mining pool and wallet
The server supports a maximum of three pool addresses. The priorities areas follows: Pool 1 > Pool 2 > Pool 3
Advanced Configuration
Custom fan speed
By default, the server self-adjusts the fan speed according to the temperatureof the computing board. Users can also set the fan speed according to the per-centage of the maximum fan speed, so that the fan runs at a fixed speed
Work Models
Users can switch different modes according to their own needs
Normal Mode
In this mode, the power consumption ratio parameters are the best
Overlocking Model
In this mode, the mining machine operates at a higher frequency, thereby increas-ing the mining machine’s computing power and income. For users with cheap elec-tricity bills, the income is higher.
Custom memory parameters
It is not recommended that users modify this parameter. 3 is the best memoryparameter value obtained through testing
Usage environment
Power supply
Air Cold Miner-Single-Phase AC Power supply input voltage: 180V~285V Hydro Miner-Three-Phase AC Power supply input voltage: 380V
Environmental requirements:
Operating temperature:-25°C~35°CStorage temperature: -40’C ~70’CWorking humidity (non-condensing):10%~90%RH
Firmware upgrade
SD Card upgrade
Obtain the latest SD card upgrade package from the official website www.volcmin-er.com, copy it into the SD card (FAT format), insert the SD card into the main con-trol SD card slot, and turn on the computer. By default, two LEDs are on duringstartup. After about ten seconds, both LEDs turn off simultaneously, and the SDcard begins to refresh. Once the SD card refresh is complete, the two LEDs lightup again, indicating the refresh was successful. Pull out the SD card after shuttingdown the server.
Network upgrade
Obtain the latest network upgrade package from the official website www.volcmin-er.com, select the upgrade package through the web page, click upload, and select Confirm
The Keep Settings option indicates whether to save the current configurationinformation of the server after the upgrade. lf it is not checked, the mining pool.wallet and other information in the server will be restored to the factory defaultsettings after the upgrade.
Lighting Function
In the site where servers are managed in batches, in order to quickly find the serverand locate the machine location, in the server system/diagnosis page, after clicking[Led on], the machine will keep the traffic light on until [Led off] is clicked or themachine is restarted, the light will go out.
Batch Tool User Manual
Select the machines you want to operate. The batch tool uses the ip seg.ment to specify the machines. lt is recommended that users fix the ip addressto manage the batch machines.
IP block: ip segment
Start/End:indicates the start ip address and end ip addressAfter filling in the lP block and Start/End, click OK and the selected ip will bedisplayed in the following display page:
Configure the server information
a) Fill the mining Pool information into the pool and the wallet information into theWorker. Up to 3 groups of mining pools/wallets are supported. lf Suffix needs to beadded to each server Worker, select the lP selection box for Suffix. The default suffixis – as the interval symbol. lf you want to change to. As the interval symbol, manuallyadd full stop mark ., as shown in the picture below:
b) Finally, click the Start button, select “Yes” in the “Are you sure to change poolsdialog box, and then start to configure corresponding machines according to lP.c) The machine operation mode can be selected during the configuration process(only one mode can be selected):
Password use
On the upper right of the tool, you can fill in the password of the machine. lf youdo not fill in the password, you will use the password by default. lf the user haschanged the Password, enter the new password in the Current Password box.
Change passwords in batches
Mining machine password: fill in the current machine passwordNew Password: Fill in the new password you wish to updateConfirm password: Fill in the new password againFill in the lP segment and click OK. At this time, the change password buttonbecomes clickable. Click and select OK
Check the server status
Fill in the ip segment and click OK, click the Check Pools button and the serverstatus will be displayed in the display box.
Batch upgrade firmware
a)Select the Firmware Upgrade button, and the display page switches to theupgrade display screen.
b) Click the Add Firmware button, select the Miner Type/Miner Type as Volcminer,click the Select Firmware button and select the firmware package to be upgraded.c) After the firmware is added to the batch tool, close the Add Firmware dialog boxd) Select Miner Type/Miner type as VolcMiner, select a certain firmware to upload.it is particularly important to keep the configuration box. lf you do not check theupgrade firmware, all data in the machine will be cleared, such as the passwordconfigured by the user, the user’s previous Configured mining pool information.fixed lP, adaptive parameter file, etc. So be especially careful to keep this optionconfigured, it is checked by default.
e) Fill in the lP segment information and click OK. Finally, click the upgrade buttonand select OK. The tool will start to upgrade the firmware in batches.
How to Troubleshoot Common Issues with the VolcMiner
Is your VolcMiner D1 mini Pre underperforming or not working? Follow this fast, step-by-step troubleshooting guide to solve network, performance, and power issues—and get back to mining Litecoin (LTC), Dogecoin (DOGE), and Bells (BEL) at peak efficiency.
1️⃣ Miner Not Connecting to Network? (Fix Fast)
🔴 Symptoms:
- Miner won’t connect to the internet
- No pool connection detected
✅ Quick Fixes:
✔ Check Ethernet cables – Ensure no damage or loose connections
✔ Test router/switch ports – Try a different port or restart networking gear
✔ Reboot miner & network devices – Resets potential glitches
✔ Scan for duplicate IPs – Conflicts can block connectivity
2️⃣ Low Hashrate or Unstable Performance? (Boost Mining Speed)
🔴 Symptoms:
- Slower-than-expected mining speeds
- Frequent disconnections from pool
✅ Quick Fixes:
✔ Verify mining pool URL & port (e.g., stratum+tcp://pool.example.com:3333)
✔ Monitor operating temperature – Overheating throttles performance
✔ Test with a stable power source – Voltage fluctuations hurt efficiency
✔ Improve airflow & cooling – Prevent thermal throttling
3️⃣ Miner Won’t Power On? (Emergency Fixes)
🔴 Symptoms:
- No lights or fan activity
- Miner completely unresponsive
✅ Quick Fixes:
✔ Test power outlet – Plug in another device to confirm it works
✔ Inspect power cables – Look for frayed wires or damage
✔ Swap power cord – Try a known-working cable
✔ Check circuit breakers & PDU – Reset if tripped
🔍 Pro Tip: Prevent Future Issues
Update firmware – Ensures optimal performance
Regularly clean dust buildup – Improves cooling efficiency
Use a surge protector – Protects against power spikes
What Information Should You Prepare for Customer Support?
When contacting support, having the right information can speed up the process.
Prepare your miner’s model, serial number, a description of the issue, and any relevant logs or error messages.
To get quick, accurate support for your VolcMiner D1 mini Pre, please provide these details to our technical team:
1️⃣ Device Identification (Required)
- Full model number
- Serial number (found on the back/bottom label)
- Current firmware version (Check in miner settings)
2️⃣ Problem Documentation (Be Detailed)
- Exact symptoms (What’s happening?)
- Error codes/messages (Screenshot if possible)
- When the issue started (Date/time/frequency)
- Device behavior (Restarts, crashes, performance drops)
3️⃣ Diagnostic Data (Critical for Analysis)
- System logs (Last 24 hours preferred)
- Screenshots of:
- Miner dashboard (full interface)
- Temperature & power stats
- Any error pop-ups
4️⃣ Mining Setup Details
- Mining pool info:
- Stratum URL (e.g.,
stratum+tcp://ltc.pool.com:3032)
- Worker name & password
- Difficulty settings (if customized)
- Network setup (Diagram if using complex configurations)
5️⃣ Additional Evidence (Speeds Up Resolution)
- Video of the issue (Highly recommended)
- Maintenance history (Past repairs/updates)
- Environment conditions:
- Room temperature & humidity
- Cooling system status
Why This Matters for Warranty Claims
✅ Faster response time – Complete info = quicker fixes
✅ Avoid warranty denial – Missing details can delay service
✅ Prevent repeat issues – Helps diagnose root causes
What is the Repair Process for the
- Service Initiation
- Submit repair request through Volcminer official support channels:
- Diagnostic Phase
- Complete technical questionnaire
- Provide required diagnostic materials:
- Device identification data
- Error logs and visual evidence
- Configuration details
- Receive preliminary fault assessment
- RMA Processing
- Obtain Return Merchandise Authorization (RMA) number
- Follow secure packaging guidelines
- Ship using approved carriers with tracking
- Service Center Operations
- Comprehensive diagnostic testing
- Component-level repair/replacement
- Firmware update to latest stable version
- Device Return
- Quality assurance certification
- Return shipment with full tracking
- Delivery confirmation requirement
- Optional on-site reintegration support
Conclusion
The Click here for more helpful resources and support!
Happy mining! ⛏️💰
✔ Check Ethernet cables – Ensure no damage or loose connections
✔ Test router/switch ports – Try a different port or restart networking gear
✔ Reboot miner & network devices – Resets potential glitches
✔ Scan for duplicate IPs – Conflicts can block connectivity
✔ Verify mining pool URL & port (e.g.,
stratum+tcp://pool.example.com:3333)✔ Monitor operating temperature – Overheating throttles performance
✔ Test with a stable power source – Voltage fluctuations hurt efficiency
✔ Improve airflow & cooling – Prevent thermal throttling
✔ Test power outlet – Plug in another device to confirm it works
✔ Inspect power cables – Look for frayed wires or damage
✔ Swap power cord – Try a known-working cable
✔ Check circuit breakers & PDU – Reset if tripped
Prepare your miner’s model, serial number, a description of the issue, and any relevant logs or error messages.
- Miner dashboard (full interface)
- Temperature & power stats
- Any error pop-ups
- Stratum URL (e.g.,
stratum+tcp://ltc.pool.com:3032) - Worker name & password
- Difficulty settings (if customized)
- Room temperature & humidity
- Cooling system status
✅ Avoid warranty denial – Missing details can delay service
✅ Prevent repeat issues – Helps diagnose root causes
- Service Initiation
- Submit repair request through Volcminer official support channels:
- Diagnostic Phase
- Complete technical questionnaire
- Provide required diagnostic materials:
- Device identification data
- Error logs and visual evidence
- Configuration details
- Receive preliminary fault assessment
- RMA Processing
- Obtain Return Merchandise Authorization (RMA) number
- Follow secure packaging guidelines
- Ship using approved carriers with tracking
- Service Center Operations
- Comprehensive diagnostic testing
- Component-level repair/replacement
- Firmware update to latest stable version
- Device Return
- Quality assurance certification
- Return shipment with full tracking
- Delivery confirmation requirement
- Optional on-site reintegration support
Conclusion
The Click here for more helpful resources and support!
Happy mining! ⛏️💰
