
What Should You Do Before Setting Up Whatsminer Hydro Cooling Miner?
Hey there, crypto miner! 👋 So, you’ve got your hands on a Whatsminer Hydro Cooling Miner—smart move! Whether it’s the M33S+, M53S++, M63S++, or any other hydro-cooled model, you’re about to experience fanless, ultra-quiet, and highly efficient Bitcoin mining.
But how do you set it up? Don’t worry—I’ve got your back. In this step-by-step guide, we’ll walk through unboxing, installation, cooling setup, and maintenance for your hydro-cooling beast. Let’s dive in! 🚀
Why Choose a Hydro-Cooling Miner?
Before we jump into setup, let’s quickly recap why hydro-cooling miners like the M63S++ are game-changers:
✔ No Fans = No Noise – Say goodbye to jet-engine sounds!
✔ Dust-Proof & Sealed – No more clogged-up miners from dirty environments.
✔ Lower Maintenance – Fewer moving parts = fewer breakdowns.
✔ Better Heat Dissipation – Water cooling keeps temps stable for max efficiency.
✔ Eco-Friendly & Scalable – Perfect for large farms and hot climates.
👋 Before you fire up your Whatsminer Hydro Cooling Miner (M63S++, M53S+, or any other model), let’s talk safety first. I know—safety instructions aren’t the most exciting part of mining, but trust me, a few simple precautions can save you from fried circuits, shocks, or worse.
Here’s your no-nonsense safety checklist to keep your miner (and yourself) running smoothly:
1️⃣ Pre-Power Check: Look Before You Leap!
- Give your miner a quick visual inspection—any dents, loose cables, or leaks?
- Check cooling hoses—make sure they’re snug and not cracked.
- Avoid water damage! Keep it away from spills, humidity, or rain. (Yes, even though it’s water-cooled, moisture inside the wrong parts = bad news.)
2️⃣ No DIY Repairs—Call the Pros!
- If something’s wrong, don’t play electrician—seriously.
- Hydro miners have high-voltage components—tinkering inside could mean shocks or permanent damage.
- Stick to basic maintenance (like cleaning dust off radiators) and leave the rest to certified technicians.
3️⃣ Hands Off When Powered On!
- Never touch the miner’s internals while it’s running—those circuits pack a punch!
- Use the power button for reboots—no yanking cables.
4️⃣ Stable Power = Happy Miner
- Avoid sketchy power sources—voltage spikes can fry your ASIC.
- Use a surge protector—cheap insurance against electrical surges.
How to Set Up Your Whatsminer Hydro Cooling Miner?
Overview
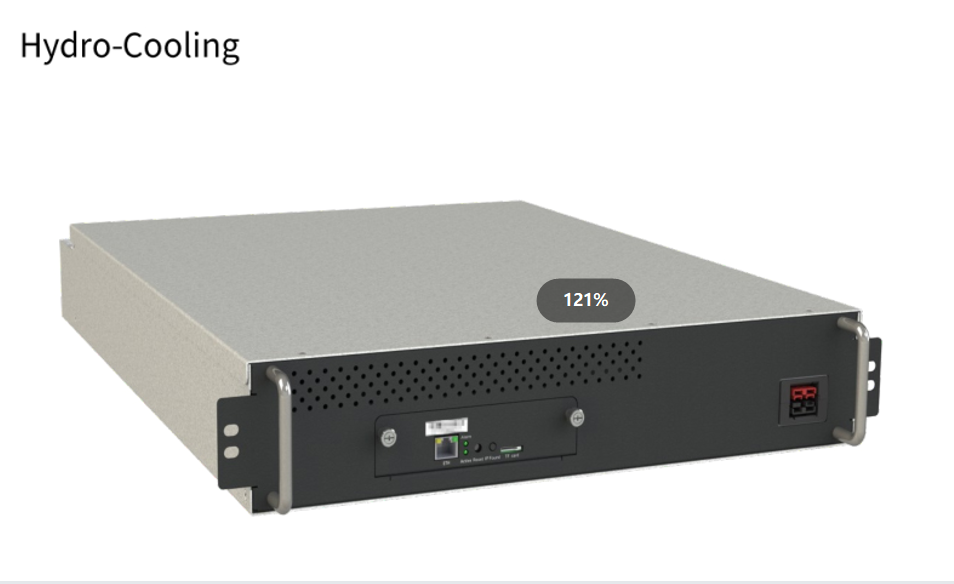
Whatsminer hydro-cooling miner includes multiple models, such as M33S+, M33S++, M53,M53S,M53S+,M53S++,M54S++,M63,M63S, M63S+,M64, M65, and M63S++. In addition toM54S++ and M64, the remaining models of hydro-cooling miners merely differ inperformance and specification, such as power ratio and hashrate, but they are the same inappearance, installation and disassembly methods, operation, and maintenance.Therefore, this Document takes thenewest version M63S++ as an example for introduction.

Different models of hydro-cooling miners have different specifications. For specificparameters, see the corresponding product manual on the official website (WhatsMiner)In terms of environmental parameters, antifreeze parameters, and coolant parameters.these hydro-cooling miners are the same.
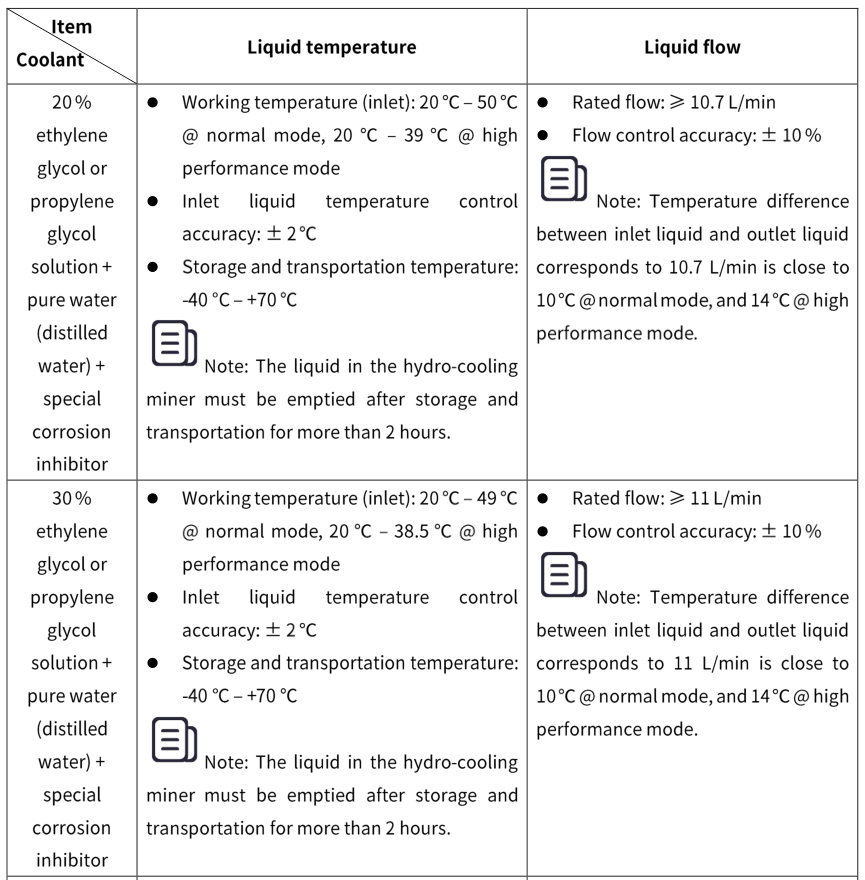
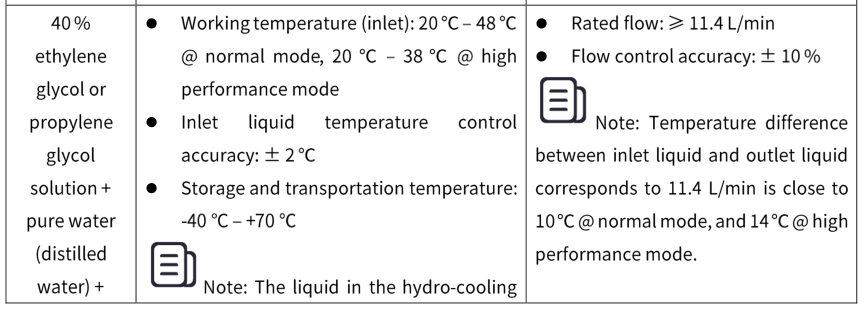
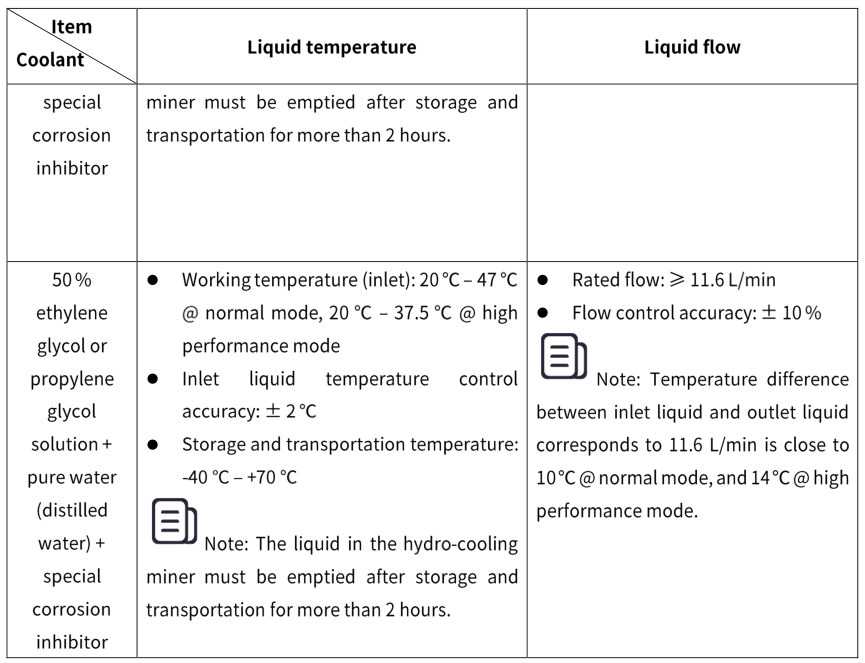
The following table introduces environmental parameters of a hydro-cooling miner, in which liquid refers to coolant.
Table 1-1
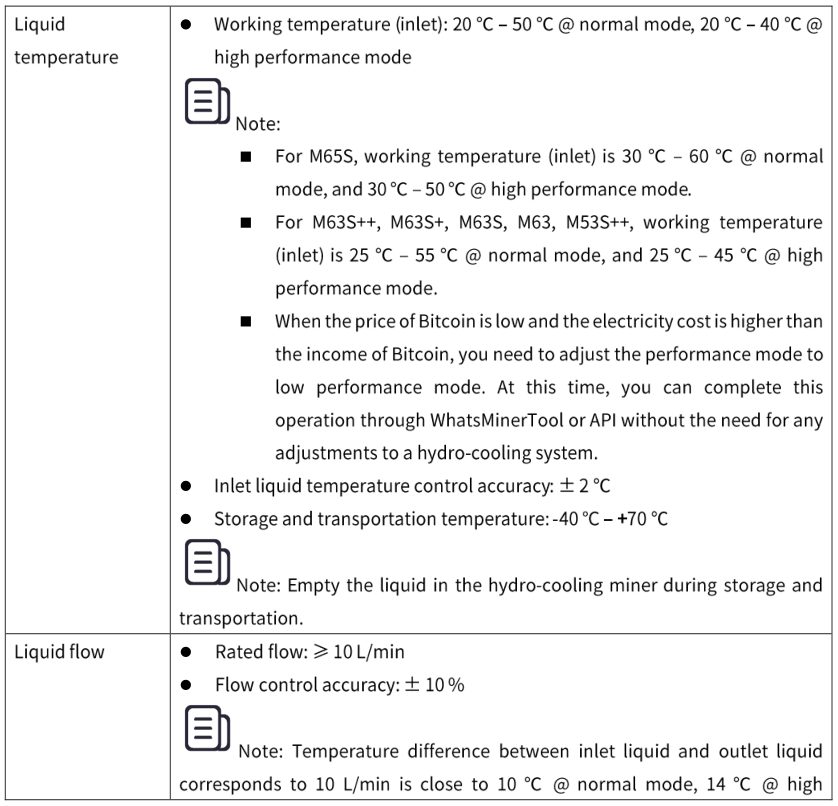
Parameters related to the liquid temperature and liquid flow in Table 1-1 are based on purewater + special corrosion inhibitor as a liquid medium. lf a liquid medium uses pure water+ special corrosion inhibitor + antifreeze, parameters related to the liquid temperature andthe liquid flow of ethylene glycol or propylene glycol solution + pure water (distilled water)+ special corrosion inhibitor are shown in Table 1-2
Table 1-2
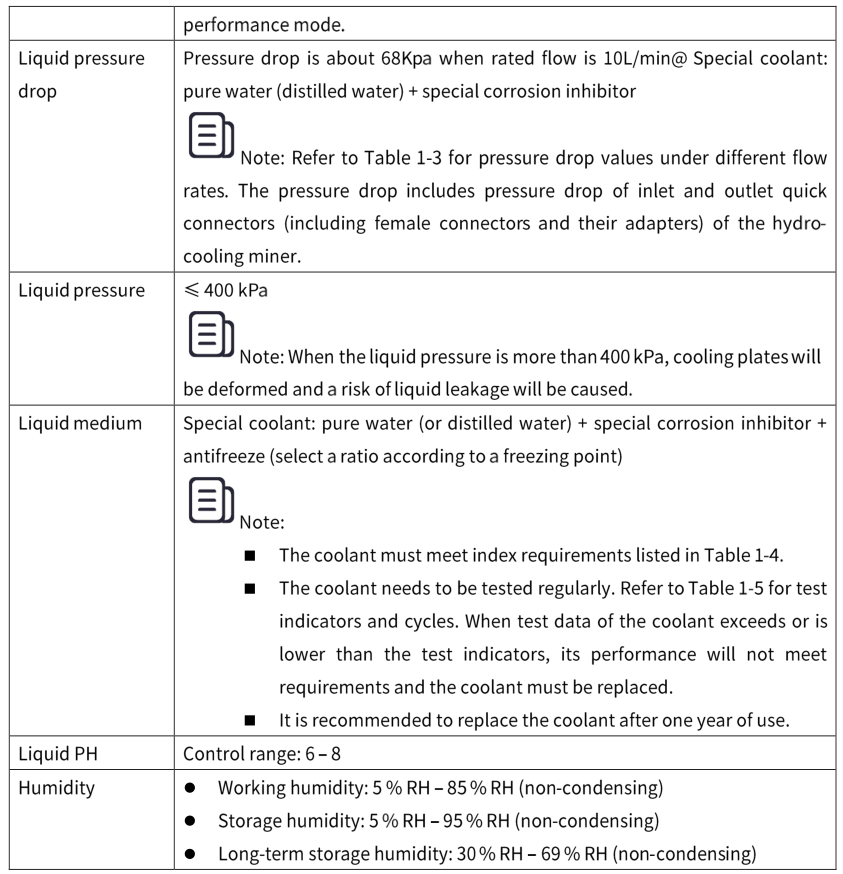
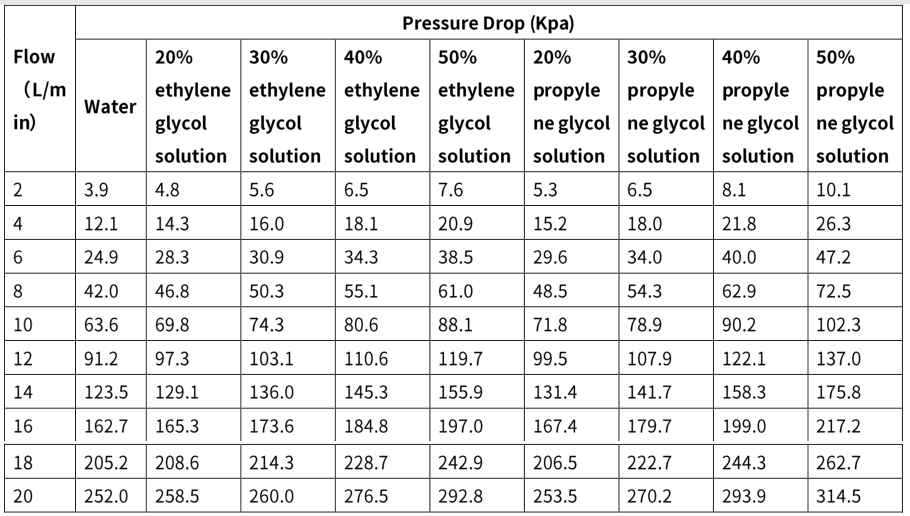
Pressure drop parameters of the hydro-cooling miner for different coolant (at 20 ‘C) atdifferent flow rates are shown in the following table.
Table 1-3
Initial index requirements for coolant and coolant test indicators and cycles are shown inthe following tables.
Table 1-4
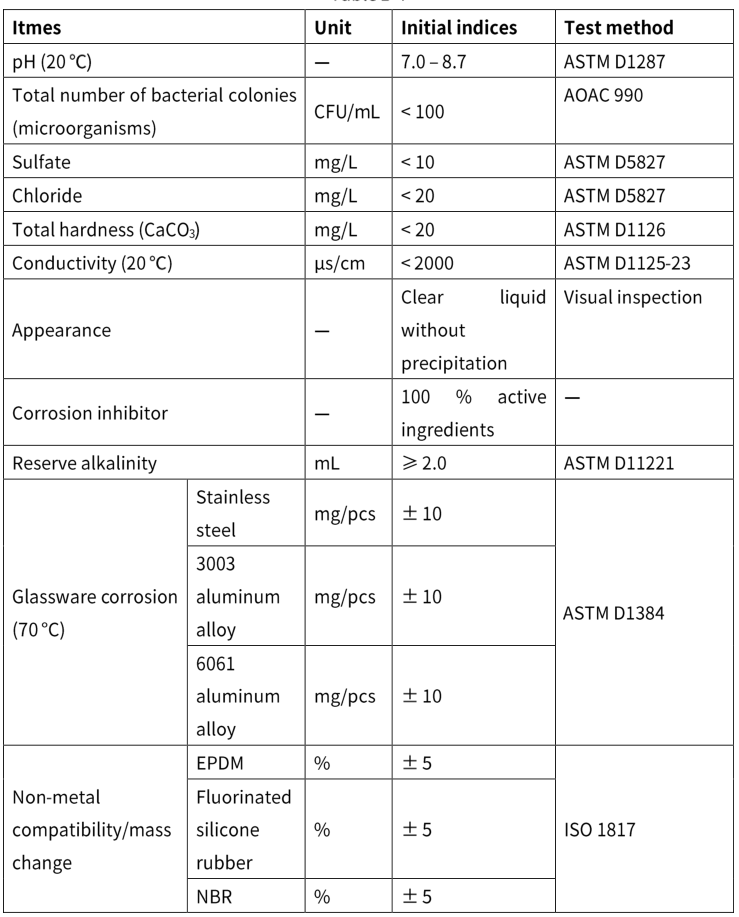
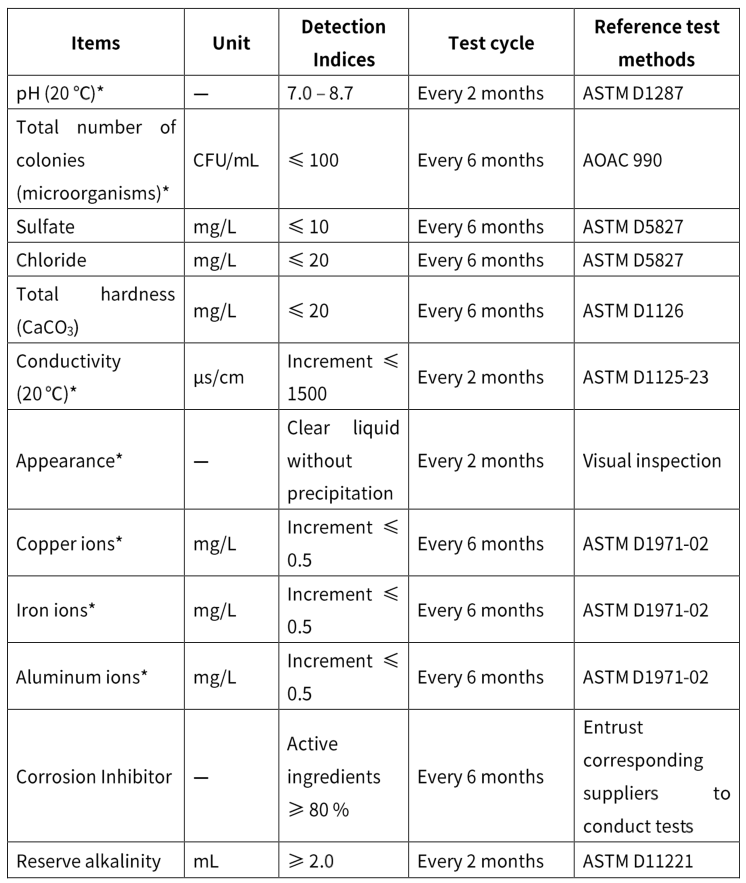
Note:* indicates that this index must be checked.
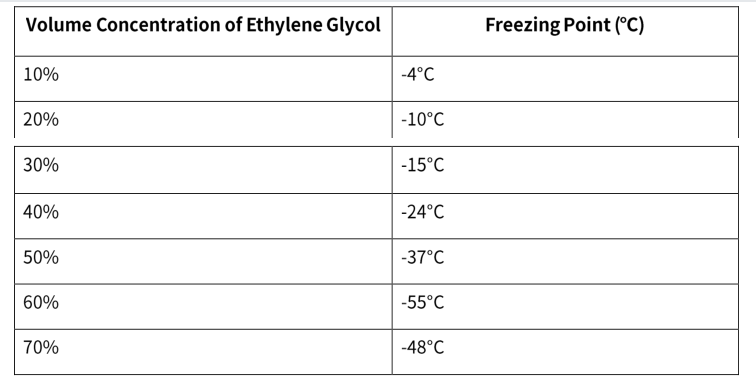
The following table introduces freezing points of ethylene glycol at differentconcentrations.
Table 1-6
Design Considerations of Hydro-Cooling System
A hydro-cooling system uses a closed-loop design in which liquid is circulated through a heat exchanger without coming into contact with electrical components. In the hydro.cooling system, liquid flows through a network of pipes or channels that directly interact with a hydro-cooling miner. As the liquid passes through the hydro-cooling system, it absorbs the generated heat. The heated liquid is then circulated away from the hydro.cooling miner and cooled via the heat exchanger, Once the liquid has released heat and cooled down, it is recirculated back to the hydro-cooling miner to perpetuate a cooling cycle.
Therefore, when you purchase the hydro-cooling miner, the hydro-cooling system isessential. You can choose to purchase our hydro-cooling system, such as Heat Core hydro.cooling system and WANDE hydro-cooling system, and we will provide professionals to build this system for you, so as to help you save time and energy. lf you have any interests.feel free to consult our sales.
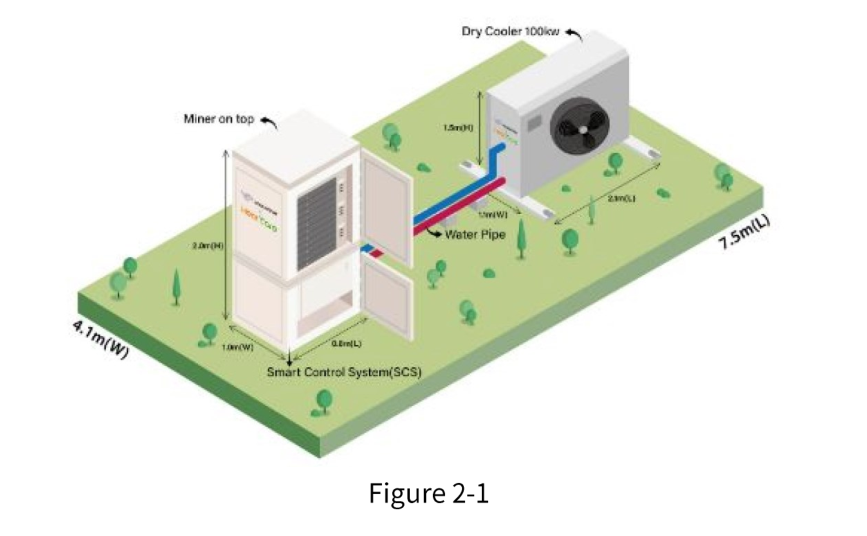
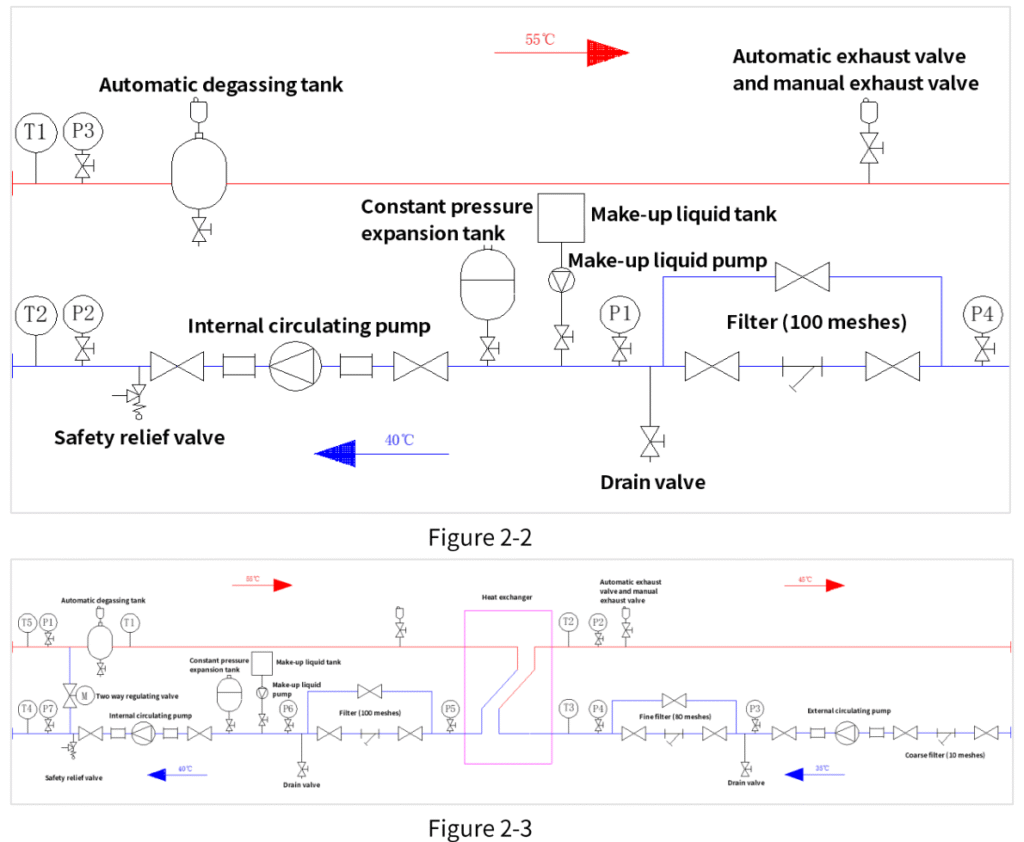
For example, in the Heat Core hydro-cooling system, warm liquid flows through a cooling plate covering a surface of chips to take away heat from chips. The whole system consistsof three parts, including a cabinet, a smart control system (CDU), and a cooling device (drycooler). The system also can be connected with a heat exchanger, without a dry cooler, toprovide heat for various heating scenarios.Every hydro-cooling miner’s connection uses a quick auto-closed connector,and hot plug without any liquid leakage,and for main pipes clamps are used, All pipes and dry coolers use 304L food-grade stainless steel to prevent corrosion and rust. To ensure a stable and suitable liquid temperature flow through hydro.cooling miners, the whole system is automatically controlled by the smart control system,which is equipped with a monitor screen on a front cabinet. The inlet and outlet liquid temperature can be shown on the screen.In the system, there is also a liquid fill tank, whichcan be auto-refilled, and the bubble is auto-removed by the smart control system. The liquid leakage is also auto-detected by the system.The following figure illustrates a simple example.
In addition, you can also build your hydro-cooling system as needed. To be more specific you can choose to build a single cycle hydro-cooling system or a double cycle hydro.coolingsystem.
In the single cycle hydro-cooling system, a hydro-cooling CDU (Cooling Distribution Unit)includes the following components, such as an automatic degassing tank, a safety reliefvalve, a constant pressure expansion tank, a circulating pump, a make-up liquid pump, amake-up liquid tank, a filter, an automatic exhaust valve,a manual exhaust valve, a drainvalve, and the like. In a double cycle hydro-cooling system,the most important component included in the hydro-cooling CDU is a heat exchanger, while other components are similar to those in the single cycle hydro-cooling system. Therefore, when you have necessary components, you can prepare to build a simple hydro-cooling system. The following two figures show examples of CDUs in single cycle and double cycle modes.
Hydro-Cooling System Design Specifications
| Category | Control Requirements / Range | Notes & Warnings |
|---|---|---|
| 1. Inlet Liquid Temperature Control | – Accuracy: ±2°C – Normal Mode: 20°C–50°C – High-Performance Mode: 20°C–40°C | Excessive fluctuations or high temperatures may cause overheating or instability in the hydro-cooling miner. |
| 2. Inlet Liquid Flow Control | – Accuracy: ±10% – Single Miner Flow: ≥10 L/min – ΔT: 10°C (Normal), 14°C (High-Perf.) | Flow fluctuations may cause temperature instability; low flow may lead to excessive outlet temperature, affecting miner performance. |
| 3. Inlet Liquid Pressure Control | Max Pressure: <400 kPa | Excessive pressure may deform cooling plates, damaging the miner. |
| 4. Coolant Medium | – Composition: Pure/Distilled Water + Corrosion Inhibitor + Antifreeze (ratio adjusted for freezing point) – Replacement: Follow Table 1-5 guidelines | Non-compliant coolant may cause rust, corrosion, or blockage in cooling plates/connectors, leading to miner failure. |
| 5. Circulation System | ||
| – Piping Material | Stainless steel recommended; copper prohibited | Copper causes galvanic corrosion; carbon steel welds may rust and clog cooling plates/connectors. |
| – Filtration | – Main line: ≥100 mesh – Optional: 10-micron side filter | Insufficient filtration may allow large particles to block cooling plates/connectors. |
| – Component Temp. Resistance | >85°C | Components with lower heat resistance may leak or fail, damaging the miner. |
| – Circulation Pump | Stainless steel pumps recommended (1 active + 1 standby) | Cast iron pumps may rust, leading to corrosion/blockage in cooling plates/connectors. |
| – Pressure Test & Leak Check | Use air compressor + soap bubble method (avoid water tests in winter) | Water tests in winter require full drainage to prevent freezing damage. Gas tests are more efficient. |
| – Vents & Drain Valves | Auto vents at high points; drain valves at low points; manual vents recommended for faster priming. | Improves initial filling efficiency. |
| – System Cleaning | Flush with deionized water (conductivity <5 μS/cm) for ≤8 hours; drain completely before adding coolant. | Residual impurities or leftover water may affect coolant properties or clog components. |
| – Miner Cleaning | Flush miner channels with deionized water (≤8 hours); drain fully before operation. | Residual contaminants may cause corrosion/blockage. |
| – Pressure Relief Valve | Install 4 bar safety valve (pre-adjusted) | Unadjusted valves may fail to release pressure, risking system overpressure (>400 kPa). |
| – Expansion Tank | Use a pre-adjusted constant-pressure expansion tank | Unadjusted tanks may fail to stabilize pressure, risking miner damage. |
| – Bypass Valve | Recommended on cooling source side | Prevents inlet temperature from dropping below 20°C by mixing cooled fluid with warm return fluid. |
Precautions for Miner In and Miner Out
installation Location
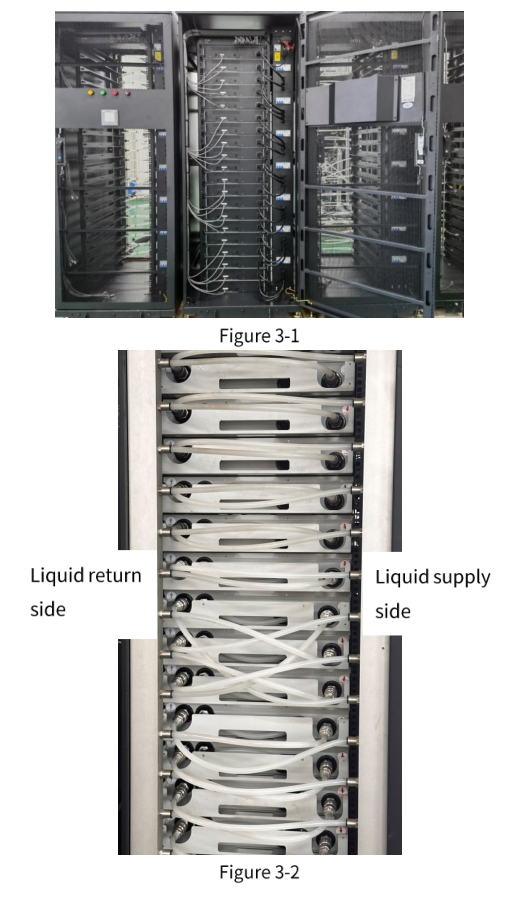
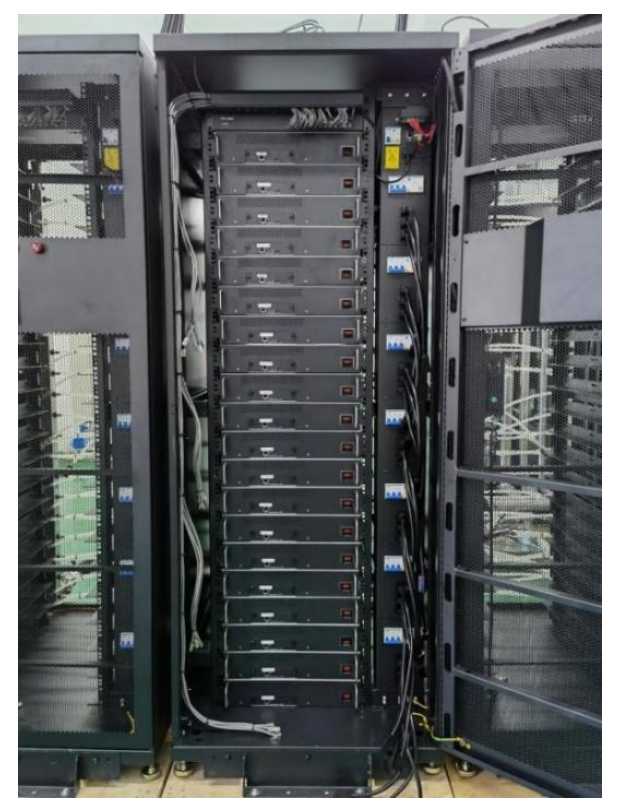
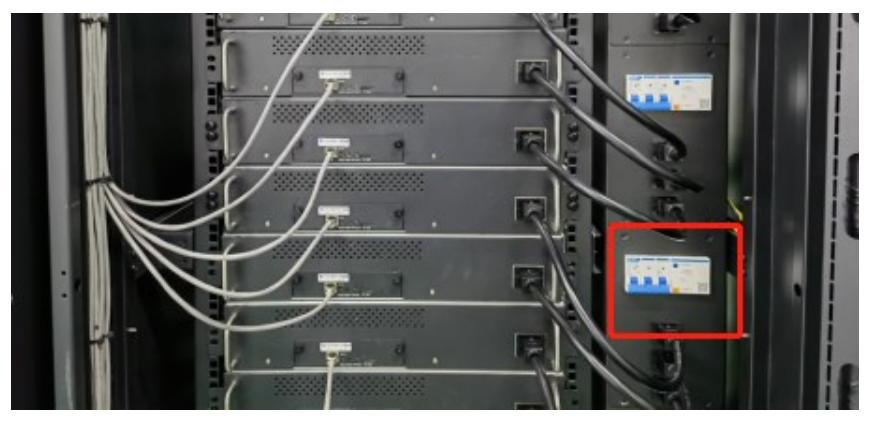
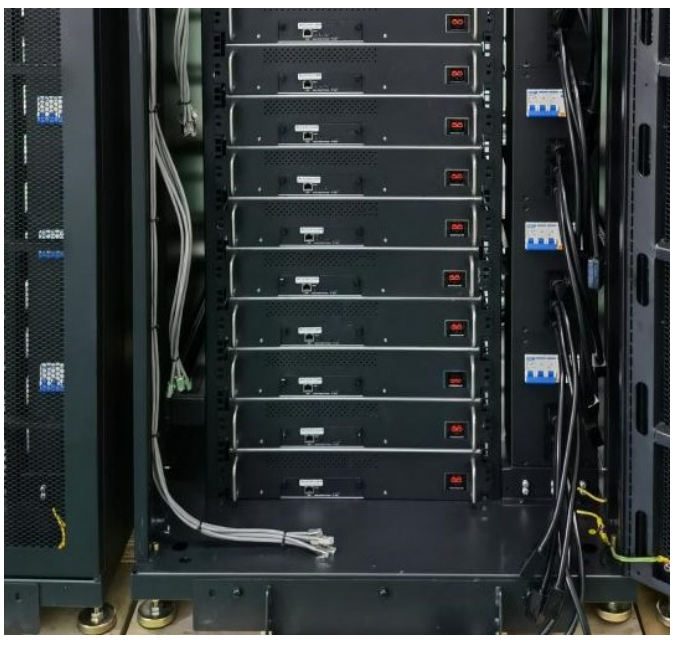
Before putting ahydro-cooling miner in to a cabinet and taking the hydro-cooling miner out the cabinet, you should know an installation position of the miner. Hydro-cooling miners adopt a standard 2u structure design and are installed in a standard 19-inch hydro-cooling cabinet. The front and back of the hydro-cooling cabinet are shown as follows after all hydro-cooling miners are putting into the cabinet.
Hydro-Cooling Miner Installation Guide
| Step | Action | Notes & Cautions |
|---|---|---|
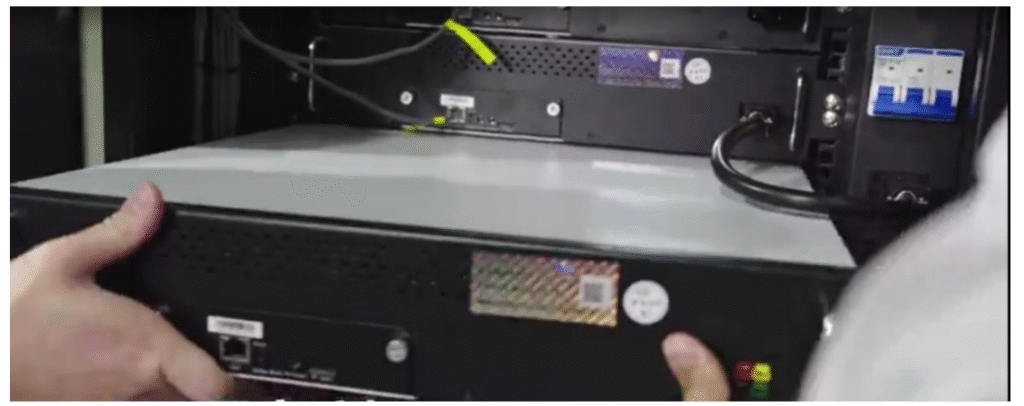
| 1 | Slowly push the hydro-cooling miner into the cabinet along the rack slot. | Note: Requires two people for this operation. |
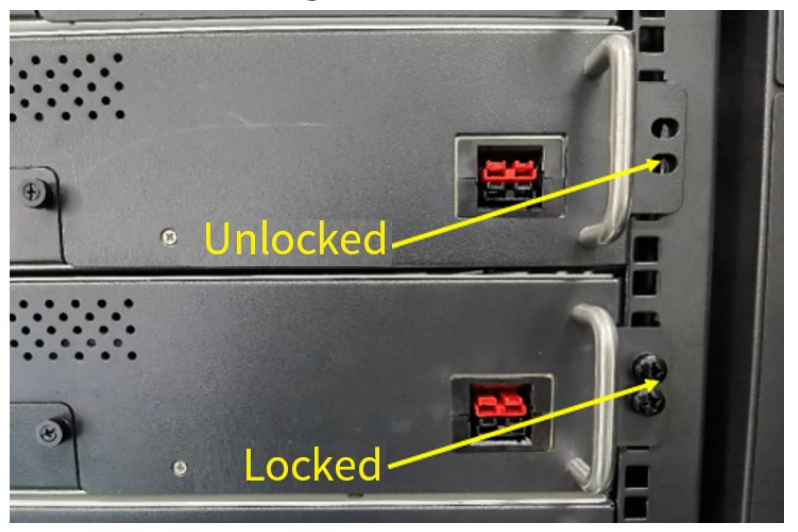
| 2 | Align the fixed holes on the miner’s front panel with the cabinet’s floating nuts, then secure with screws. | Note: Floating nuts are pre-installed in the cabinet. Caution: When transporting the cabinet with miners installed, ensure front-panel screws are fully tightened. |
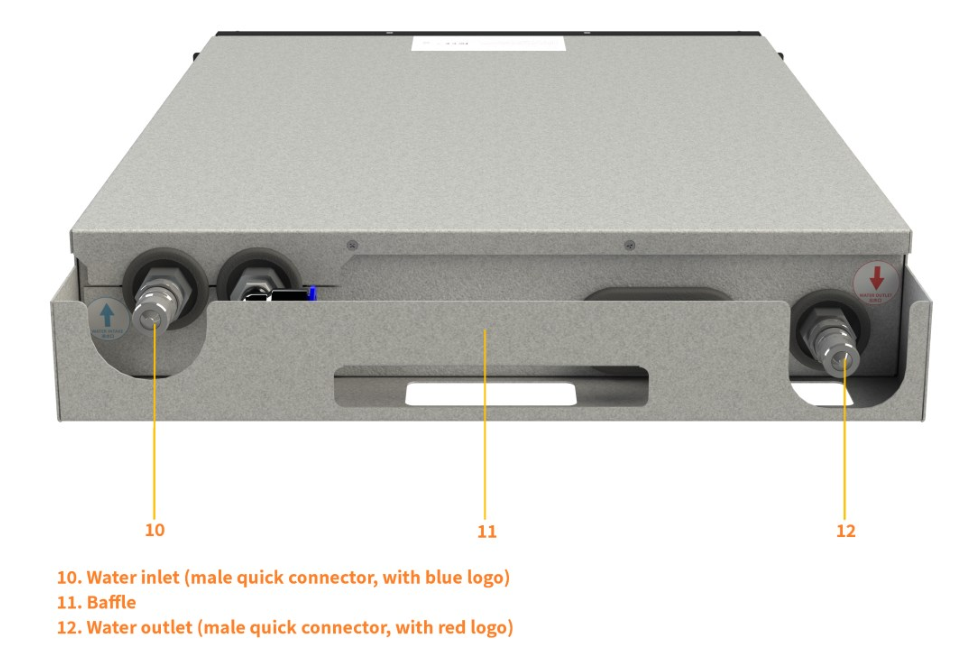
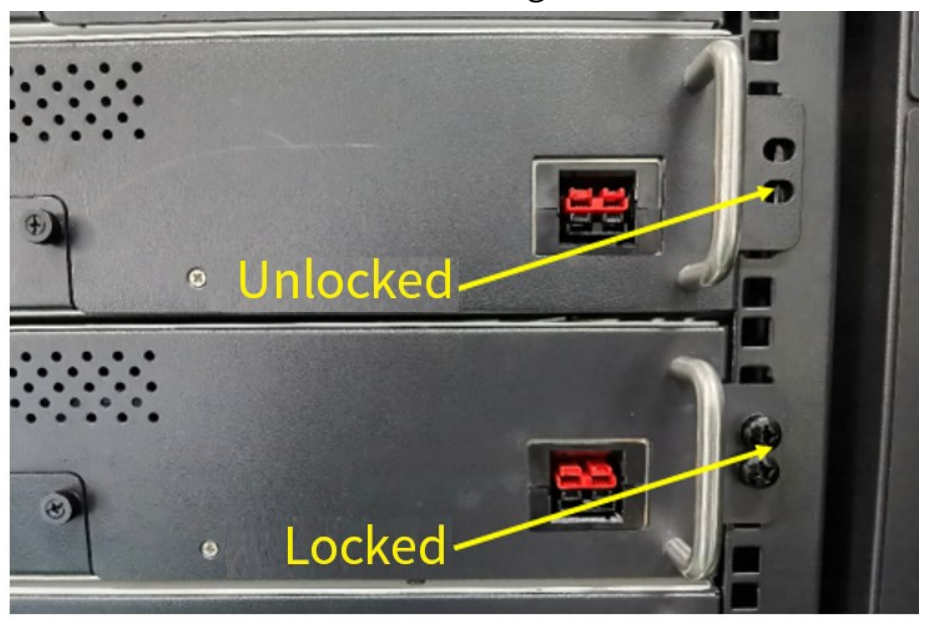
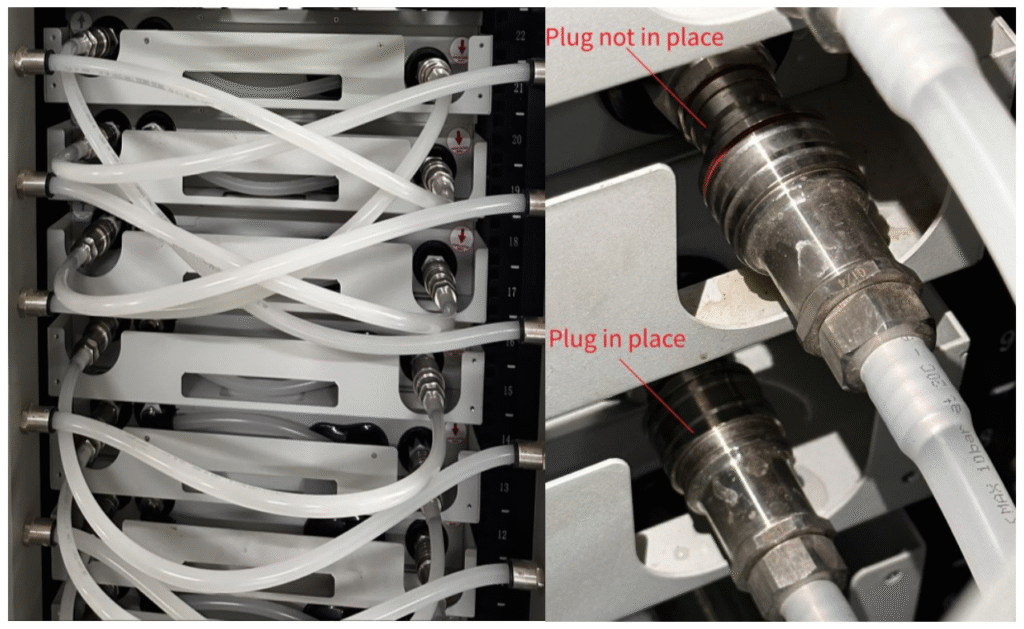
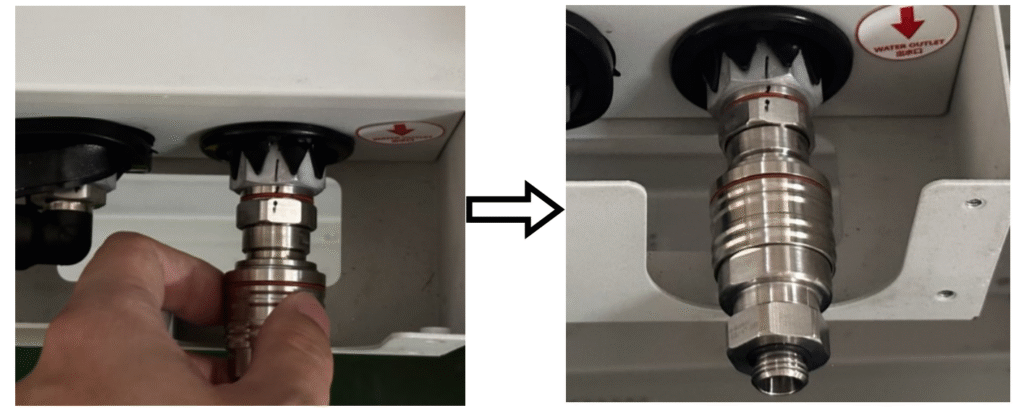
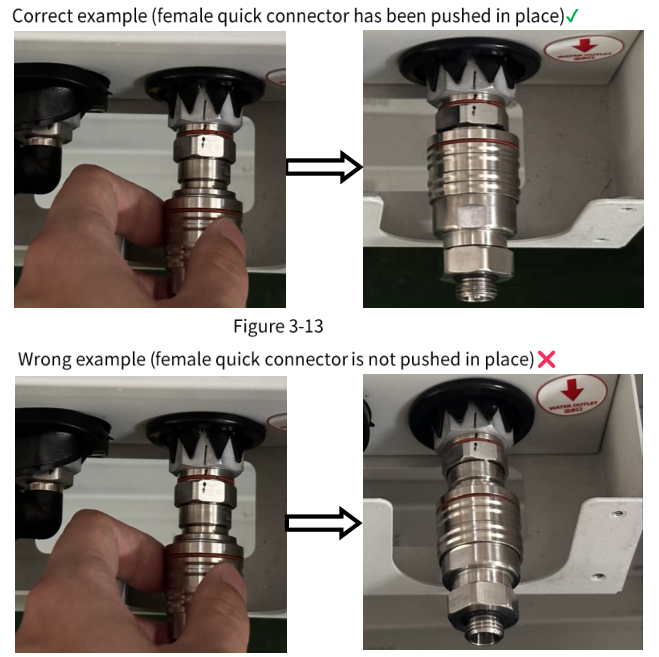
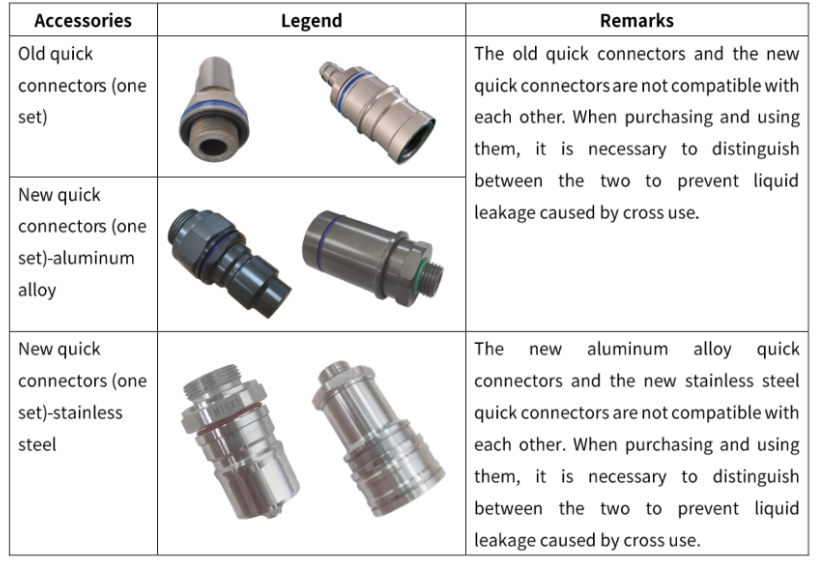
| 3 | Connect the miner’s inlet/outlet pipes: 1. Remove protective caps from connectors. 2. Attach female quick-connectors (pipes) to male quick-connectors (miner). | Note: Ensure connectors are fully seated (“plugged in place”). Visual Aid: Reference diagrams for correct (left) vs. incorrect (right) connections. |
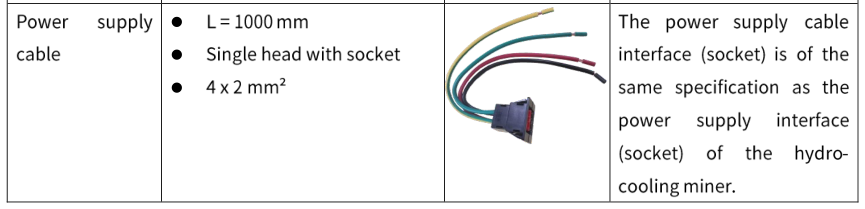
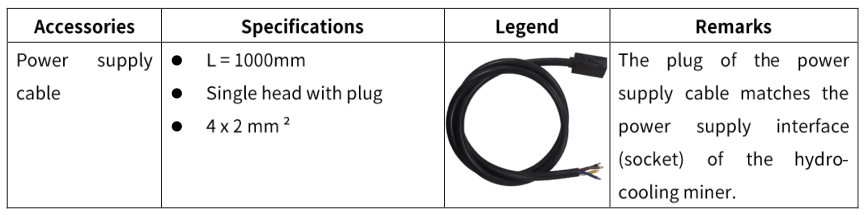
| 4 | Connect the network cable and power supply cable. | Note: Use only the factory-provided power cable. |
| 5 | Complete installation and perform initial checks. | Caution: Before powering on: 1. Cycle water once to check for leaks. 2. Confirm no abnormalities before connecting power/network. |

Hydro-Cooling Miner Removal Steps
| Step | Action | Notes & Cautions |
|---|---|---|
| 1 | Power down the hydro-cooling miner and disconnect its circuit breaker. | Ensures electrical safety before handling. |
| 2 | Unplug the network cable and power supply cable. | Note: Handle cables gently to avoid damage. |
| 3 | Disconnect inlet/outlet pipes: 1. Hold the movable ring on the female quick-connector (pipe side). 2. Pull back to release from the male quick-connector (miner side). | Tip: Apply even pressure to avoid damaging seals. |
| 4 | Loosen screws securing the miner’s front panel to the cabinet. | Note: Floating nuts remain in the cabinet. |
| 5 | Remove the hydro-cooling miner from the cabinet. | Note: Requires two people (one per side) for safe handling. Critical: If storing/transporting for >2 hours, drain internal liquid: 1. Connect two female quick-connectors to the miner’s inlet/outlet. 2. Use compressed air (one pipe) to pneumatically drain liquid via the other pipe. |
Precautions Before, During and After Operation
| Phase | Precaution | Key Notes |
|---|---|---|
| Before Operation | 1. Confirm hydro-cooling system circulation – Ensure pipes are air-free and leak-free. | • Air in pipes risks damaging the circulating pump. • Inspect all connectors/pipes; address any leakage immediately to prevent miner damage. • No responsibility for damage from leaks/air. |
| 2. Power-on sequence for shared systems – When powering multiple miners simultaneously, run cooling system components (fans, pumps, valves) at full load first. | • Prevents miner overheat protection due to uncontrolled liquid temperature. • Only reduce system load after miner power approaches rated capacity. | |
| 3. Air removal from cooling plates – Inject liquid into each miner’s cooling plate to purge air before cabinet installation. | • Cooling plates arrive empty; air enters pipes upon system connection. • Sequential installation: Add miners one-by-one after liquid replenishment. • Simultaneous dry connections cause system liquid shortage → air ingress → pump damage/local overheating → miner burnout. • No responsibility for such damage. | |
| 4. Check for condensation – Ensure no condensation exists on the miner. | • Condensation occurs if ambient temperature rises while miner is idle. • Dry via solar heating if needed. • No responsibility for condensation damage. | |
| During Operation | 1. Use original components – Only use factory-provided female quick connectors and power cables. | • No responsibility for damage from non-original parts. |
| 2. Verify quick connector engagement – After connecting, ensure self-locking is active and no leakage. Pull hose at pagoda joint to check looseness. | • Improper connection causes miner failure/cooling plate damage from overheating. • No responsibility for related damage. | |
| 3. Correct connector handling – Hold the pagoda joint head (not movable ring) when plugging in. | • Prevents connection failure. | |
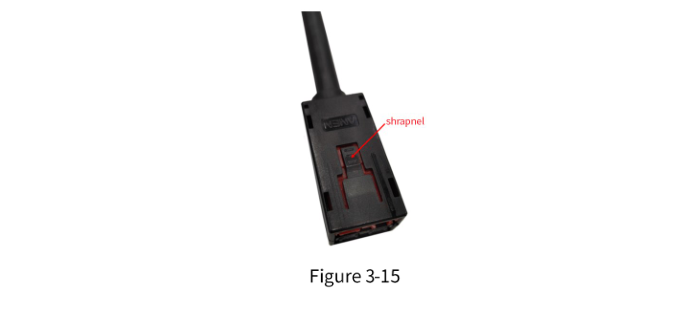
| 4. Power cable removal – Press the shrapnel when unplugging the power cable. | • Ensuresafe disconnection. | |
| After Operation | 1. Drain liquid after disconnection – After power-off and disconnecting from the hydro-cooling system, drain all liquid from the miner. | • Prevents cooling plate damage from residual liquid. • No responsibility for damage due to undrained liquid. |
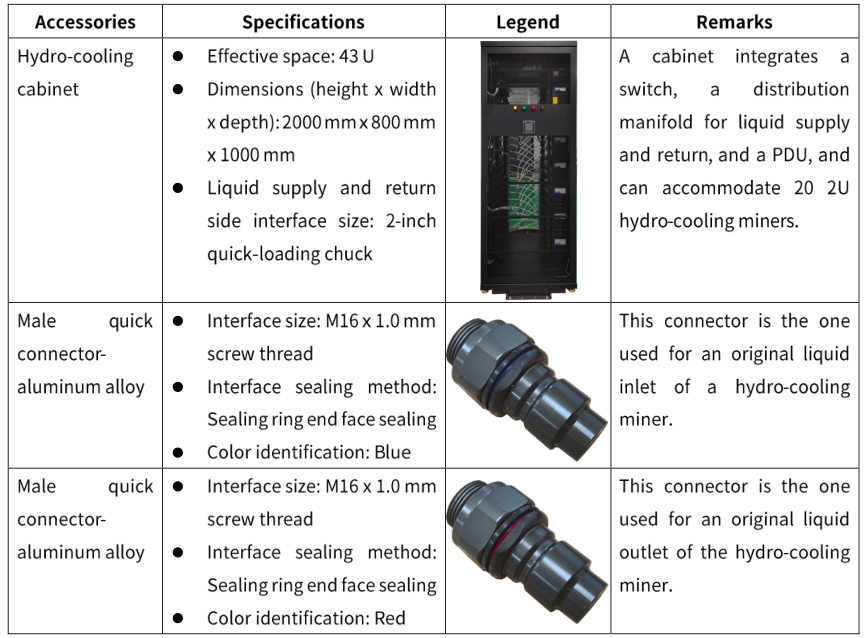
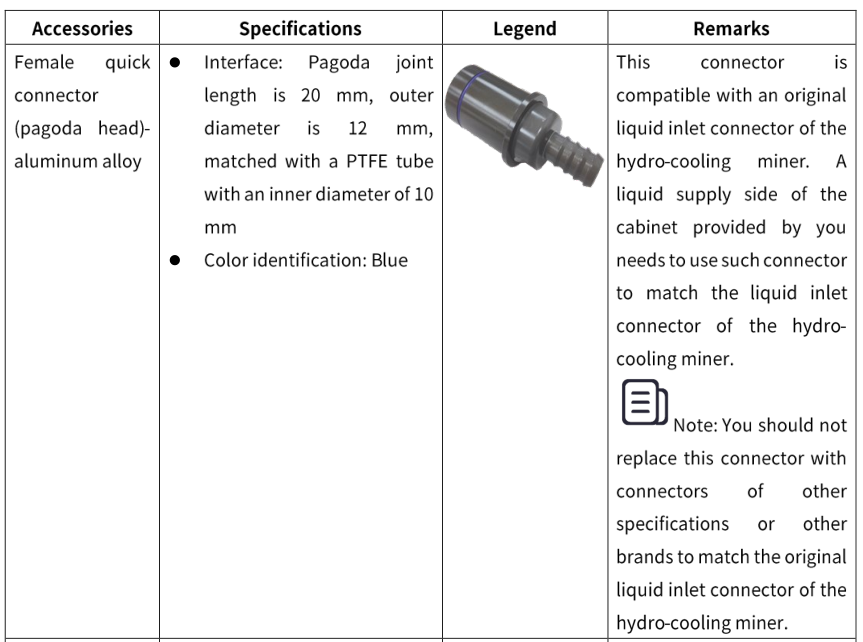
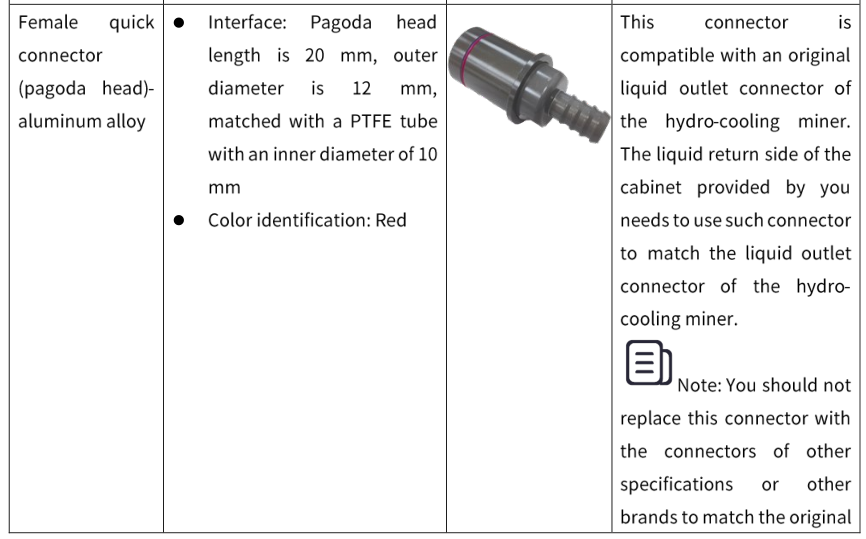
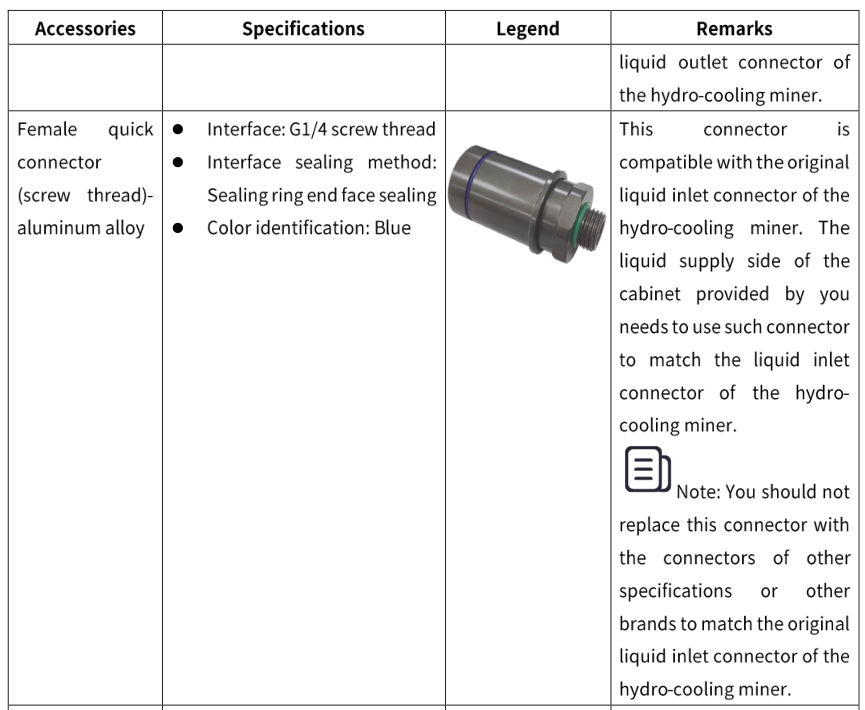
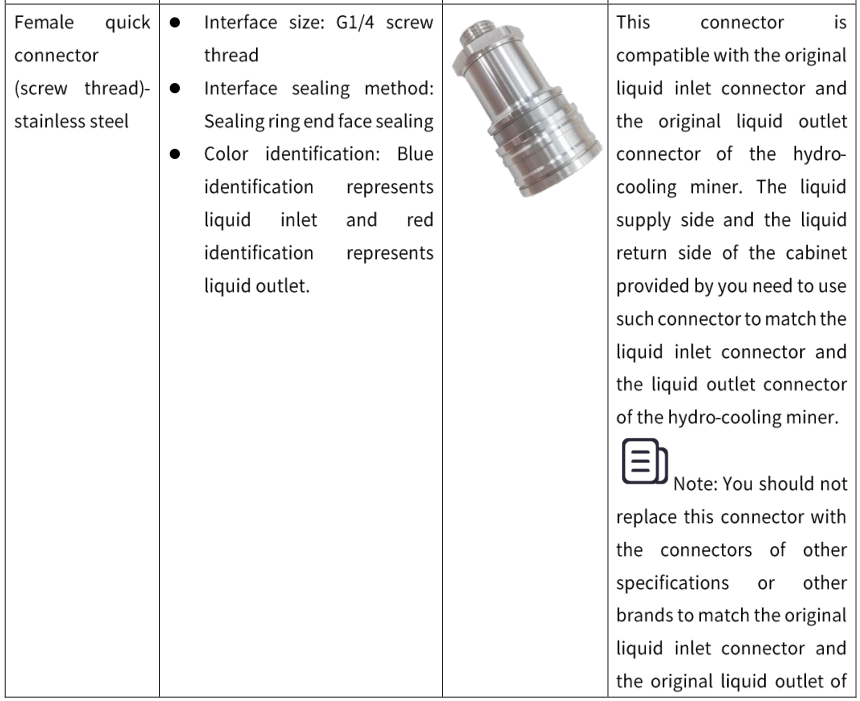
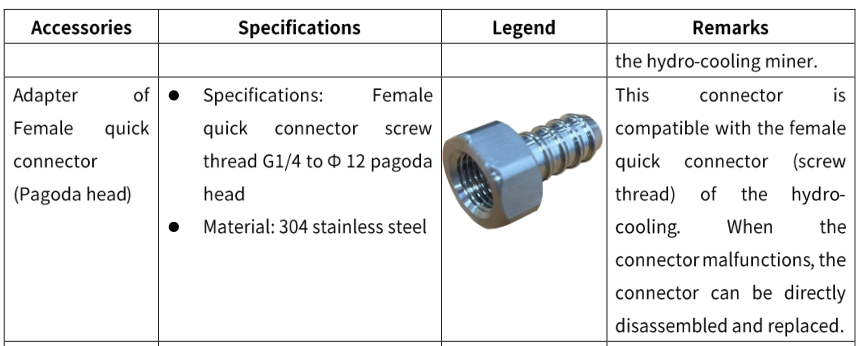
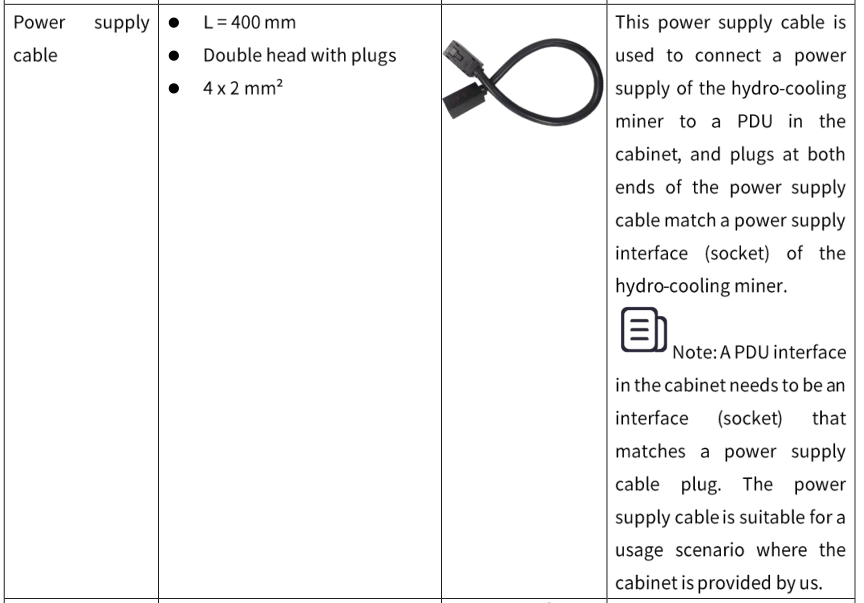
Introduction to Accessory Specifications
For a hydro-cooling miner or a cooling system, accessories are very important. in thefollowing, specific specifications about the required accessories will be introduced.

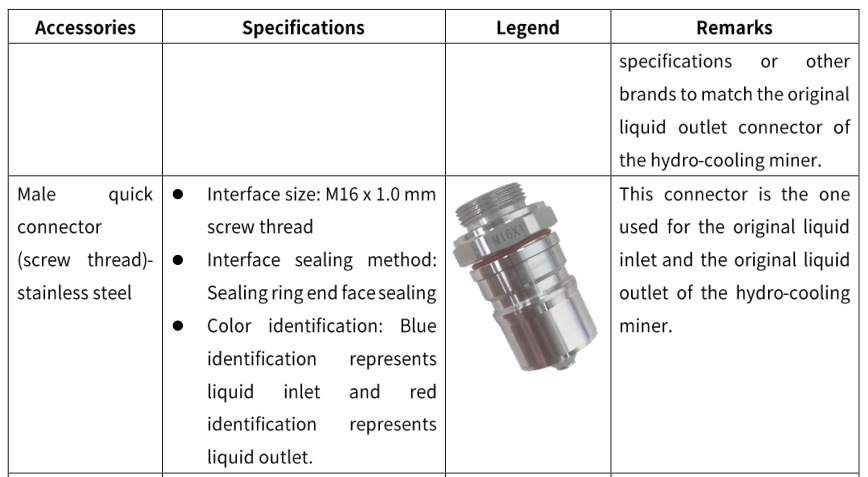
Precautions forAccessories
Environment Configuration for Miner
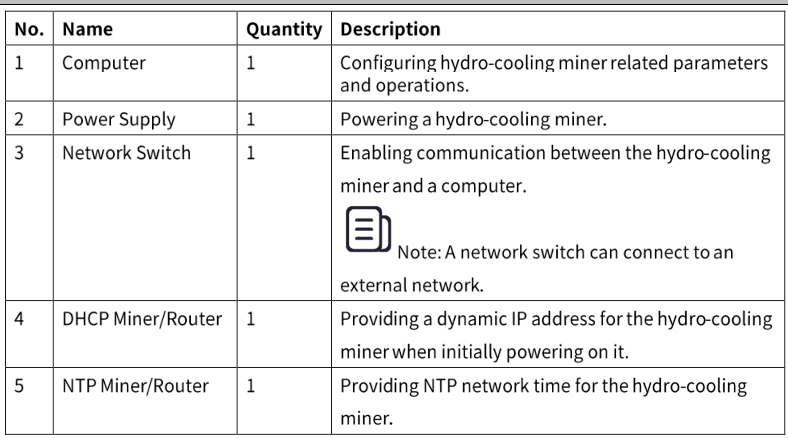
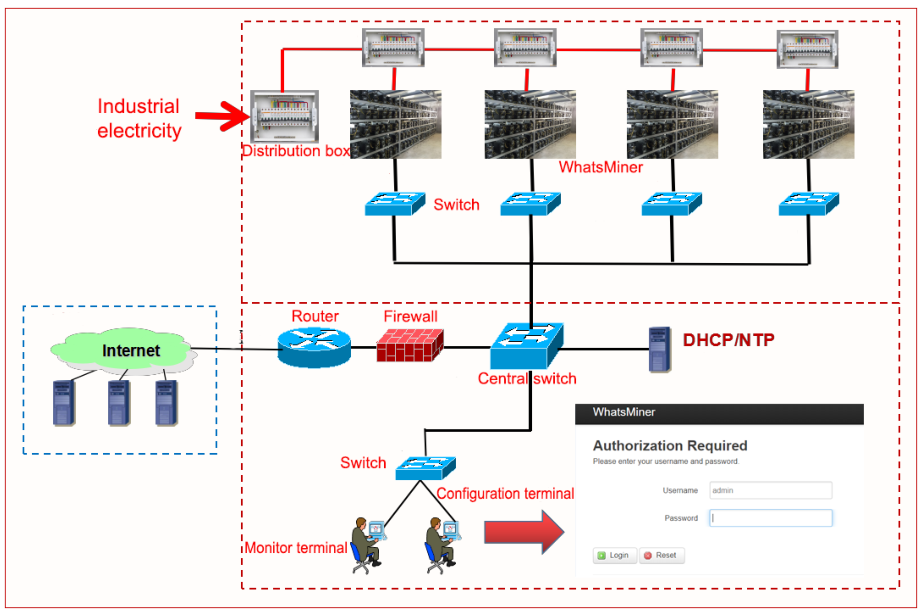
Network Environment Configuration for Miner
When a hydro-cooling miner leaves the factory, it defaults to obtaining a dynamic lP address through DHCP (Dynamic Host Configuration Protocol). Therefore, a DHCP servershould be configured in a network of a mining farm, or a router enables DHCP to dynamically allocate lP addresses. The operating time of the hydro-cooling miner and the accuracy of hashrate statistics depend on the network NTP (Network Time Protocol) time.The hydro-cooling miner itself is configured by default with multiple public NTP server addresses. in order to accelerate speed of NTP obtaining the network time and improve the time precision, it is recommended to configurea local NTP server in the network of themining farm.
Data Configuration for Miner
You can configure data for a hydro-cooling mineron the webpage.
Querying Dynamic IP Address Obtained by Miner
You can query a dynamic IP address of the hydro-cooling miner on WhatsMinerTool. You can download this software on WhatsMiner Before configuring miner data, connect your computer to the same network segment asthe hydro-cooling miner.
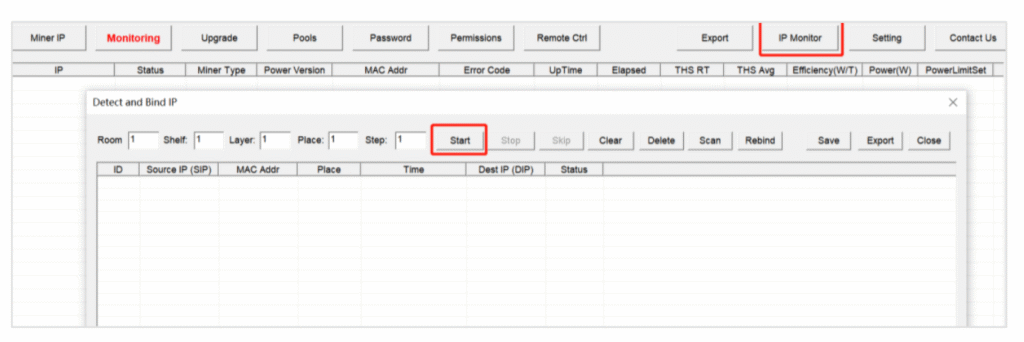
Step 1 Double-click WhatsMinerTool to enter a main page.
Note: Before operating WhatsMinerTool, download it first.
Step 2 ClicklP Monitortab, configure Room, Shelf, Layer, Place, and Step as needed,andthen click Start.
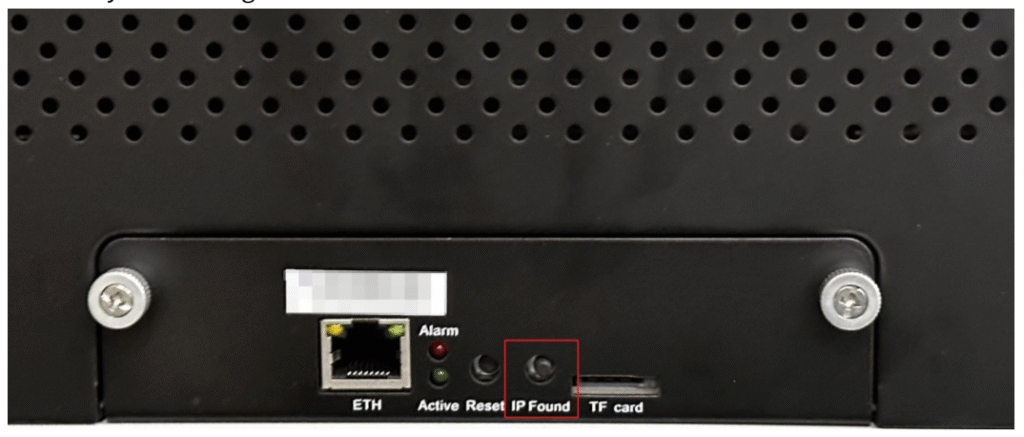
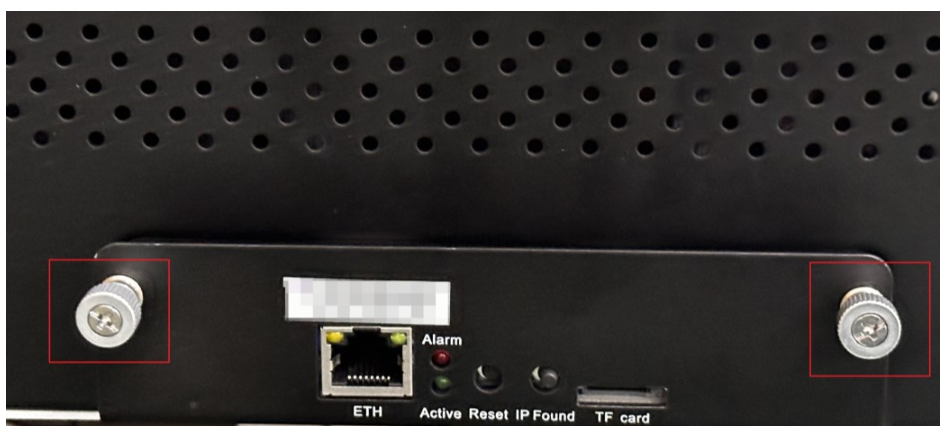
Checking IP Address Reported by Miner
After the Hydro-cooling miner is powered on for about 30 seconds, under normal circumstances, a yellow light on a network port is always on and a green light is flashing.At this time, press lP Found button on a control board of the Hydro cooling miner for more than 2 seconds, then two LED lights, Active and Alarm, will flash a few times, indicating that the hydro cooling miner has broadcast its IP address and MAC address to the network.
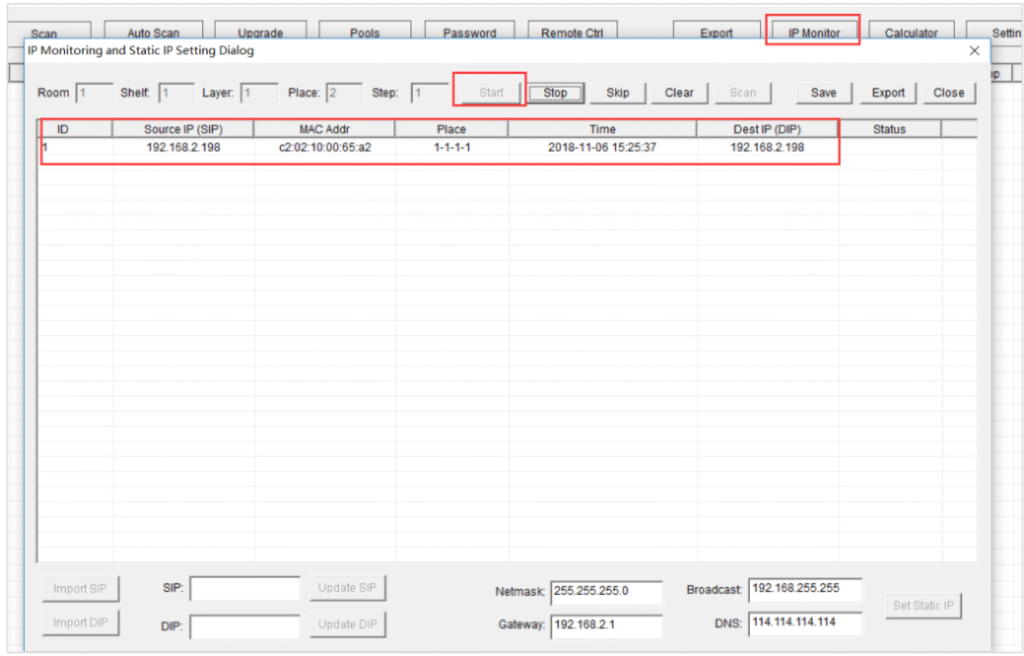
You can view the dynamically obtained IP address and MAC address, and miner place reported by the hydro cooling miner in WhatsMinerTool.
| Symptom/Scenario | Possible Causes | Troubleshooting Steps |
|---|---|---|
| All lights on control board not lit after power-on | Power supply cable issue | 1. Check if the power supply cable is connected reliably and correctly. |
| Active/Alarm LEDs lit, but network port lights off or green light not flashing | Network switch, cable connection, or cable quality issue | 1. Verify the network switch functions properly. 2. Ensure the network cable is connected securely. 3. Check the network cable for damage or replace it. |
| WhatsMinerTool fails to detect miner | Computer and miner in different network segments | 1. Ensure the computer running WhatsMinerTool and the miner are in the same network segment. |
| WhatsMinerTool does not query IP after pressing “IP Found” button (Same network segment + DHCP enabled) | Configuration error or communication failure | 1. Long-press the Reset button on the control board for >5 seconds to restore factory settings. 2. Power off the miner, then restart. 3. Wait 30 seconds after power-on, then press IP Found again. |
| WhatsMinerTool auto-detects IP/MAC without pressing “IP Found” button | “IP Found” button stuck on the control board | 1. Identify the miner using the MAC address shown in WhatsMinerTool (match with barcode on the case). 2. Power off the miner. 3. Reinstall the control board to ensure buttons/lights are exposed and not stuck. |
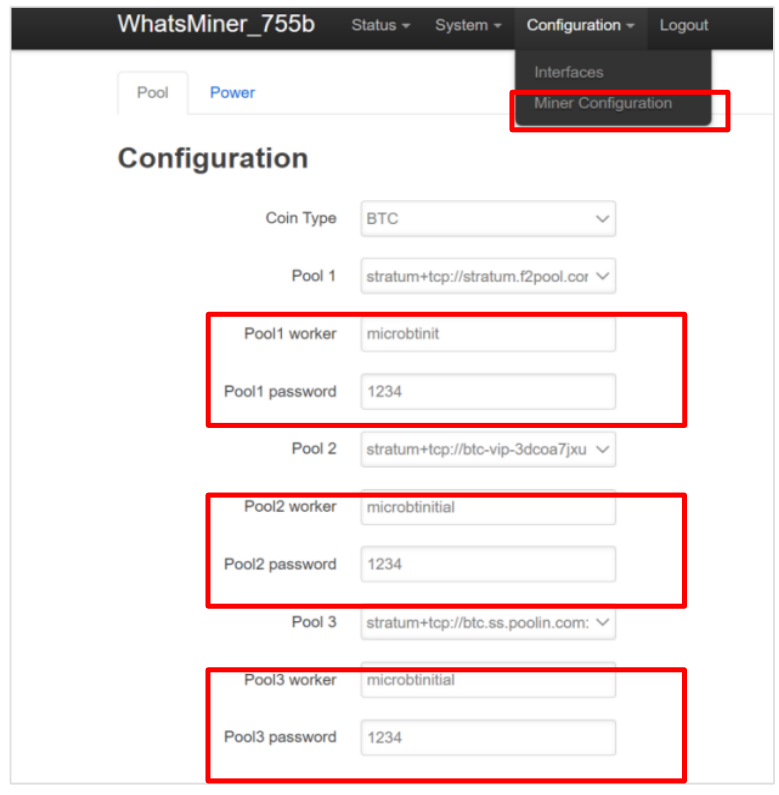
Configuring Pool and Worker
| Step | Action | Notes/Additional Instructions |
|---|---|---|
| 1 | 1. Open browser on computer 2. Enter miner’s IP in address bar 3. Log in with username/password | • Computer and miner must be in same network segment • Default credentials: admin (both username and password) |
| 2 | 1. Go to Configuration → Miner Configuration 2. Enter pool name and worker name 3. Click Save & Apply | • Configuration requires restart to take effect |
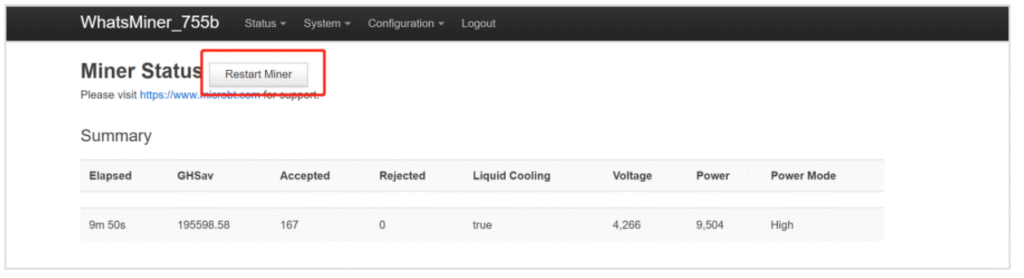
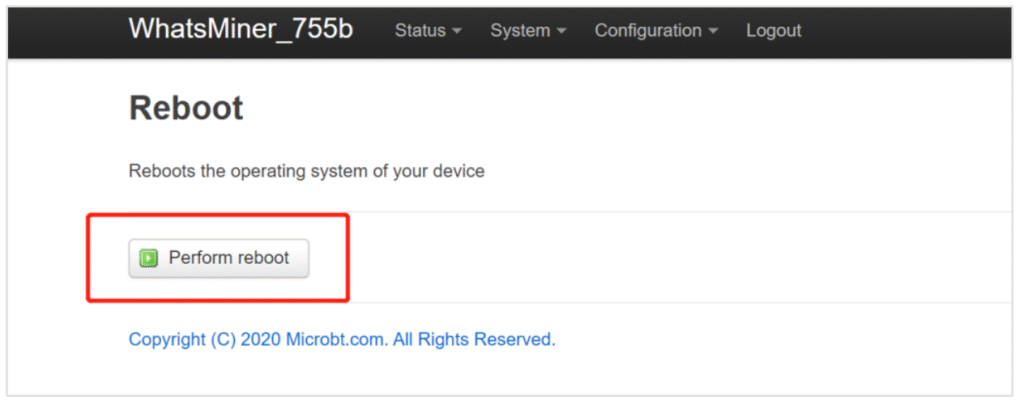
| 3 | Restart using ONE method: Option A (Miner Program): 1. Go to Status → Miner Status 2. Click Restart Miner Option B (Control Board): 1. Go to System → Reboot 2. Click Perform reboot | • Restart completes in ~30 seconds • System will auto-redirect to login page after restart • Only one restart method required |
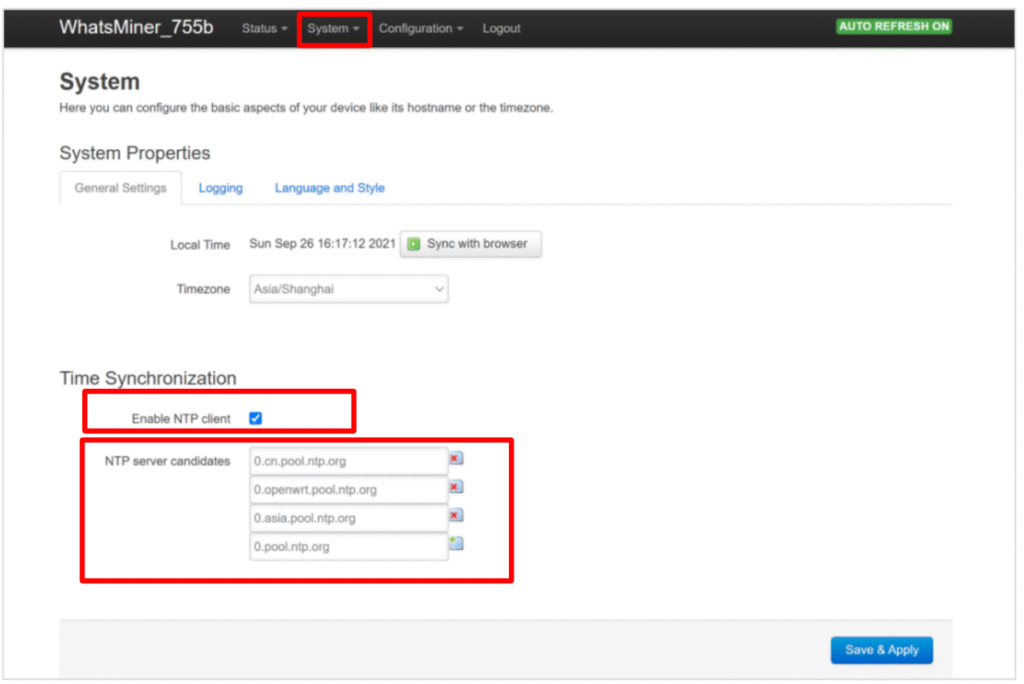
Configuring NTP Synchronization Server Address (Optional)
The Hydro cooling miner has been configured by default with 4 NTP server addresses. You can modify or add an NTP server address when a default NTP server address cannot be connected or you want to connect your own server address as needed.
| Step | Action | Parameters | Notes & Important Information |
|---|---|---|---|
| 1. Access Miner Interface | 1. Open web browser 2. Enter miner IP in address bar 3. Login with credentials | – IP: [Your Miner’s IP] – Username: admin – Password: admin | ![Warning] Must be on same local network ![Security] Change default password after first login |
| 2. Navigate to NTP Settings | 1. Click “System” in top menu 2. Select “System” submenu | – Path: System → System | NTP client is enabled by default (recommended to keep enabled) |
| 3. Configure NTP Server | 1. Enter NTP server address 2. Verify settings | – Common NTP servers: • pool.ntp.org • time.google.com • time.windows.com | Use reliable NTP server for accurate time synchronization |
| 4. Save Configuration | Click “Save & Apply” button | – Location: Bottom of configuration page | ![Important] Changes take effect immediately No restart required for NTP changes |
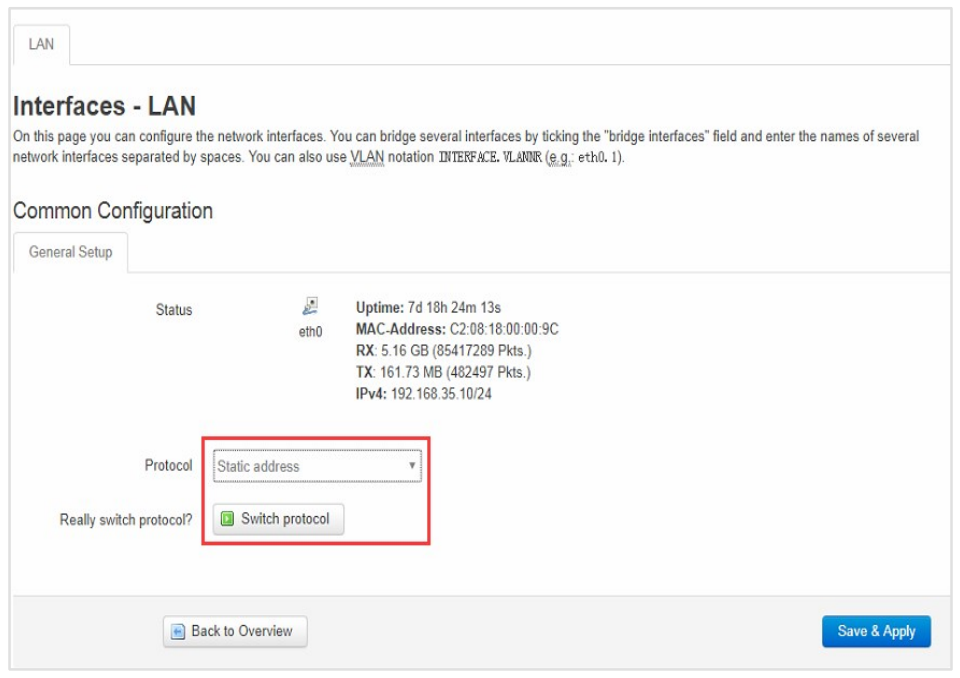
Configuring static lP Address (optional)
You can modify an lP address obtained through DHCP to a static IP address for network planning of miner operation. When there is an IP conflict, configuringthe static lP address can avoid not being able to search for the lP address of the hydro cooling miner.
| Step | Action | Parameters | Critical Notes |
|---|---|---|---|
| 1. Access Miner Interface | 1. Open browser 2. Enter current miner IP 3. Login with admin credentials | – Current IP: [discovered via DHCP] – Username: admin – Password: admin | ![Warning] Computer and miner must be on same network segment |
| 2. Navigate to Interface Settings | 1. Click “Configuration” 2. Select “Interface” 3. Click “Edit” under Actions | Path: Configuration → Interface → Edit | Prepare new network details before starting |
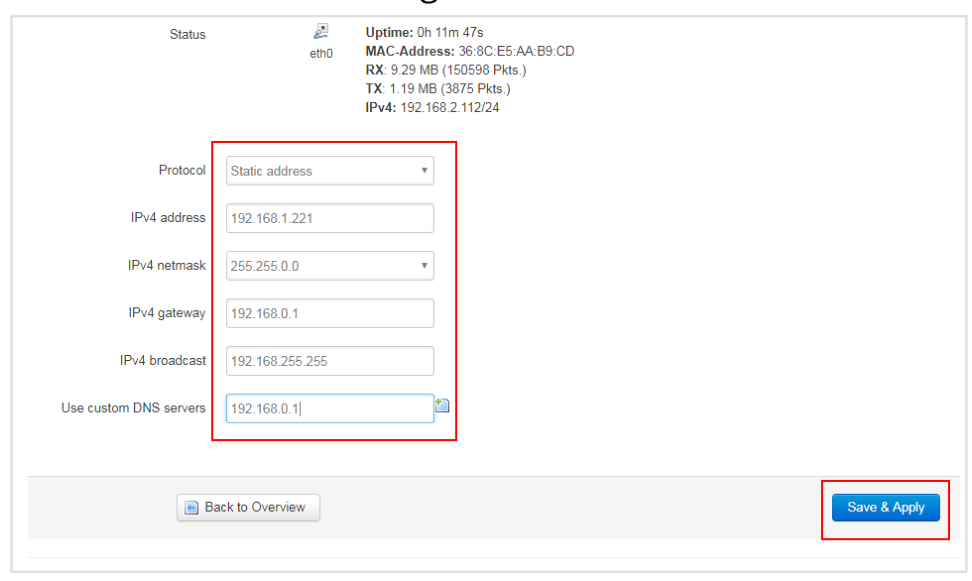
| 3. Configure Static IP | 1. Select “Static address” 2. Enter: – New IP address – Subnet mask – Gateway – Broadcast address – DNS servers | Example: – IP: 192.168.1.100 – Mask: 255.255.255.0 – Gateway: 192.168.1.1 – DNS: 8.8.8.8 | ![Alert] Record new settings before saving |
| 4. Save & Apply | Click “Save & Apply” button | System will apply new network config | ![Critical] Immediately use new IP to reconnect |
| 5. Re-login | 1. Close old session 2. Access miner via new static IP | Use same admin credentials | Page will timeout if using old IP address |
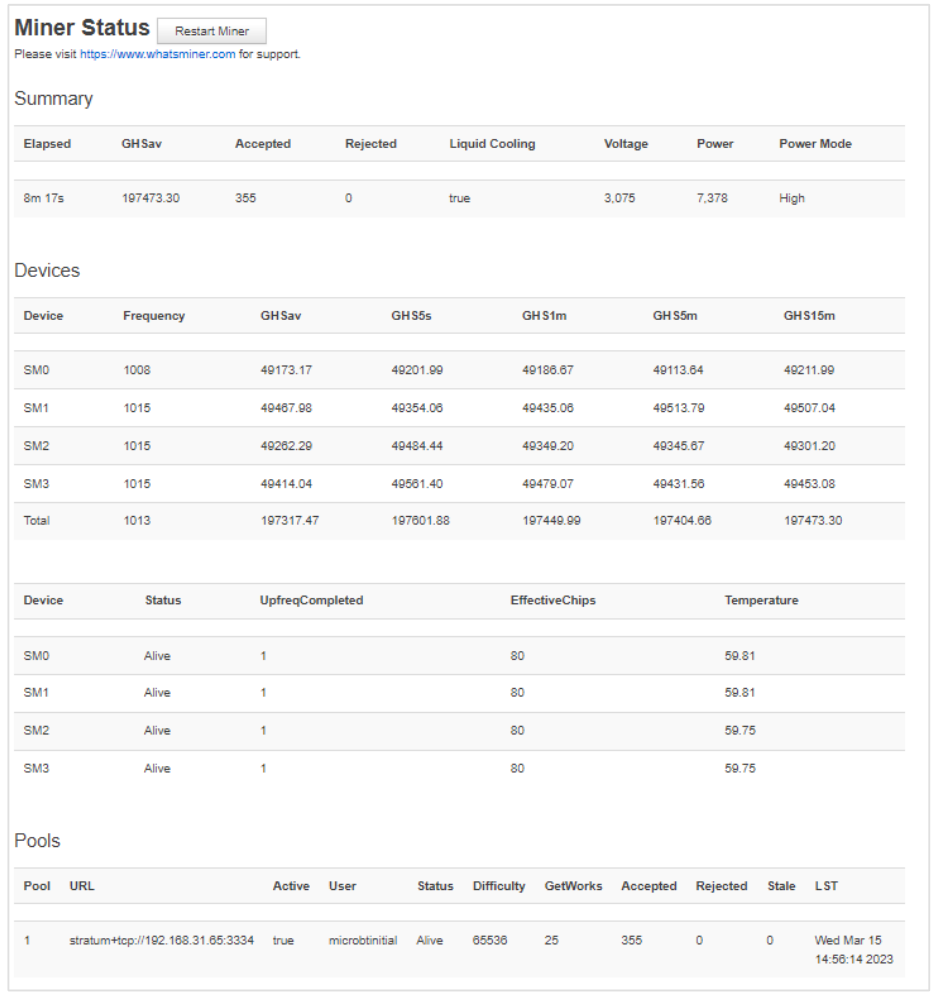
Operation Status Check for Miner
After an hydro cooling mineris connected to a network, you can log in to the hydro cooling miner on a computer connected to the same network segment to check its operation status.
| Step | Action | Notes |
|---|---|---|
| 1 | 1. Open browser on computer 2. Enter miner’s IP in address bar 3. Log in with username/password | • Computer and miner must be in same network segment • Default credentials: admin (both fields) |
| 2 | 1. Navigate to Status → Miner Status 2. Monitor key metrics: – Overall hashrate (GHSav in Summary/Devices) – Pool information – Hash board temperature – Power consumption – Power mode | Critical Initialization Notice: • After power-on, miner performs automatic 40-minute frequency search test • Normal hashrate only appears AFTER this test completes • During frequency search: – Displayed hashrate will be LOWER than normal – This is expected behavior • Ensure network connectivity throughout the process |
How to Troubleshoot Common Issues with Whatsminer Hydro Cooling Miner?

When you receive a new hydro-cooling miner, you do not need to assemble it, but whenthe hydro-cooling miner encounters problems, you may need to disassemble somecomponents of the hydro-cooling miner to resolve the problems. The following willspecifically introduce how to disassemble and install a control board.
Installing and Disassembling Control Board
When indicator lights on a control board are not lit up or when an error code related to thecontrol board is displayed on a main interface of WhatsMinerTool, you can remove thecontrol board and check it. For details about error code and WhatsMinerTool, see ErrorCode Description and WhatsMinerTool Operating GuideV9.0.3.
Disassembling Control Board
Step 1 Loosen 2 screws that secure a housing of a control board to a case of a hydro-coolingminer, and then pull out the housing of the control board slowly until it is no longer pulledout.
Step 2 Unplug 3 flat cables, and then pull out the entire housing of the control board
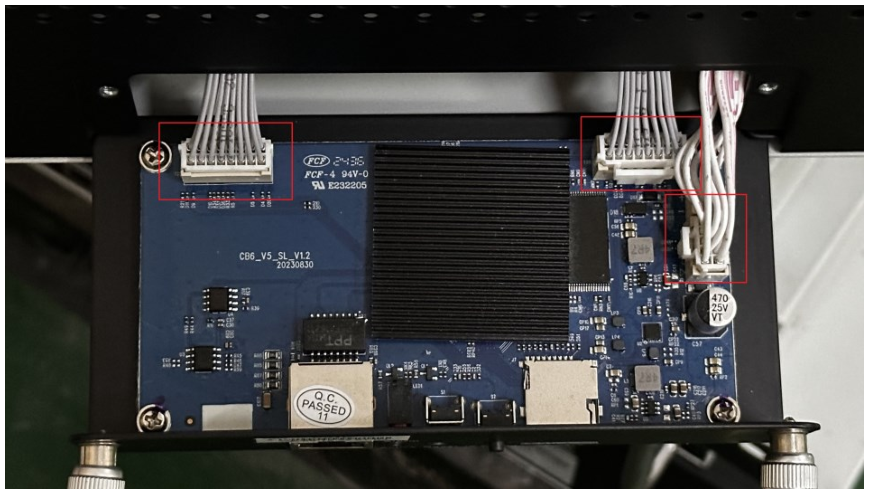
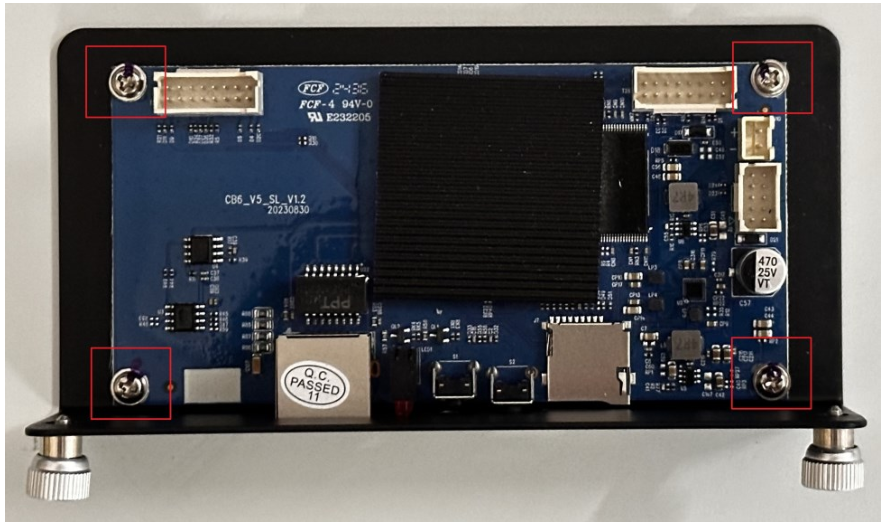
Step 3 Remove 4 screws that secure the control board to the housing, and then remove thecontrol board from the housing.
Installing Control Board
Step 1 Align holes on a control board with holes on a housing, and then screw in 4 screwsand tighten them.
Step 2 Insert 3 flat cables into corresponding slots on the control board.
Step 3 Tighten 4 screws that secure the housing to a case of a hydro-cooling miner.
🚀 Need More Help? Click here for more helpful resources and support!
What Information Should You Prepare for Customer Support?
When contacting support, having the right information can speed up the process.
Prepare your miner’s model, serial number, a description of the issue, and any relevant logs or error messages.

To help our support team quickly diagnose and resolve your issue, please make sure to provide the following essential details when submitting a ticket:
1. Miner Model and Serial Number
- Clearly state the model of your miner
- Provide the correct serial number (found on the device label or dashboard).
✅ Accurate model and serial number help ensure faster identification and support.
2. Fault Description
- Briefly describe the issue you are experiencing.
- Examples include:
- Miner fails to power on
- Connection issues or offline status
- Unusual fan noise or high temperature
- Low hashrate or frequent disconnections
💡 The more specific your description, the faster we can assist.
3. Operation Log
- Attach any system logs or error messages available from the miner dashboard.
- Logs help us understand what may have gone wrong before or during the issue.
4. Miner Dashboard Screenshot
- Take a full screenshot of your miner dashboard, including:
- Hashrate
- Temperature
- Fan speed
- Pool settings
- Error messages
📸 Complete and clear screenshots help us better analyze your device status.
5. Mining Pool Information
- Confirm your mining pool address, port, and worker account settings.
- Incorrect pool configuration is a common cause of mining failure.
What is the Repair Process for the Whatsminer Hydro Cooling Miner?

WhatsMiner Repair Process – Step-by-Step Guide
If your Whatsminer encounters a hardware or software issue, follow this official step-by-step repair procedure to ensure a smooth and efficient service experience.
1. Contact Customer Service
Reach out to WhatsMiner official after-sales support team via:
- The official website support page
- The customer service hotline listed in your user manual
💡 Always use official contact channels to ensure fast and secure service.
2. Fault Confirmation
Customer service will guide you to provide the following for preliminary diagnosis:
- Miner model and serial number
- Detailed fault description
- Dashboard screenshots
- Operation logs (if available)
✅ Accurate information helps determine if a return is necessary and saves time.
3. Mailing the Device
Once repair is confirmed, follow customer service instructions to ship the device:
- Package the miner securely to prevent damage in transit
- Include a copy of the repair form or ticket ID
- Ship to the designated repair center address
📦 Tip: Keep your tracking number for reference.
4. Repair and Testing
At the service center, the device will undergo:
- Comprehensive diagnostics
- Hardware or software repair
- Testing to ensure performance and stability before return
🔧 All repairs are handled by trained professionals using official tools and components.
5. Return Delivery
Once repaired, the Avalon Q will be:
- Shipped back via express delivery
- You’ll receive a tracking number once the device is dispatched
🚚 Expect delivery within a few working days, depending on your region.
Conclusion
Now that you’ve mastered the Whatsminer Hydro Cooling Miner setup, the crypto realm is yours to dominate. Will you optimize for maximum hashrate or efficiency? The choice is yours, adventurer.
💬 Comment below with your miner model and any quests (questions) you face!
Got questions? Drop them below—We’ll help you out! 🚀
Click here for more helpful resources and support!
Happy mining! ⛏️💰
