
What Should You Do Before Setting Up Glodshell AE MAX?
The Goldshell AE Max Aleo Miner 360M is a premier, cutting-edge ASIC miner engineered exclusively for the zkSNARK algorithm and optimized for Aleo (ALEO) mining. Delivering a staggering 360Mh/s hashrate at an industry-leading energy efficiency of 9.167j/Mh, this powerhouse redefines profitability for professional and enterprise-level mining operations.
Before powering on your new miner, please perform these quick safety checks to ensure optimal performance and maintain your warranty coverage:
🔍 Visual Inspection Checklist
✓ Exterior Condition – Look for any dents, cracks, or physical damage
✓ Fan Integrity – Verify all fan blades are intact and undamaged
✓ Unusual Noises – Gently shake to check for loose screws or rattling sounds
⚠️ Important Notice
If you spot any issues:
- Document – Take clear photos/videos of the problem
- Contact Support – Submit a ticket at Goldshell Help Center
🚫 Never attempt self-repairs! Your miner has:
• Anti-tamper warranty seals
• Voided warranty if opened by unauthorized personnel
Pro Tip: Catching issues early ensures faster resolution and protects your investment!
Prepare
Power cord
Lite series and MAX series miners will come with a power cord which has a type i plug and IEC C19 power connector.
If the power cord provided with the miner doesn’t match your local socket, you can opt to purchase an adapter or a power cord that meets the specifications (C19 connector;16A/250V 2.5mm²).
- 16A indicates a current carrying capacity of 16 Amperes, capable of handling a maximum current of 16 Amperes.
- 250V indicates a voltage rating of 250 Volts, suitable for environments with a maximum voltage of 250 Volts.
- 2.5mm² indicates a wire cross-sectional area of 2.5 square millimeters, indicating the wire’s conductivity and load-bearing capacity.
Please note: Using a different power cord may impact troubleshooting any potential issues later on.
Ethernet cable
The miner needs to be equipped with an ethernet cable.
Usage Precautions
Ensuring the safe and efficient operation of your Goldshell miner is paramount. Following these guidelines will help protect your investment, maximize performance, and maintain your warranty coverage.
1. Pre-Operation Physical Inspection
Before powering on, conduct a thorough visual inspection of your miner.
- Check for Damage: Look for any signs of physical interference, crushing, or impact that may have occurred during shipping or handling.
- Cable Connection Check: Ensure all cable connections are secure and stable. Loose connections can lead to performance issues and safety hazards.
2. Critical Electrical Safety Protocols
- Beware of Electric Shock Risk: Always handle the miner and power supply with caution.
- Stable Voltage Supply: Ensure your power source provides a stable voltage within the miner’s required specifications to prevent damage.
- Power Off for Connections: Never plug or unplug any cables while the device is powered on. Always turn off the power completely before making or changing connections.
3. Optimal Operating Environment
The environment around your miner is crucial for its longevity.
- Temperature Control: Maintain an ambient temperature between 10°C and 35°C (50°F – 95°F).
- Humidity Control: Keep ambient humidity below 65%. Avoid areas with high humidity or potential water exposure.
- Dust & Debris Prevention: Operate the miner in a clean environment to prevent the intake of dust, hair, pet dander, and other foreign objects that can clog fans and cause overheating.
4. Proper Use & Maintenance
- Correct Installation: Follow all installation instructions carefully. Proper setup is critical for safe operation.
- Regular Maintenance: Keep the miner’s fans and vents clean to ensure adequate airflow and cooling.
5. Warranty & Service Information
No Unauthorized Disassembly: Customers must not disassemble the miner without prior explicit permission from Goldshell’s official after-sales team. Unauthorized opening of the device will void the warranty.
Voiding Warranty: Please note that warranty services will not be provided for miners, hash boards, or components that are crushed or damaged due to improper operating conditions, physical misuse, or unauthorized modifications.

How to Set Up Your Glodshell AE MAX for Mining?
The Miner comes with a detailed “how to start” user manual that users can refer to when getting started with AE MAX
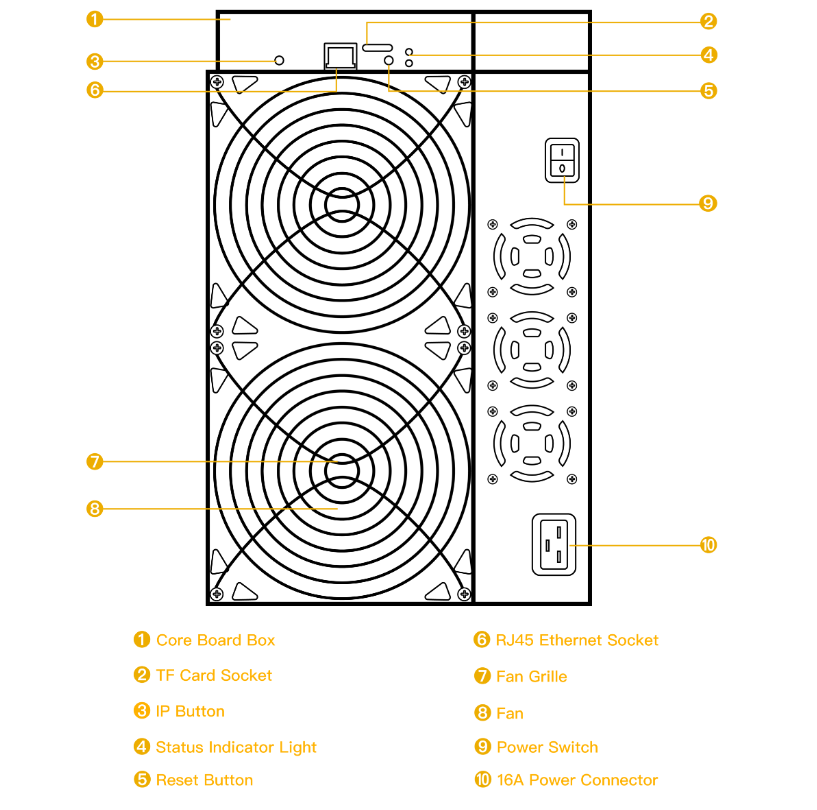
Connect the Miner
Plug one end of the Ethernet cable into your miner’s Ethernet port.
Connect the other end of the Ethernet cable to your network source, such as a router or switch.
Connect the power, and turn on the power switch.
After powering on, the indicator lights will simultaneously flash red and green for a brief moment. Soon after, only the green light will be rapidly blinking.
If the indicator lights show any abnormalities, please refer to Interpretation of indicator lights.
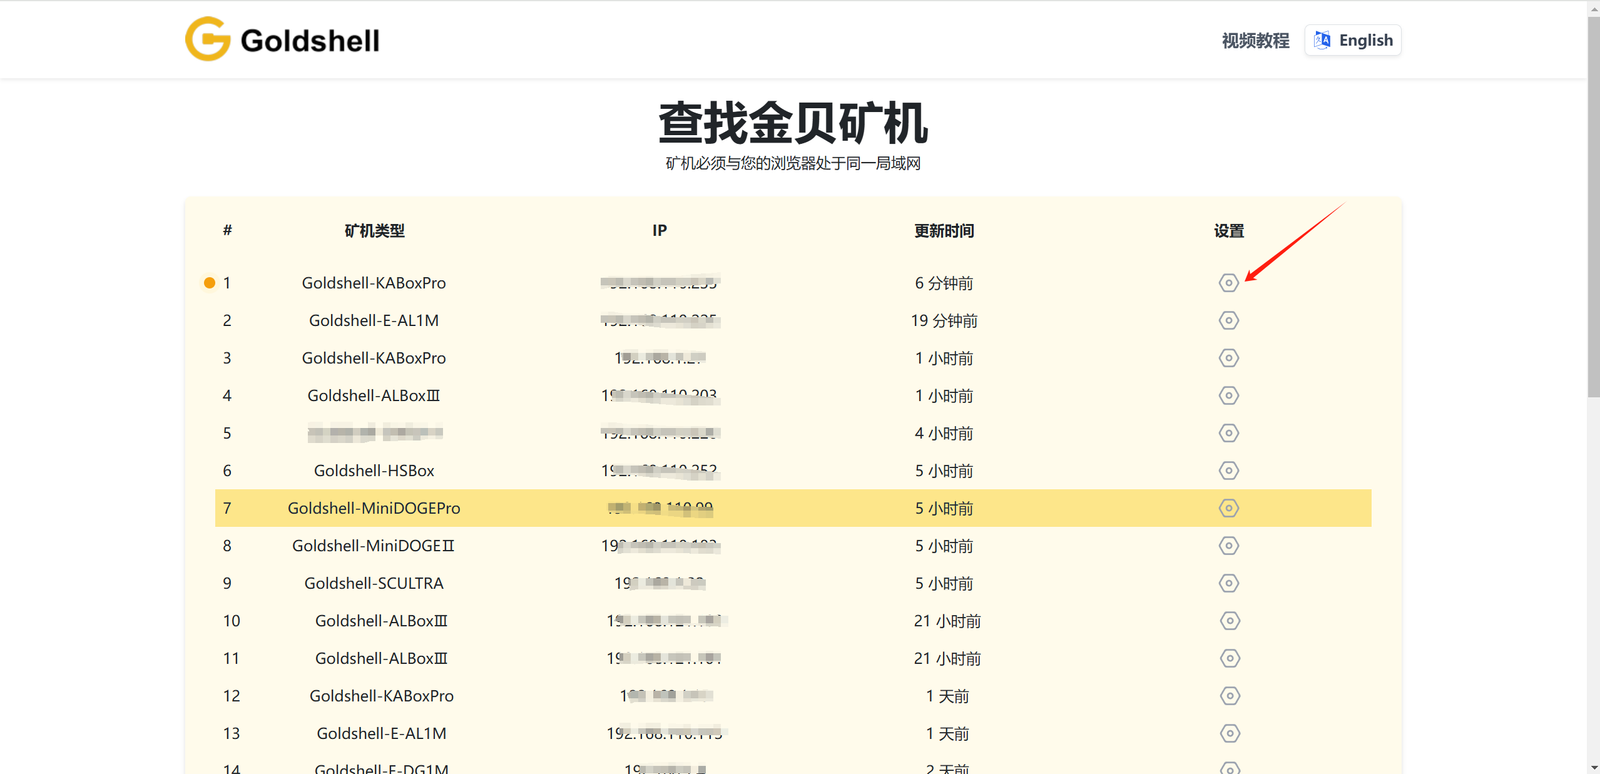
Get the IP of the miner and enter the miner’s dashboard
Get the IP of the miner and enter the miner’s dashboard
- Visit find.goldshell.com using a browser like Google Chrome on your phone or computer.
- Make sure your miner and device are on the same network and frequency band.
- The website will detect the miner’s IP address within 6 minutes of startup.
- If the IP doesn’t match, press the miner’s IP button and refresh the website.
- Click the settings icon to access the miner’s dashboard.
Miner settings
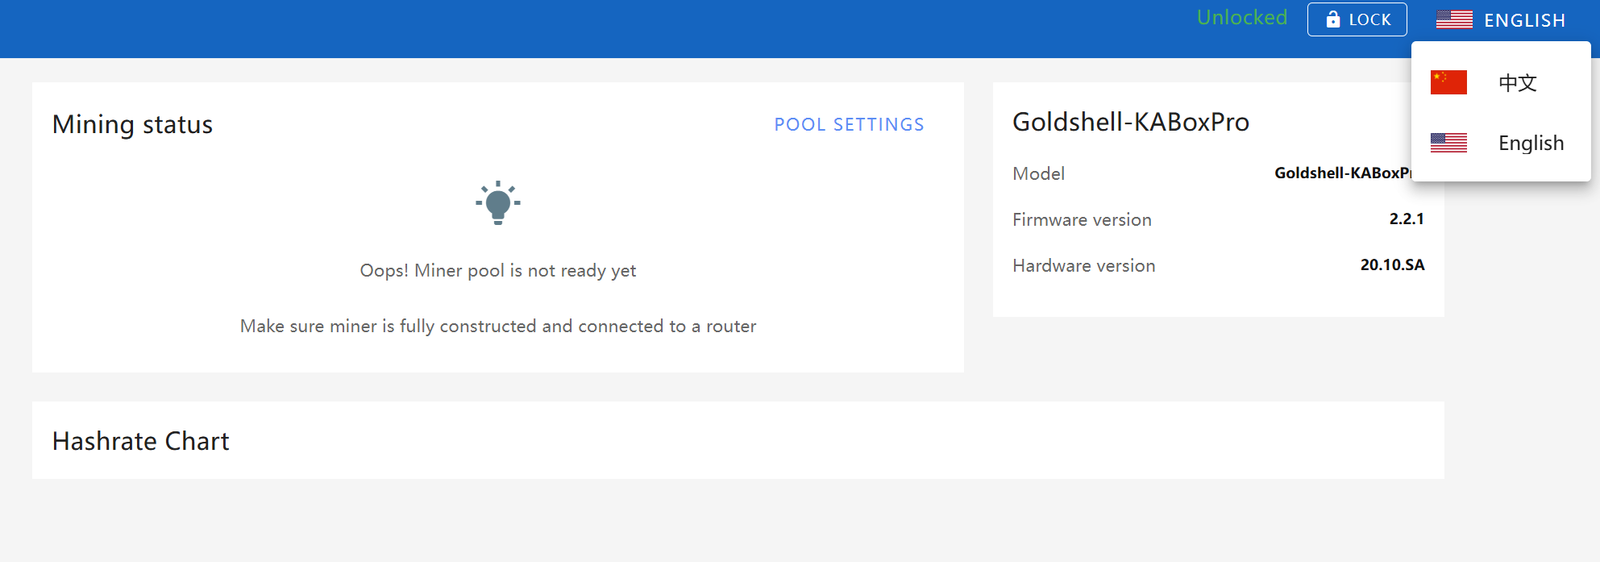
Language Switch
The miner dashboard supports both Chinese and English languages. You can switch between them by clicking on the small flag icon at the top right corner of the home page.
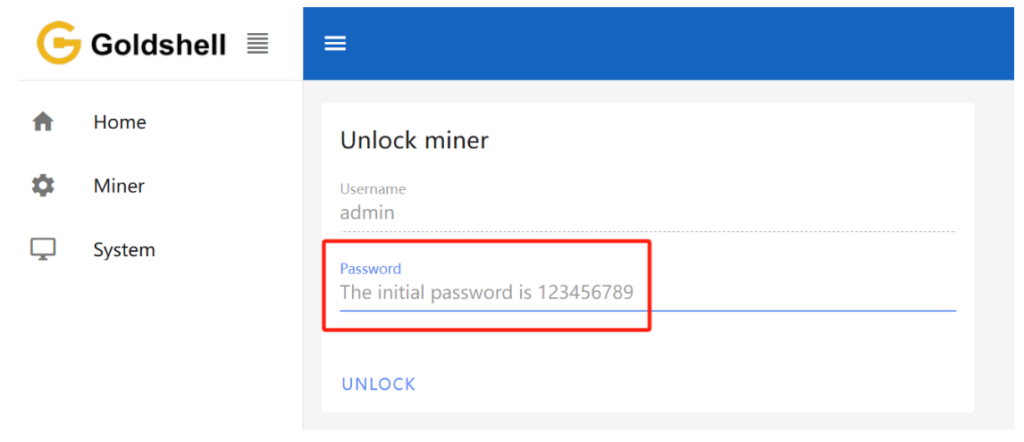
Unlock the Miner
Click “Unlock” on the top-right corner of the page and enter the password to unlock your miner.
The initial password of the miner is 123456789
Change the Password
To ensure the security of your assets, we strongly advise changing the miner’s password after the initial setup.
To get started, unlock your miner and access the [System] page. Input the current password along with the desired new password as shown below, then click the [Change] button.

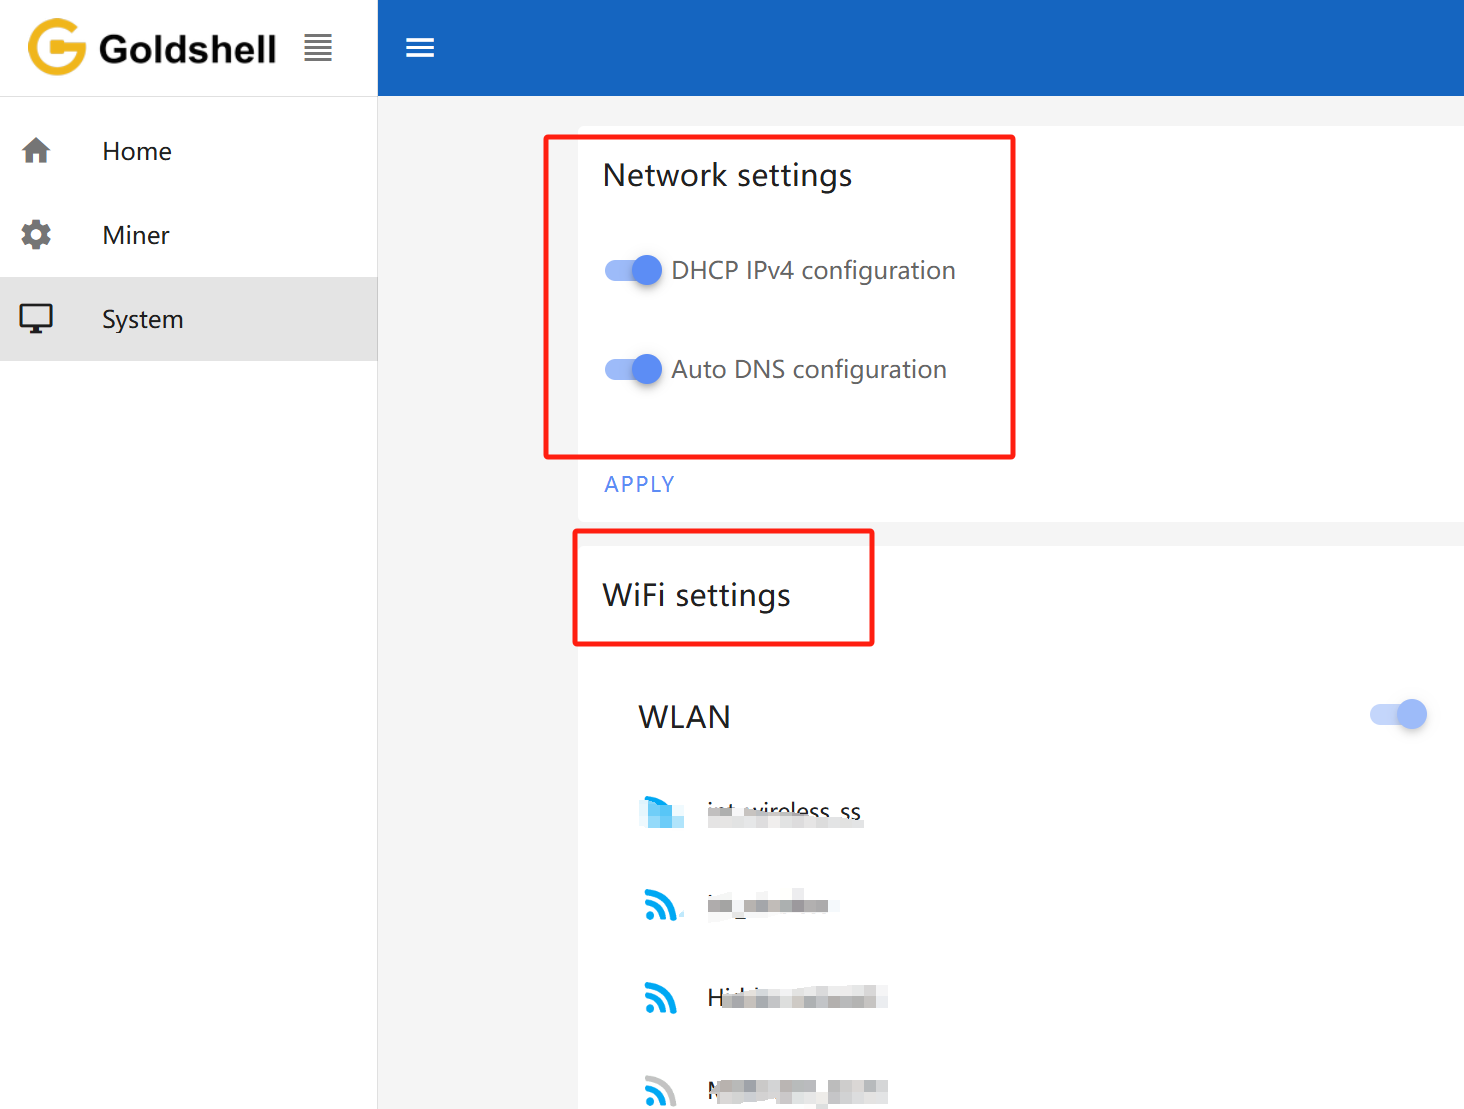
Network Settings
The default configuration is set to DHCP mode. You can adjust the IP mode based on your requirements.
Here’s how to proceed:
- Unlock your miner.
- Go to the [System] page and disable the [DHCP IPv4 configuration] and [Auto DNS configuration] under the [Network Settings] section.
- Input the IP details according to your specific situation.
- Click the [Apply] button to save the changes.
WIFI settings:If your miner supports WIFI, after connecting to WIFI, you can check the connected WIFI here. Guidelines for Using or Disabling the Wi-Fi Functionality of Goldshell Miners
Add a Mining Pool
Step-by-Step Guide: Connecting Your Miner to a Mining Pool
🌐 Before You Begin
New to mining? We recommend checking out these
⚙️ Pool Configuration Made Easy
1️⃣ Access Your Miner Dashboard
- Log in to your miner’s web interface
- Navigate to [Miner] → [Pool Settings] on the left menu
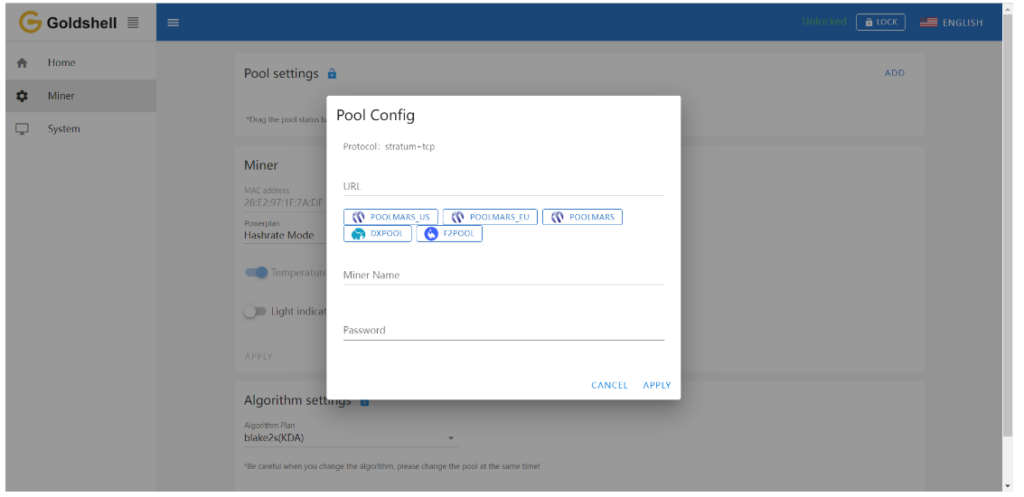
2️⃣ Add Your Mining Pool
- Click “ADD” to create new pool configuration
- We’ll use DxPool as an example:
Required Fields:
- Pool URL: (Get this from your pool’s website)
- Worker Name:
YourDxPoolUsername.MinerName
(Tip: Name each miner uniquely if you have multiple devices!) - Password: Can usually be left blank or set to “x”
3️⃣ Save & Verify
- Click “Apply”
- Wait for the pool status to turn GREEN (success!)
- Your miner will now start earning crypto rewards!
💡 Pro Tips:
• Double-check your pool’s recommended settings
• Connection may take 5-10 minutes to stabilize
• Monitor your worker status on the pool’s website
Wait for a successful pool connection, then navigate to the [Home] section and monitor the chart. If you observe a hashrate curve, it indicates a successful pool configuration.
Note:
- Make sure that the pool information matches the mined cryptocurrency. If you switch to a different algorithm to mine different cryptocurrency, you need to remove the original pool addresses and add a new one (different pools corresponding to each currency cannot exist simultaneously). Connecting to the wrong pool could result in miner malfunctions.
- All miners can be set up with 3 mining pools, with priority decreasing from the top pool to the botton pool. The pools with lower priority will only be used if all higher priority pools are offline.
Introduction to Miner Dashboard Data
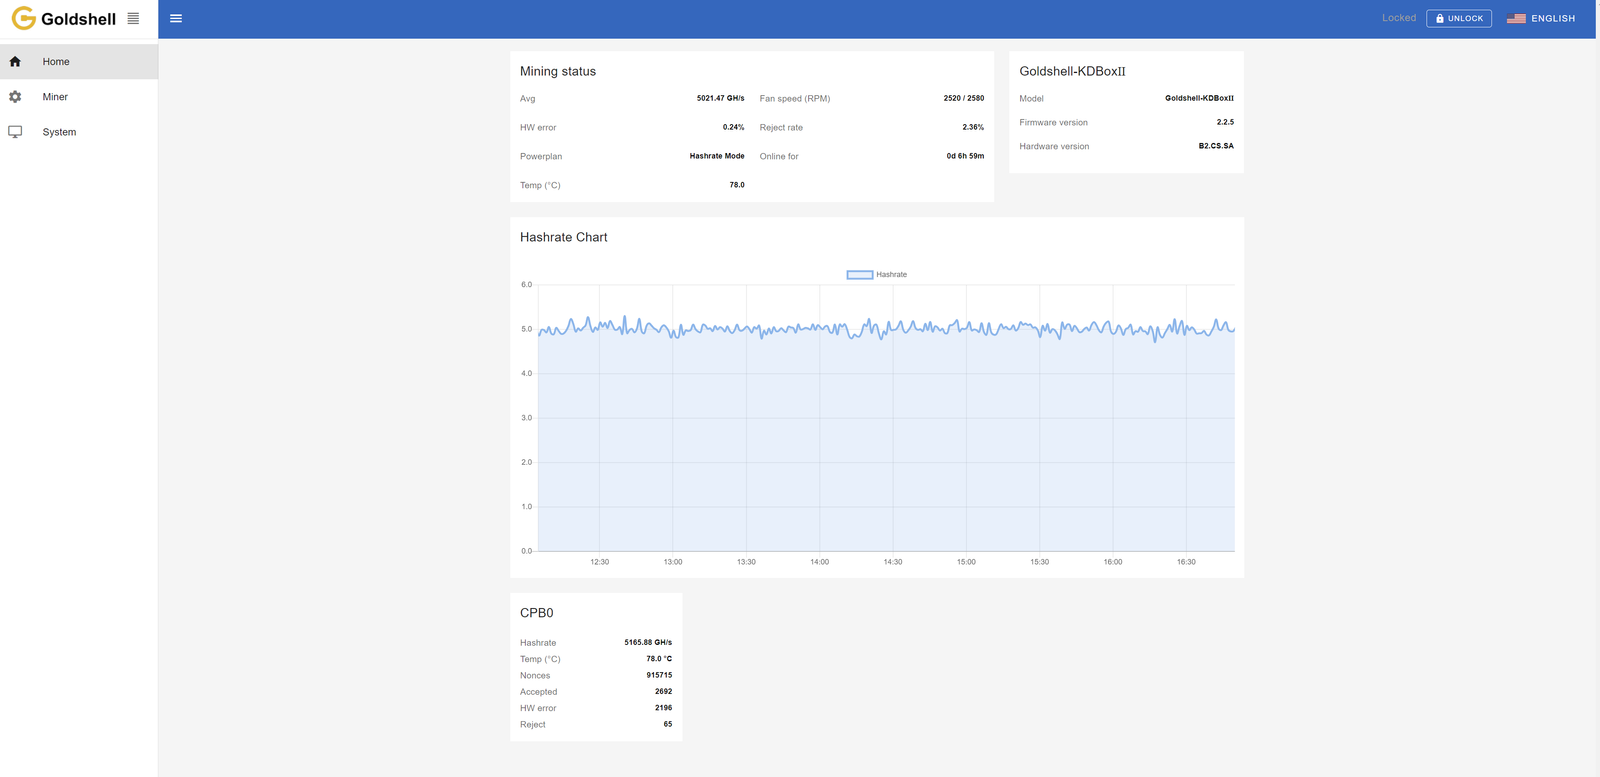
Home Page
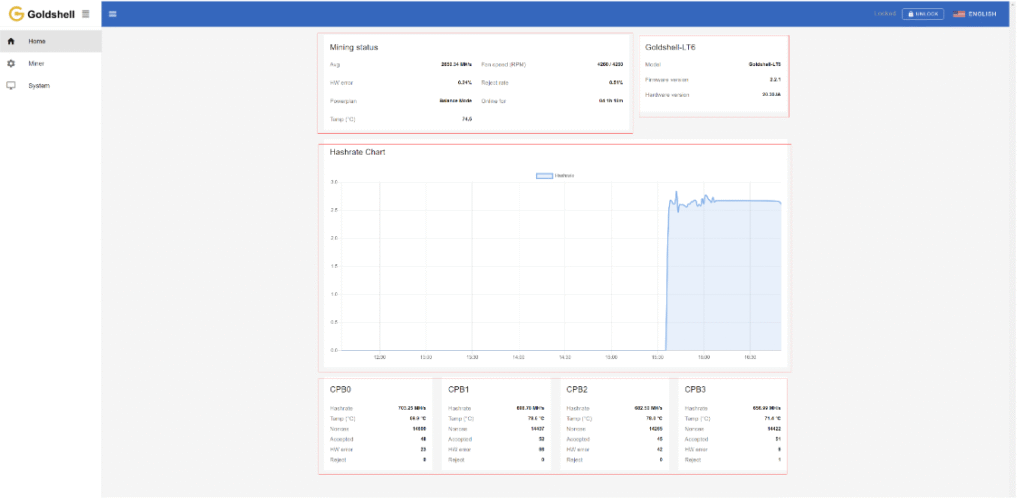
The Home page consists of four modules: Mining Status, Miner Model Information, Hashrate Chart, and Hash Board Status. The Mining Status module consolidates the hash board information and serves as a crucial information section for monitoring miner status. The following diagram illustrates the Home page data for the LT6 as an example, other miners follow a similar format.
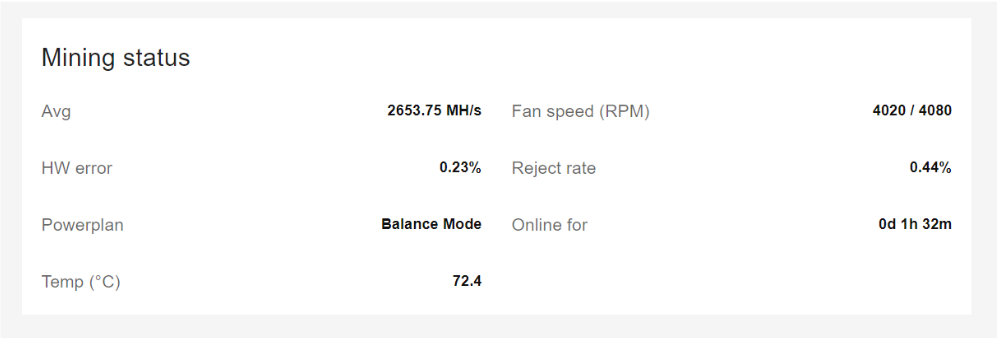
Mining status
Miner Page
Avg: The average hashrate within a specific time frame is relatively stable compared to the hashrate displayed in the Hash Board Status section. It best reflects the operational status of this miner and varies among different models. As long as the hashrate is within the ±5% range indicated in Miner Specification , it falls within the normal hashrate range.
HW error rate: Before submitting computational results to the mining pool, the control board verifies the results. Any calculation results that do not conform to the format will be discarded, resulting in a hardware error count increase by one. Factors such as operating environment, voltage stability, natural device wear, and chip quality affect the HW error rate. High HW error rates can lead to a decrease in the miner’s average hashrate. Only when the HW error rate exceeds 5% and the hash rate is below the standard value is it considered to have a high HW error rate.
Solutions for high HW error rate
Reject rate: After submitting computational results to the mining pool, network latency, fluctuations, and blockchain characteristics can lead to delays or losses in submissions. The miner’s submitted results become invalid, resulting in an increase in the reject rate on the miner, which in turn reduces earnings. A reject rate within 1% to 10% and not affecting the average hashrate is considered normal.
Solutions for high Reject rate
Powerplan: Currently, X5 and LT6 miner have different modes. You can find instructions on how to switch at this link.
Temp: The average temperature of hash board. Check Miner Normal Operating Temperature.
Fan speed(RPM): Displaying the current fan speed.
Online for: The running duration of the miner.
Miner Model Information

Model: The current miner model of the control board firmware.
Firmware version: The version number of the current firmware on the control board.
Hardware version: The current hardware version of the miner.
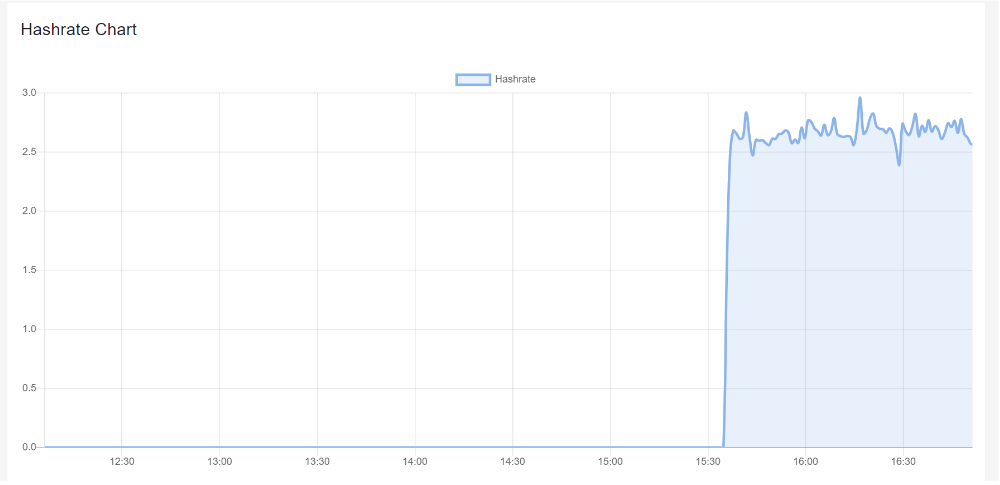
The curve in the graph is generated based on the real-time hashrate of the miner. Due to various factors such as network conditions and operating environment, the miner’s hashrate is not constant. Therefore, the hashrate graph is intended solely for observing whether there are periods of no hashrate or low hashrate within the displayed timeframe on the page. The specific hashrate situation needs to be assessed by observing the average hashrate.
Hash Board Status
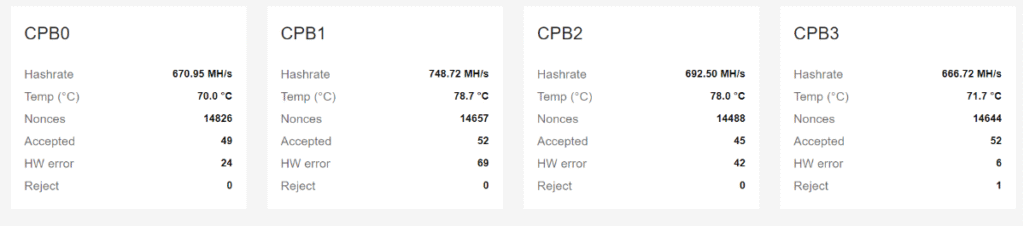
Hash board number(CPB 0): CPB0, CPB1, CPB2, CPB3 represent the position of hash board within the miner (usually starting from 0). Generally, CPB0 corresponds to hash board #1, CPB1 corresponds to hash board #2, CPB2 corresponds to hash board #3 and CPB3 corresponds to hash board #4.
Hashrate: It is the real-time hashrate of the hash board in the current position. The overall miner’s hashrate should be assessed by observing the average hashrate.
Temp: The temperature of the hash board.
Nonces: Indicates the number of valid computation results stored by the miner.
Accepted: The number of correct computation results accepted by the mining pool.
HW errors: Before submitting computational results to the mining pool, the control board verifies the results. Any calculation results that do not conform to the format will be discarded, resulting in a hardware error count increase by one. This count accumulates during a single uptime session. The specific HW errors situation of the miner should be assessed by observing the HW error rate.
Reject: The quantity of computation results submitted by the miner that have been rejected. This count accumulates during a single uptime session. The specific mining pool rejection situation of the miner should be observed through the Reject rate.
Miner page
The Miner page consists of three modules: Pool settings, Miner and Algorithm settings.

Pool settings: You can check/add/remove the mining pools here.
MAC address: Media Access Control address
Powerplan: Currently, X5 and LT6 miner have different modes. You can switch the modes here.
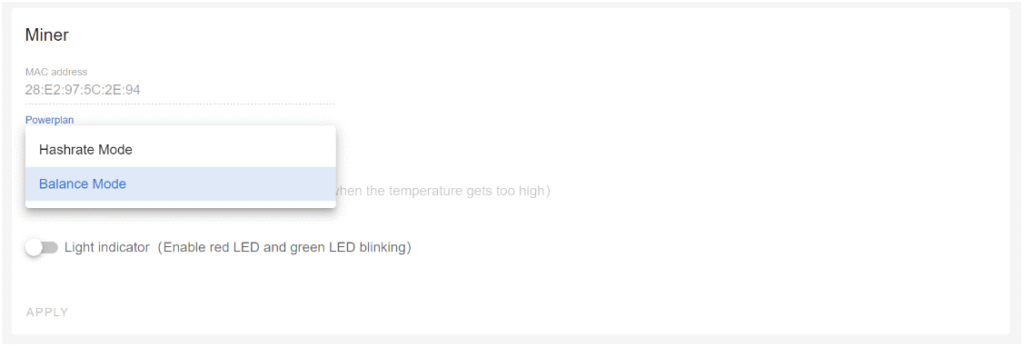
Temperature monitor: It is used to measure and monitor temperature of the miner. If you turn it on, the miner will automatically shut down when the temperature exceeds the normal range.
Light indicator: If you turn it on, the indicator lights near the IP button will flash rapidly in red and blue, allowing you to quickly locate this Miner.
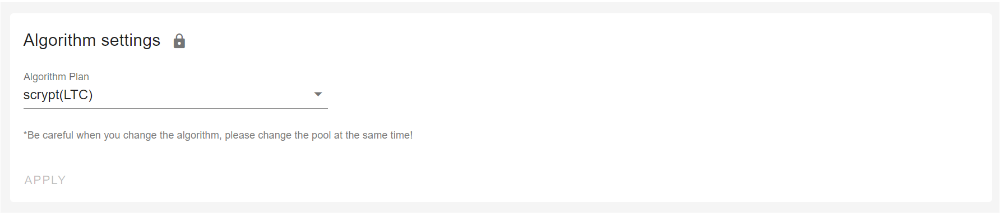
Algorithm settings: Choosing different algorithms allows you to mine different cryptocurrencies. But you need to make sure that the pool information matches the mined cryptocurrency. Therefore if you switch to a different algorithm to mine different cryptocurrency, you need to remove the original pool addresses and add a new one. Connecting to the wrong pool could result in miner malfunctions.
HS5, HS6, HS6SE support multiple cryptocurrencies. If you need to switch between them, please refer to the tutorial.
System page
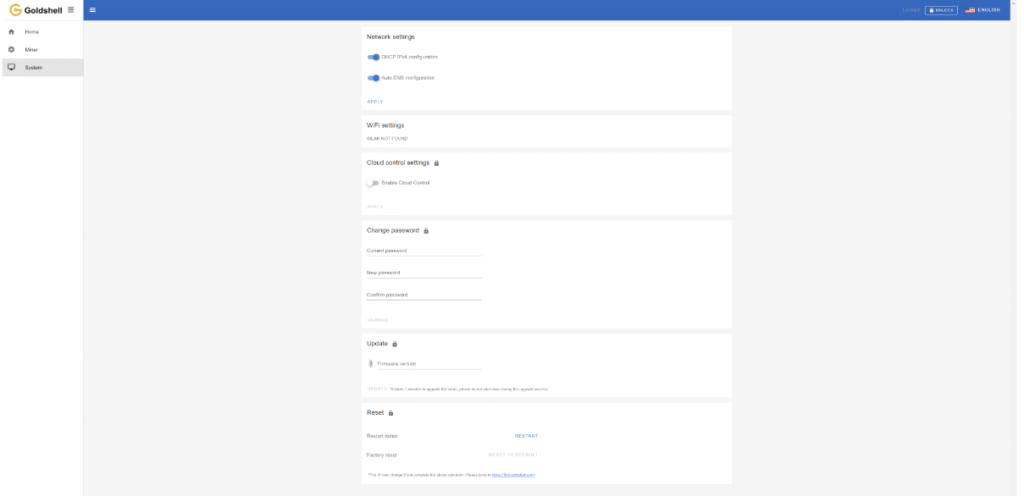
System page includes Network settings, WiFi settings, Cloud control settings, Change password, Update miner firmware, Reset and Restart miner.
Network Settings: As previously mentioned, you can set your network here.
Cloud control settings:
Check how to use the cloud control.

Change password:As previously mentioned, you can change password here.
Update: You can upgrade the miner firmware here.
Check the tutorial.

Reset & Restart
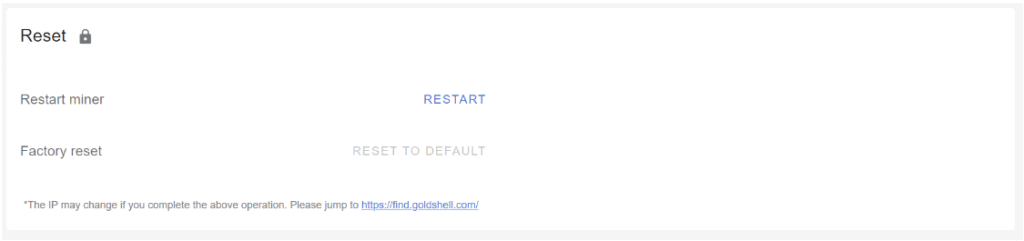
Restart miner: Click the [Restart] button, the miner will restart.
Factory reset: Click the [Reset] button, the miner will restore to its factory settings. All configuration information will be lost after the miner is restored to factory settings.
How to Troubleshoot Common Issues with the Glodshell AE MAX?
Encountering issues? Here’s how to diagnose and fix common problems.
Common issues include network connectivity, abnormal hash rates, and power failures, which can often be resolved with simple checks.

Goldshell AE MAX Plus Troubleshooting Guide: Fix Common Issues Fast
1. Network Connection Problems
🌐 Can’t Connect to Network? Try These Fixes:
- Inspect all Ethernet cables for damage or loose connections
- Verify router ports are functioning properly
- Reboot both miner and router to refresh connections
- Check for IP conflicts in your network settings
2. Mining Performance Issues
⚡ Low Hashrate Solutions:
- Double-check mining pool address and port settings
- Monitor real-time miner temperature (ideal: 60-75°C)
- Test with alternative stable power source (110V/220V)
- Ensure proper ventilation around your mining device
3. Power Failure Troubleshooting
🔋 Miner Won’t Turn On? Follow These Steps:
- Test power outlet with another device
- Examine power cord for frays or damage
- Try different power cable if available
- Check for tripped circuit breakers in your electrical panel
Pro Tip: Always keep your miner’s firmware updated for optimal performance and bug fixes. Visit Goldshell’s support portal for the latest updates.
What Information Should You Prepare for Customer Support?
When contacting support, having the right information can speed up the process.
Prepare your miner’s model, serial number, a description of the issue, and any relevant logs or error messages.

📋 Required Information for Efficient Technical Support
To help us resolve your issue quickly, please provide the following details:
1. Device Identification
- Miner Model: (Example: AE MAX)
- Serial Number: (Located on the back of your device)
2. Problem Description
- Clearly describe your issue:
- Startup failure?
- Network connectivity problems?
- Performance degradation?
- Error messages received?
3. Diagnostic Data
- System Logs: Share recent operation logs
- Error Screenshots: Capture any error messages
- Dashboard Screenshot: Full miner status page
4. Mining Pool Configuration
- Pool name and URL
- Your wallet/account details
- Port settings being used
🔍 Pro Tip: Including this information in your first support request can reduce resolution time by up to 50%.
📸 How to Capture Helpful Screenshots
- Press “Print Screen” on your keyboard
- Paste into Paint or Word document
- Save as JPEG or PNG
- Attach to your support ticket
What Is the Repair Process for the Glodshell AE MAX?
If your miner needs repair, here’s what to expect.
Contact Goldshell support, provide necessary details, and follow their instructions to send the device for repair.
1️⃣ Contact Goldshell Support
📞 How to Reach Goldshell:
- Visit [Goldshell Official Support Page]
- Submit a ticket
Pro Tip: Have your serial number ready for faster service!
2️⃣ Initial Diagnosis
🩺 What Goldshell Need From You:
- Clear description of the issue
- Device model & serial number
- Recent error logs/screenshots
- Mining pool configuration details
3️⃣ Shipping Instructions
📦 Preparing Your Miner for Return:
- Use original packaging if possible
- Include all accessories
- Follow Goldshell provided shipping label instructions
- Insure your shipment (recommended)
4️⃣ Professional Repair Service
🛠️ Goldshell Service:
- Certified technicians handle all repairs
- Full hardware diagnostics
- Firmware updates if needed
- 48-hour testing period post-repair
5️⃣ Fast Return Delivery
🚚 Getting Your Miner Back:
- Typically shipped within 3 business days after repair
- Trackable express shipping
- Signature required upon delivery
⏳ Estimated Turnaround Time
- Diagnosis: 1-2 business days
- Repair: 3-5 business days
- Total process: 7-10 business days
Conclusion
Easily configure your Glodshell AE MAX? by connecting to pools, monitoring temps, and adjusting power modes. Enable safety features like auto-shutdown and locator lights. Always match algorithms with correct pools for optimal performance. Keep firmware updated for best results!
Best for:
Home miners looking for a quiet, efficient miner
Beginners wanting an easy-to-set-up crypto miner
Low-power mining with high ROI potential
Want to stay updated with the latest tips and news about the AE MAX? Click here for more helpful resources and support!
